


The Best Ways To Add Tabs On Shopify Product Page
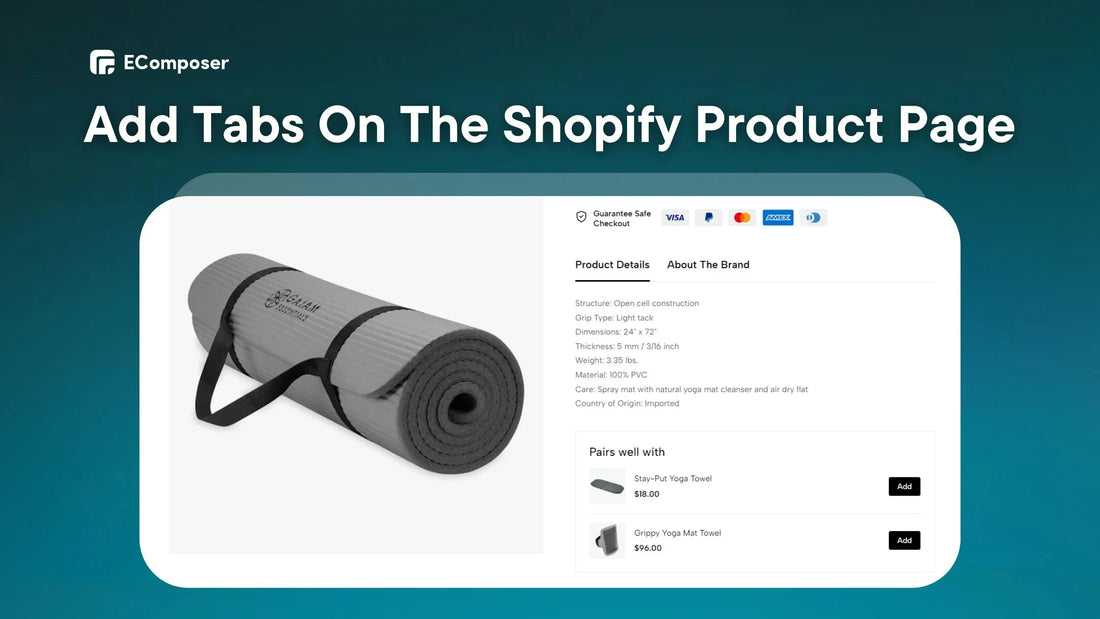
Table Of Contents
Want to know how to add tabs to your product page? This detailed article covers the best methods to add tabs to your Shopify product pages. We'll look at solutions for experienced coders and those who prefer a more straightforward approach.
Read more to find out!
3 Other Ways To Add Tabs In Shopify Product Page (Without App)
Here are three different ways to add tabs to your Shopify product pages without using apps:
Option 1: Install Shopify Themes Built-In Tab Capability
Many themes have pre-built tab functionality. Here's how to use it:
Step 1: Visit Shopify Themes Store
First, navigate to your Shopify admin under Online Store > Themes.
Click the three-dot icon on the right side of the "Theme Library" area. Then, pick the "Vist Theme Store." option.

You can also directly click Shopify Themes Store to access it.

Pro tips: Look for themes with "Tabbed Product Pages" in their features. This will save time when testing themes with preview buttons.
Step 2: Install And Preview Your Theme
Once you've discovered a theme with product tabs in step 1, click Try Theme.
Then, Shopify will install and customize the theme for your shop. Wait till the procedure is completed.
To show this step, we will install "Loft” by Trailblaze Media theme, which supports the tab product page functionality. However, we recommend that you seek themes that fit your demands.

Step 3: Customize Your Tabs
After successfully installing the themes, pick "Customize" for the themes you installed in Step 2.

Then, select the “Add block” option on the Template and choose the "Description tab." If you don't see the described block, you may search for terms in the "Search Box."

Next, choose the number of "Description tabs" you want to show for your shop and place these blocks together on the page where you like.
Now, click on the tabs to edit them. You will need the following extra information:
- Tab title: Please enter the tab name you desire.
- Tab style: Choose whatever text look you want to show.
- Page content: Choose whatever page content you wish to include.
- Text content: If you enter tab information. For example, if you choose the "Description" option, you may provide a product description.

Step 4: Save & Publish
Finally, when satisfied with the tab style and content, click Save and Publish to update your shop.

For example, in the image below, we have built three tabs labeled "Description," "Shipping," and "Refund Policy" and put them under the "Buy it Now" button.

BONUS TIPS: Here are top Shopify themes with built-in tabs, which may transform product pages without coding:
Kalles Theme: Boost Engagement with Product Tabs
Price: $89.

- Improved UX: Simplified navigation organizes and locates information.
- Increased Clarity: Customers may get specifics without overwhelm.
- Simplified Management: No coding is required; just add and customize tabs for a dynamic product experience.
Kalles goes beyond simple themes, including features that improve your store's appearance and increase conversions.
Check the4 Studio — #1 Shopify Full-Service Agencies for themes other companies use to inspire your design.
Option 2: Create Custom Code
You may customize your theme and add the tab code. This option allows you to customize the tab views. To achieve your goal, add the following code to your template:
What do you need? You should have a basic understanding of HTML, CSS, and JavaScript and access to the Shopify admin panel.
If you are inexperienced with coding, we suggest trying alternative methods of creating tabs or hiring a Shopify developer to assist you.
Step 1: Choose The Edit Code Option
Go to Online Store > Themes > Actions > Edit code.

Look for the Sections folder within the code editor. Click the “Add a New Section” option and name it "Custom Tabs" or anything else you like.

Step 2: Paste Code
In the new section, replace the code with the following:
|
{% stylesheet %} ul.custom--tabs{ list-style-type: none; width: 1200px; max-width: 100%; display: flex !important; flex-wrap: wrap !important; } .custom--tabs .tab__list{ background-color: #efefef; display: inline-block; } /* coded by https://websensepro.com team */ .custom__tab-content { display:none; } .custom__tab-content.active { display:block; } .tab__list h6.custom-tab { display:inline-block !important; padding:10px 15px !important; cursor: pointer !important; margin: 0px !important; } .active-always{ display: block !important; } .tab__list:first-child{ background-color: #dfdfdf; } .tab__list h6.custom-tab.active { color:grey !important; border-bottom:1px solid red !important; background-color: #dfdfdf; } @media only screen and (max-width: 576px) { ul.custom--tabs{ display: flex !important; flex-direction: column !important; } .custom--tabs .tab__list .custom-tab{ margin: 0px !important; width: 100%; padding: 10px 15px !important; border-bottom: none !important; } .tab__list h6.custom-tab { padding: 0px !important; margin: 10px 0px !important; } .custom__tab-content.active{ padding: 0 15px; } } {% endstylesheet %} <ul class="custom--tabs page-width"> <!-- coded by https://websensepro.com team --> {% for block in section.blocks %} {% if block.type == 'tab' %} <li class="tab__list {% if forloop.first %}active{% endif %}"> <h6 class="custom-tab" data-content-id="content--{{ block.id }}--{{ section.id }}" > {{ block.settings.heading }} </h6> </li> {% endif %} {% endfor %} </ul> {% for block in section.blocks %} {% if block.type == 'tab' %} <div id="content--{{ block.id }}--{{ section.id }}" class="custom__tab-content page-width {% if forloop.first %}active{% endif %}" > {{ block.settings.tab_content }} </div> {% endif %} {% endfor %} {% javascript %} tabs= document.querySelectorAll('.custom-tab'); tabContents= document.querySelectorAll('.custom__tab-content'); tabs.forEach(function(tab){ tab.addEventListener('click',function(){ contentId = this.dataset.contentId; content = document.getElementById(contentId); tabContents.forEach(function(content){ content.classList.remove('active'); }); tabs.forEach(function(tab){ tab.classList.remove('active'); }); this.classList.add('active'); content.classList.add('active'); }); }); {% endjavascript %} {% schema %} { "name": "Tabs", "blocks": [ { "type": "tab", "name": "Tabs", "settings": [ { "type": "text", "id": "heading", "label": "Heading", "info": "Include a heading that explains the tab." }, { "type": "richtext", "id": "tab_content", "label": "Content" } ] } ], "presets": [ { "name": "Tabs", "blocks": [ { "type": "tab" } ] } ] } {% endschema %} |

Finally, click the Save button to make the code changes.
Step 3: Add Tabs Into Your Product Page
After step 2, return to Shopify's "Theme" editing area and pick "Customize" the theme you added to the code in step 2.

Then, under Template, click the "Add section" option, find the "Tabs" option, and drag it to the appropriate spot.

Then, modify the "Tabs" you have just added:
- Heading: Include a title that describes the tab.
- Content: The rich text editor provides specific information for each tab. You may add text, photos, and videos.
Finally, press the Save button and preview your product page to ensure the tabs operate and seem as desired.
If you prefer a visual approach or wish to optimize tab content for SEO and user experience, see the following step. You'll use the theme editor and basic CSS coding to improve your tabs.

Option 3: Edit HTML Description Product
In addition to changing the theme and adding code, you can use HTML to add tabs to the product page. This is a simple way to add tabs to your product descriptions, but remember that it has restricted design possibilities.
First, in your Shopify admin, go to Products and choose the product you wish to change.
Then, click on the product description area.
To open the HTML editor, click the "View HTML" button in the upper right corner.
Next, put the following code snippet into the HTML editor. This code generates the basic tab structure, including labels and content spaces.
|
<ul> <li> <a href="#tab1">Tab 1</a> </li> <li> <a href="#tab2">Tab 2</a> </li> <li> <a href="#tab3">Tab 3</a> </li> </ul> <ul> <li> <p>Tab 1 content goes here.</p> </li> <li> <p>Tab 2 content goes here.</p> </li> <li> <p>Tab 3 content goes here.</p> </li> </ul> |

NOTE:
- Edit the text inside the tags (e.g., "Tab 1", "Tab 2", etc.) to match the desired tab names.
- Replace the material inside the tags (e.g., "Tab 1 content goes here") with your customized information for each tab.
To finish, click "Save" to preserve the changes you just made. Check the tabs' functionality and appearance in the preview of your product page.
For example, we will fill in "Reviews" on tab 1, "Delivery" on tab 2, and "Return" on tab 3.

Using EComposer Builder Page To Customize Tabs On Shopify Product Page
Adding custom tabs to your Shopify product pages may enhance the user experience and increase sales.
But why settle with sluggish code or restricted theme options? The EComposer Builder Page elevates product page customization to a new level.
Here's why EComposer stands out:
- Drag-and-Drop: No complex coding. This Shopify builder page's easy-to-use interface lets you design stunning product pages with tabs, divisions, and more in real-time.
- Built-in Tab Functionality: EComposer has a dedicated tab element, allowing you to construct organized and comprehensive product descriptions easily.
- Unrivaled Flexibility: Create any page type or customize current parts using an extensive collection of pre-designed components.
- Performance & Speed: Optimised code and speed-up methods provide a smooth user experience and performance.
Follow these instructions to use EComposer to add tabs to your product page:
Step 1: Access to the Shopify App Store and install the Shopify Landing Page Builder.

Step 2: After installation, return to the Shopify admin panel and select EComposer from the "Apps" menu.
Step 3: Use EComposer to build a new product page. Please choose the theme that you desire.

Step 4: Navigate to the left side of "Elements" and search for "Tabs" before dragging it to the desired location on the page.

Step 5: After that, you may change what is on these tabs.

Step 6: After you've finished, click "Save" to commit your changes and "Publish" to update your shop.
For example, we will create three tabs: "Overview," "Care Instructions," and "Reviews & Ratings" and set them under the "Add to Cart" button.

Tips For Optimizing Tab Content For SEO And User Experience
Crafting interesting tab content involves more than just looks. Here's how to optimize your tabs for both search engines (SEO) and user experience (UX) so they educate, engage, and convert:
Creating Engaging Tab Titles And Descriptions
You may enhance your product pages' user experience (UX) and search engine optimization (SEO) by adjusting their tab names and descriptions.
Keep your titles simple and reflect the tab's content. Include relevant keywords that people may look for while researching your product.
However, stress readability above keyword cramming. Use verbs and descriptive phrases to encourage people to click and explore the tab's content.
Also, maintain a consistent tone and style across your tab content that reflects your entire brand identity.
A great example of this approach is Allbirds' "Sustainability" tab. Their description gives a particular carbon footprint (6.88 CO2e) for their Golf Dasher, which adds credibility and demonstrates their environmental commitment.
They also suggest finding out about carbon footprint labels and Allbirds' environmental initiatives. Additionally, the website specifies the sustainable materials utilized in the shoe, offering helpful information to eco-conscious shoppers while matching their brand strategy.

Use CSS To Make It Beautiful
CSS (Cascading Style Sheets) is your tool for changing tabs from introductory text to appealing components that assist users and improve the experience.
Read this post to learn how to edit Shopify Section CSS.
Breaking down the code above and explaining what each part controls:
- Borders & Backgrounds: These sections set tab borders and backgrounds. Ideally, use theme variables for these styles. This maintains continuity if you alter your theme's color palette.
- Active Tab Styling: This section styles the chosen tab. It features border, background, text, and height modifications for a beautiful style.
- Finding Variables: If your theme doesn't use the code's variables (e.g., settings.border_color), you'll need to see them. The instructions tell checking "settings_data.json" for "border" or "background."
While hardcoding colors straight into CSS may seem like a simple remedy, it is avoided. This method involves manual theme adjustments if you alter the color scheme later. These variables are best for consistency.
Mobile-First Approach
Did you know that 58% of page visits are mobile?
More than half of all traffic to an online shop may come from mobile devices. This varies per industry, but it will grow for everyone.
Pro tip: Are you looking for a mobile-friendly solution to add tabs to your product pages without working with code? Look no further than EComposer Page Builder - This Shopify tool we’ve discussed above.

EComposer allows you to design fantastic product pages using a drag-and-drop interface without needing technical experience. You can add striking tabs to highlight crucial product data, specs, or reviews, all designed for smooth mobile consumption.
Read more:
Key Takeaways
This post offers many different ways to create tabs suitable for code-savvy users and people who want an easier way to do things. The #1 Shopify builder page app, EComposer Builder, has a drag-and-drop interface for easy tab construction. It requires no coding experience, making it suitable for individuals looking for an easy-to-use solution.
With valuable and interesting tab content, you'll be well on your way to providing your consumers with a more enjoyable shopping experience.
Visit our blog to learn more about methods for increasing sales and designing your Shopify shop.
Read more:
Build your highest-converting page in 15 minutes


Blog Categories


0 comments