


Migrate Shopify to Another Shopify Store: A Comprehensive Guide
Table Of Contents
Migrating your Shopify store to a new Shopify store can appear challenging, but it is a beneficial step for various reasons, such as rebranding, improving functionality, or starting anew. It’s a big deal and requires a lot of preparation. But we're here to cover you.
There are many important details, techniques, and essential notices you need to be aware of. Without these, you might forget to back up data and lose or miss essential product or customer details during migration. In this blog, we will also discuss mistakes to avoid for a seamless migration. So don’t miss out until everything is all set and done for you!
Why Consider Migrating Shopify Store to Another?

Switching from one Shopify store to another can really help your brand stand out. It means you can try out better features, a new look, easier ways to add apps, and more robust security. It can boost your brand, possibly leading to more sales, and lets you try out new marketing ideas.
Also, for businesses wanting to grow into new markets or keep a consistent brand style, migrating lets you create duplicate stores that look and work the same. This helps make sure all your online stores have the same design and features.
Here are some of the additional advantages:
- A new Shopify store offers more advanced features and plans that fit your business better.
- Migrating gives you a chance to refresh your brand with a new start like redesigning or installing new apps with new pricing plans.
- If your store has slow loading times or bugs due to complex code or data issues that can't be fixed, migrating to a new store allows you to start fresh with better coding performance.
- If your store has security problems that put private information at risk, migrating gives you a chance to start over with more secure components.
There are also tools and services available to help with the migration process, so it doesn't have to be daunting.
What Data Can You Transfer Within Shopify?

When moving from one Shopify store to another, essential data can be smoothly transferred to ensure everything transitions seamlessly. Here’s a detailed breakdown of the specific data that can be migrated:
- Products:
- Product Information: Name, SKU, Description, Status, Manufacturer.
- Pricing: Regular Price, Special Price, Stock Availability.
- SEO Info: Meta Title, Meta Description, Product Tags, EAN-13, UPC.
- Variants: SKU, Weight, Quantity, Pricing, Additional Images.
- Stock Management.
- Product Images.
- Collections:
- Collection Details: Name, Description, Status.
- Collection Images.
- SEO Info: Meta Title, Meta Description.
- Manufacturers: Manufacturer Name.
- Customers:
- Customer Details: First Name, Last Name, Email, Newsletter Subscription Status.
- Billing Address.
- Shipping Address.
- Orders:
- Order Details: Date, Status, Comments, Shipping Cost.
- Product Details: Name, SKU, Options, Price, Quantity, Discount, Tax, Total.
- Customer Details: Name, Email.
- Billing Address.
- Shipping Address.
- Coupons: Coupon Details: Code, Dates, Expiry.
- CMS Pages: Page Details: Title, Date, URL, Description.
- Blogs: Blog Details: Title, Description, SEO URLs.
- Custom data: Products, Variants, Collections, Customers, Orders, Draft Orders, Location and Markets
- Theme: Exclude images, paid theme licensing, certain data sets

Preparations for the Data Migrating

Before you start moving your Shopify store to a new one, there are essential things you need to do to make sure everything goes smoothly:
- Backup Your Data: This is really important! Save all your store's data, such as products, customer information, orders, and content (like pages and blog posts). If something goes wrong during the move, this backup will save you.
- Review Your Data: Not all your data might be needed in the new store. Figure out what you really need to move (like active products and recent orders) and what you can leave behind (like old products or outdated stuff). It will help you transfer quickly.
- Check Data Format: If you use a method like CSV to move your data, ensure it's suitable for Shopify. That means using the correct headings and formatting for product descriptions and customer addresses. Shopify has templates to help.
- App and Theme Check: Make sure your apps and themes now work with the new Shopify store. Some older ones might not, so look for updates or find new ones that do.
- Plan Your New Store: Decide on things like your Shopify plan, how your store will look, and basic settings like shipping and payment options before you move. This makes everything smoother.
- Prepare for Downtime: During the move, your store might be offline for some time. Tell your customers in advance and maybe put up a 'coming soon' page on your old store.
After organizing and tidying up your data, you'll make the transfer easier and set the stage for a more professional-looking store on the other end.
How to Migrate Shopify to Another Shopify Store
Coming to the most important part, we are going to equip you with 3 ways to migrate your Shopify store. With each method, we’ll delve deeply into each method's pros and cons and provide step-by-step guides.
1. Method 1: Manual Migration Using CSV Files

Manual migration using CSV files is a method for moving data from one Shopify store to another. It lets users download their Shopify data directly to their devices in CSV format. This option is great for occasional or one-time exports, like when moving a store or manually creating a backup.
For larger exports with more than 50 records, Shopify automatically emails the CSV file to the user and store owner. If the export involves fewer than 50 records, the CSV file is quickly downloaded.
The time needed to generate a CSV file is determined by the amount of data you export, especially the number of orders. As a rough estimate, it takes about an hour to export data from 100,000 orders.
Monitoring the file size is essential, as exported CSV files can't exceed 1 MB.
Pros of Manual Method:
- Users can select particular data elements for migration based on their needs.
- You can edit and refine data in CSV files before importing, guaranteeing data precision.
- This method doesn't incur extra costs for third-party migration services or apps, making it cost-effective.
- Users can customize the migration process to suit their business requirements and preferences.
- Data security is maintained by handling the migration internally without involving external parties.
Cons of Manual Method:
- Dealing with CSV files and ensuring data is mapped correctly can get tricky, especially when dealing with large amounts of data.
- Each step of the migration process needs to be done manually, which can take a lot of time, especially when dealing with a lot of data.
- This method lacks the automated features that dedicated migration apps offer, so users must handle many tasks manually.
6 Steps to Shopify Migration Manually
Now, let's learn how to easily transfer your Shopify store to another.
Step 1: Set up a new Shopify account
You'll need to create a new Shopify account first to move your current Shopify store to a new one. To do this, navigate to the Shopify website and choose the 'Start free trial' button.
You can begin with a free trial and then select the plan you prefer after the trial period ends.
If you haven’t had a Shopify account yet, seize the opportunity to benefit from a special offer: only $1 for the first month for all plans to experience Shopify from A-Z.
Step 2: Get Data from your Old Store
Once your new Shopify store is ready, you'll need to bring over data from your old store. This includes your products, customers, orders, and other info you want to move.
1. Exporting Products
Let's start by taking out the products from your old store. Here's how:
- Go to your old Shopify store's admin section and click "Products" to see all your products.
- You'll see a page with all your products. Look at the top right corner and click the “Export” button.

- A box will pop up. Since we're moving everything from one Shopify store to another, choose "All products" and “CSV for Excel, Number, or other spreadsheet programs” to export them.
- Click "Export products" to save the product details to your computer.
 2. Exporting customer information
- To export your customers, first, head to your Shopify admin and click on "Customers." This will show you a list of all your customers.
- On the right side of the page, you'll find the option to "Export." Click on it.

- In the window that appears, choose "All customers" and then hit the "Export customers" button to save the list as a CSV file.
- Once you complete this, Shopify will send the customer data to your email address. You can then download the data from your email by clicking on the CSV file.

Similarly, you can also download other details from your old Shopify site, such as images, blog posts, and more.
3. Exporting Shopify Theme
- Start by going to the admin panel of the store where the theme you want to copy is located.
- In the left-hand menu, go to "Online Store > Themes." You'll see an "Actions" button next to the live theme.
- Click the "Actions" button, and a drop-down menu will appear.
- From the options, select "Download theme file."
- Once clicked, the theme file will be sent to your account's email.

Step 3: Bring data into your new Shopify store
1. Importing products
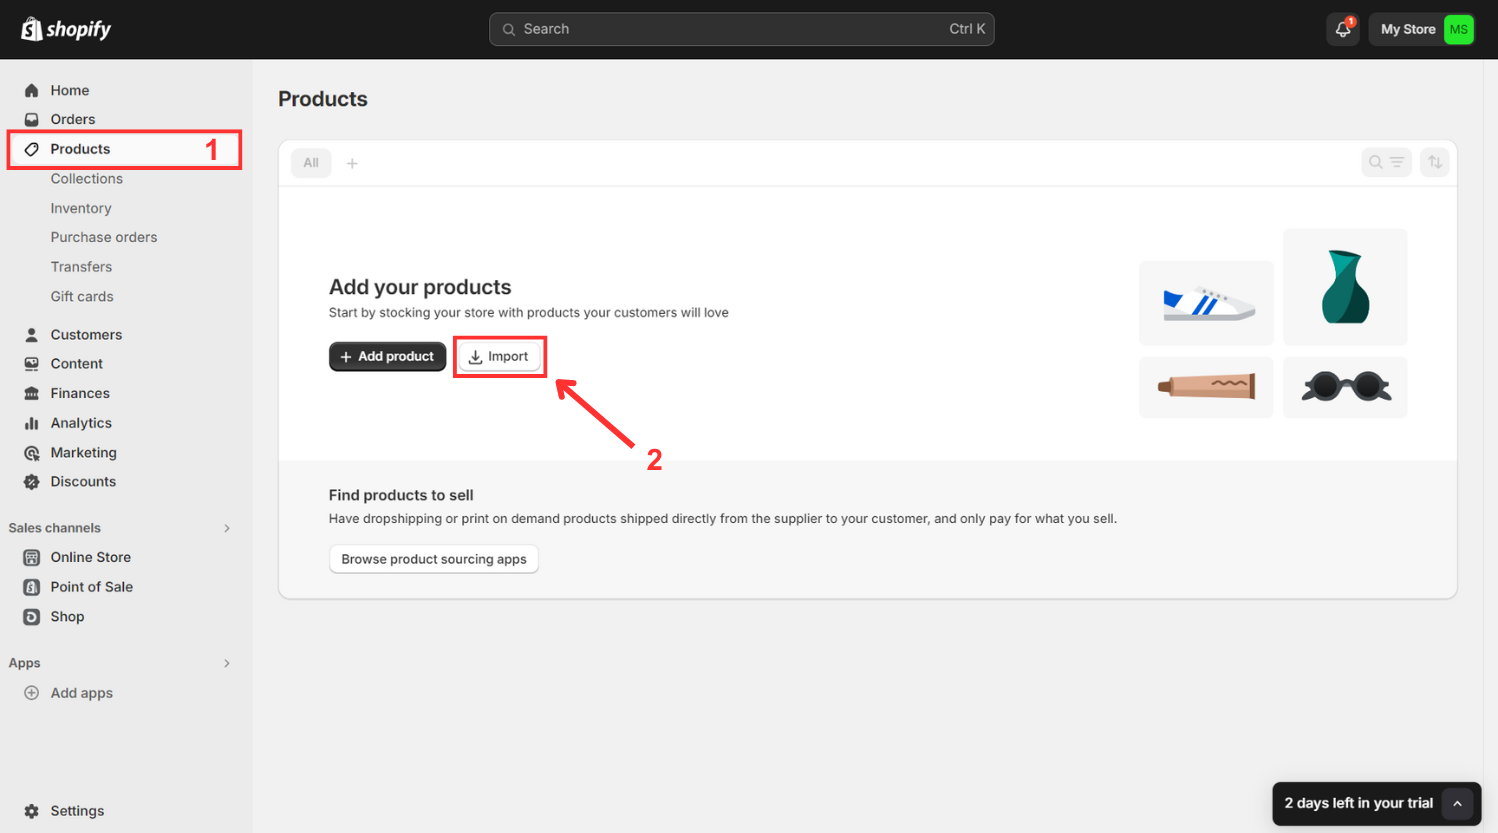
- Log into your new store and access the Shopify admin to do this. Navigate to "Products" from the admin panel.
- Once on the Products page, you'll find the option to "Import." Click on it.
- A window will pop up. Select "Add file" to upload the CSV product you saved from your old store.

- After adding the file, click on "Upload and preview." You'll see a preview of the first product to assure everything looks right. Hit “Import products” to start the process.

A message will appear; that's when the system imports the products. Once it's done, your new store's product page will be filled with all the products from your old store.
2. Importing customers
- To bring in customer information, head to your Shopify admin and click on "Customers."
- A new page will open up. You'll see two options: choose "Import customers."

- Next, a window will appear. Click on “Add file” here.

- Upload the file you downloaded from your email. You can adjust the options if needed or leave them blank. Then, click "Import customers."
- Once the customer data is uploaded, you'll get a summary showing how many customers were successfully imported and how many failed.
- Click "View all customers" to see them in your new Shopify store.
You can use the same methods to import other data types, like Orders data, from your old site.
3. Customizing data in your new store
Apart from products and customers information, there are also some of the other data we need to custom manually
- Navigate Shopify dashboard
- Click Settings at the left corner
- Opt for Custom data and recreate it one by one like your old store settings.

4. Importing theme
The email from Shopify will contain the theme file, which you’ll need to download. After downloading, you can upload this file to the new store.
- To do this, go to the Admin panel of the destination store
- Navigate to “Online Store > Themes,” and in the Theme library section
- Click the “Add theme” button.
- From the options, choose “Upload zip file.”

Select the ZIP file you downloaded from the email. Once the file is uploaded, the theme will appear in your Theme library, but it will not be published right away.
You can edit the theme before publishing it to your store, especially to add any images or banners that were not migrated. Once everything is set, you can publish the theme.
Step 4: Set Up Payment Gateways
The next important step in your new Shopify store is to add a payment gateway. This allows your customers to pay for products safely and securely online.
To add a payment gateway, take these steps:
- Navigate the Shopify admin and click on "Settings.”
- In the settings menu on the left-hand side, click on "Payments."
- You will see some default payment options.
- If you need to add a new payment method, scroll down to "Additional payment methods" and click "Add payment method."

- You can choose from various payment options or providers like Shop Pay, Pay Easy, Affirm, Ethereum, and more.
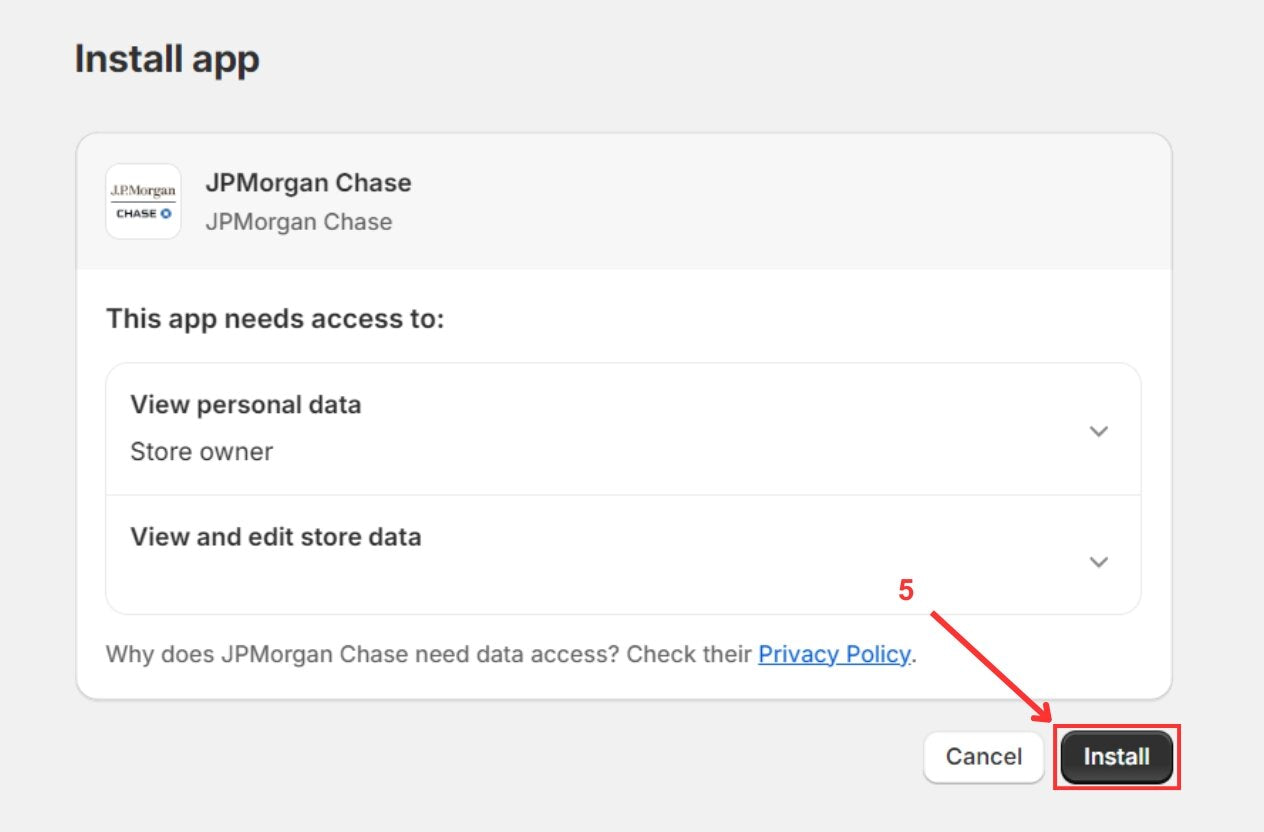
- Click on your preferred payment option, which will take you to the corresponding app page.

- Click "Install." A box will pop up, and then you must click "Install" again to complete the process.
- After installation, you will be taken to another page where you need to provide the necessary details based on the provider or method. Save the settings.

Step 5: Update the DNS Settings
Now, you need to update the DNS settings for your new store. This involves changing a record for your domain to point to your new Shopify store, or you can transfer the domain to your new store.
Step 6: Enter your shipping and tax details
Once your domain is set up, you need to update your shipping and tax information. If these aren't updated, your customers might run into problems like:
- An error message saying, "Currently no delivery options available at your location."
- Incorrect tax calculations if your operations vary by country.
To avoid these issues, create a new shipping zone with the correct shipping details and tax settings.
*Note: When updating your blog pages and other links, update your Google Analytics and Google Search Console with your new Shopify store URL.
2. Method 2: Hiring an eCommerce Expert

Hiring an eCommerce expert is a reliable and efficient way to move your Shopify store to a new one. The Shopify Partners marketplace offers trusted agencies and freelancers who specialize in helping Shopify store owners.
With their professional skills, you can ensure a smooth and secure transfer. These experts know Shopify well and can handle everything from moving data to customizing your new store to fit your needs. They can quickly solve any problems, reducing downtime for your business.
Pros of Hiring an eCommerce Expert
- Experienced eCommerce experts guarantee a smooth transfer process.
- They work efficiently, reducing downtime for your store.
- Understanding APIs, plugins, and integrations ensures seamless functionality.
- Experts promptly identify and resolve issues, saving time and hassle.
- They prioritize securely transferring sensitive customer and product data.
Cons of Hiring an eCommerce Expert
- Hiring experts can be costly.
- You depend on their availability and responsiveness.
- You have limited control over the process and preferences.
- Possible misunderstandings can lead to issues.
3. Method 3: Using an Automated Migration Tool

Choosing an automated migration tool is a fast and effective way to move your Shopify store to a different platform. These tools are made to simplify store migration, ensuring a seamless transfer of your products, customer data, and other important information.
Pros of Using an Automated Migration Tool
- Automated tools are fast and can quickly move large amounts of data, reducing the time your store is offline.
- They lower the chance of mistakes by accurately handling data like products and customer info.
- Many tools have easy-to-use interfaces that let you control how data moves from your old store to the new one. They also allow you to track the transfer progress in real-time to fix any issues.
- Using automated tools can save money, especially for smaller businesses, because you don't need to hire expensive experts.
Cons of Using an Automated Migration Tool
- Automated tools don't allow much customization, especially for complex stores or unique needs.
- The success of the transfer depends on the features of the tool chosen; some may lack necessary functions for specific stores.
- While they reduce errors, automated tools can still have problems with data formatting or compatibility, causing inaccuracies in the transferred data.
Others also read
7 Best Shopify Migration Services for Choosing in 2024
How to Put Shopify store Under Construction
How To Build A Shopify Store Easily in 10 minutes [2024 Guide]
Top 3+ Shopify Migration Apps to Choose
Here are some essential migration tools you shouldn't overlook when moving from one Shopify store to another:
1. LitExtension Store Migration

LitExtension Store Migration makes it easy to move data between Shopify, and even from over 140 e-commerce platforms to Shopify. You can import lots of different data types using CSV files, Excel, Google Sheets, or database files, even if you're not a tech expert.
Once you've moved everything, you can keep using the app to update your Shopify store regularly. It's simple to manage your data with LitExtension, keeping your store accurate and current.
Key features:
- Move from over 140 different eCommerce platforms or from files like CSV, Excel, or databases to Shopify effortlessly.
- Start your migration with 3 simple steps. Try out a free demo for 200 items.
- Prioritize keeping data safe.
- Continue selling without interruption during the move. Your SEO ranking stays intact with 301 redirects.
- You don't need technical skills. Get round-the-clock support and a 30-day money-back guarantee.
Pricing: Free to Install
Ratings/Reviews: 4.8 ⭐ 252 merchants
Merchants love this app because it smoothly moves data, handles big tasks like complex migrations and different currencies. It's praised for its all-in-one service and personalized help. The app is known for being fast, efficient, and affordable—it often finishes migrations in less than a day. Users also appreciate its excellent customer support and how it saves time by doing data transfers automatically.
2. Matrixify

Matrixify makes it easy to move lots of data, like product details and customer info, between Shopify stores or even from other ecommerce platforms if you need. It helps merchants smoothly transfer data and check it against the original to ensure accuracy. The app also gives tips on spotting and fixing any problems to keep data reliable. Its flexibility and control give users the power to manage their store data effectively throughout and after the migration process.
Key features:
- You can move data using Excel, Google Sheets, or CSV files.
- Switch from Magento, WordPress/WooCommerce, BigCommerce, Lightspeed, and other platforms.
- Back up and recover your data.
- Plan and automatically repeat export and import tasks.
- Keep an eye on and manage export and import tasks in real-time, and view their history.
Pricing:
- Demo: Free for 10 per file
- Basic: $20/month, up to 5K products
- Big: $50/month, 50K products
- Enterprise: $200/month for everything unlimited
Ratings/Reviews: 4.8 ⭐ 479 merchants
Shop owners like this app because it handles lots of products well. It's great at managing big files for importing and exporting, organizing special data fields, and moving data. The app also helps with updating lots of items at once, keeping track of inventory, scheduling sales, and turning orders into sales. Although it takes some time to learn, it's essential for making big changes and reporting every day. Customers love the support, especially the Slack channel and AI bot. It's a top choice for its wide range of features and ability to access data that Shopify doesn't usually let you export.
3. Cart2Cart Store Migration App

The Cart2Cart Store Migration App provides an easy and quick way to switch from any e-commerce platform to Shopify or Shopify Plus. This simple app lets merchants export different types of data, ensuring a smooth migration.
The app is not just for the initial migration; its user-friendly interface makes managing data easy over time. Merchants can use it for regular updates, keeping their Shopify store up-to-date and accurate.
Key features:
- Works with all popular eCommerce platforms for easy migration.
- Speeds up the transfer process, letting you focus on your business goals.
- Imports more types of data than other similar tools.
- Ensures a completely secure and accurate data transfer to Shopify.
Pricing: Free to install
Ratings/Reviews: 4 ⭐ 241 merchants
Merchants like this app because it efficiently transfers all types of data, like product details, customer records, and SEO links, to Shopify. It's great for handling big and complex migrations. The app offers a test migration feature and migration insurance. The support team is known for being quick to help and giving good advice. Merchants find the app affordable and dependable.
Common Mistakes to Avoid During Shopify Migration

Moving from one Shopify store to another is usually simple, but mistakes can happen if you're not working with a Shopify migration expert.
Apart from the preparation mentioned above, there are common mistakes to watch out for and avoid when migrating your Shopify store to another Shopify store.
- Ignoring SEO Elements: Many businesses forget to optimize their store for search engines after migrating, which can lead to losing search rankings and website traffic.
- Skipping Store Testing: After moving to a new store, test everything, including contact forms, product reviews, shipping, and payment systems, to make sure they work correctly.
- Neglecting Mobile Performance: Most customers use mobile devices to browse your store. Test your store on different devices to make sure of a good user experience.
- Not Setting Up Proper Redirects: After migrating, check and set up redirects to ensure they work properly for user experience and SEO.
Steps to Set Up Redirects:
- In your Shopify dashboard, go to account settings > URL redirects.
- Use the help option if you can’t find URL redirects.
- Enter the old URL in the "From" section and the new Shopify URL in the "To" section.
- Repeat for all pages you need to redirect.
Best Practices for Smooth Shopify Migration

- Clean and Optimize Data
Before you start the migration, clean up your data. Remove any duplicates, outdated information, and errors. Organize your data so everything is clear and easy to find. It makes the transfer smoother and your new store works better.
- Involve Experts If Necessary
If the migration process seems too hard or you don't have time to do it yourself, think about hiring a professional. Experts or Shopify migration agencies know how to handle complex migrations, making the move easier and minimizing problems.
- Install Essential Shopify Apps
Apart from choosing well-reviewed and trusted migration tools to help you move your data accurately and quickly, reducing the chance of mistakes. Make sure to install other necessary apps that help you handle other things like marketing, managing inventory, and improving how customers shop.
You can consider must-have Shopify apps here.
- Build a Comprehensive Store
After migration, the next step is apparently to build your store. And of course, designing your Shopify store can not be surpassed. To streamline the process of setting up from the beginning, we suggest you EComposer – Top Drag & Drop Shopify Page Builder app.

Especially when you wish to restart to upgrade your store to a new level, then Ecomposer is tailored for you with its huge library of stunning premade templates. You can get started quickly or create custom pages, from captivating landing pages to appealing homepages to informative blogs.
Also with EComposer, you won't have to worry about managing numerous overwhelming apps. It provides all-in-one solutions with up to 25 built-in add-ons and over 50 third-party integrations aimed at offering the most advanced features and ensuring a seamless user experience for your completely new store.
FAQs
1. Do I need technical skills to migrate Shopify stores?
The level of technical expertise needed depends on the chosen migration method.
- Manual CSV Import: This requires some technical know-how to format your data correctly according to Shopify's specifications.
- Third-Party Apps: Many migration apps are user-friendly and require minimal technical skills.
- Shopify Partner: Hiring a Shopify expert eliminates the need for technical skills on your end.
2. How long does Shopify migration typically take?
The timeline can depends on several factors:
- Store Size and Complexity: Larger stores with more products and data will take longer to migrate.
- Migration Method: Manual CSV import is generally faster for smaller stores, while third-party apps or Shopify partners might take longer for complex migrations.
- Data Volume: The amount of data being transferred significantly impacts the duration.
3. Can I reuse my paid plans from my old store to my new store?
No, unfortunately, paid plans are not transferable between Shopify stores. You'll need to choose a new plan for your new store based on its needs.
4. Can I migrate Shopify apps and themes to the new store?
Apps and themes generally need to be reinstalled and configured manually in the new Shopify store. Ensure compatibility and functionality testing to maintain seamless operations.
5. How can I maintain SEO rankings after migrating?
You can set up 301 redirects from old URLs to new ones to preserve SEO authority. Then remember also to update meta tags, sitemaps, and ensure content remains relevant and optimized for search engines.
Wrap Up
We hope this guide has explained how to migrate your store from one Shopify account to another. Remember to check the entire customer experience to catch if any problems happen.
The process is usually straightforward if everything goes well. But if you're unsure, it can get complicated. Hiring a trusted Shopify migration company is the best way to avoid mistakes.
=================
Add EComposer Next generation page builder Here
Follow Us on Facebook
Join Official Community
Build your highest-converting page in 15 minutes


Blog Categories


0 comments