


How to Create a Shopify Shipping Label Without an Order
Table Of Contents
Shipping labels are the backbone of any successful e-commerce operation, ensuring that products reach customers on time and in perfect condition. However, a common problem arises when Shopify users need to create shipping labels without an order, leaving many needing help with how to proceed.
In this blog, "How to Easily Create a Shopify Shipping Label Without an Order", we'll walk you through a straightforward process to solve this issue. Following our step-by-step guide, you'll learn how to efficiently generate shipping labels on Shopify, even when an order has yet to be made.
Understanding Shopify Shipping Labels

Shipping labels are vital components of any e-commerce business. These labels contain essential information such as the destination address, sender details, tracking numbers, and shipping methods. They ensure that packages are correctly routed and delivered to customers, playing a critical role in the smooth operation of online stores. With could be lost, delayed, or misdelivered with recovered accurate shipping labels, leading to customer dissatisfaction
Typically, shipping labels are generated automatically when an order is placed through Shopify. In standard scenarios, when a customer completes a purchase, Shopify allows you to create a shipping label corresponding to the order. This label is attached to the package, ensuring it reaches the right customer at the right time.
Details of the shipping label:
- Name, address, and phone number of the recipient
- The address of the sender
- A barcode
- Order number for the shipment: A tracking number
- When the order was dispatched and what kind of shipping service was chosen
- Details of the shipping company
To make things easier, Shopify offers a page with shipping label templates.
Preparation Before Creating a Shipping Label

Gather Necessary Information
Gather all the required information about the shipment to create an accurate shipping label. This includes the recipient's full name and complete shipping address. To prevent delivery problems, be sure that every information is accurate.
Next, measure and record the package dimensions (length, width, and height) and weight, as this information is crucial for calculating shipping costs and selecting the appropriate shipping method. If the package contains items that require special handling, make a note of that as well. Organizing all these details beforehand will help you create a precise shipping label that meets the carrier's specifications.
Ensure Account Settings Are Correct
Before proceeding, you must ensure your Shopify account is set up correctly to support the label creation process. Begin by checking that your shipping carrier integrations, such as UPS, FedEx, or USPS, are active and configured adequately within your Shopify settings. This will allow you to generate labels directly from your Shopify account.
Additionally, review your payment methods to confirm that they are set up to cover any shipping costs, including any additional charges that might arise for special services like insurance or expedited shipping. Double-checking these settings will prevent interruptions during the label creation and help you manage your shipping operations smoothly.
Step-by-Step Guide to Creating a Shopify Shipping Label Without an Order
Step 1: Log into your Shopify account.
To log in to your Shopify admin, visit shopify.com, click "Log in", and enter your store's URL, email, and password. Enter the code to access your admin dashboard if two-step authentication is enabled.

Step 2: Go to Create Order
Select the "Orders" tab in your Shopify dashboard under the "Home" section. Click the "Create order" button in the upper right corner of the "Orders" section.

Step 3: Select the Draft section
Once you select "Create order", you will be sent to the "Orders" section's "Drafts" tab. You may explore and choose the product you wish to add to the order under the "Drafts" page.

Step 4: Convert the draft order into a regular order
Once the order has been verified, select "Mark as paid". This will inform the system that a payment was made to you outside of Shopify.
Next, select "Create order" from the menu. This will convert the draft order to a normal order.
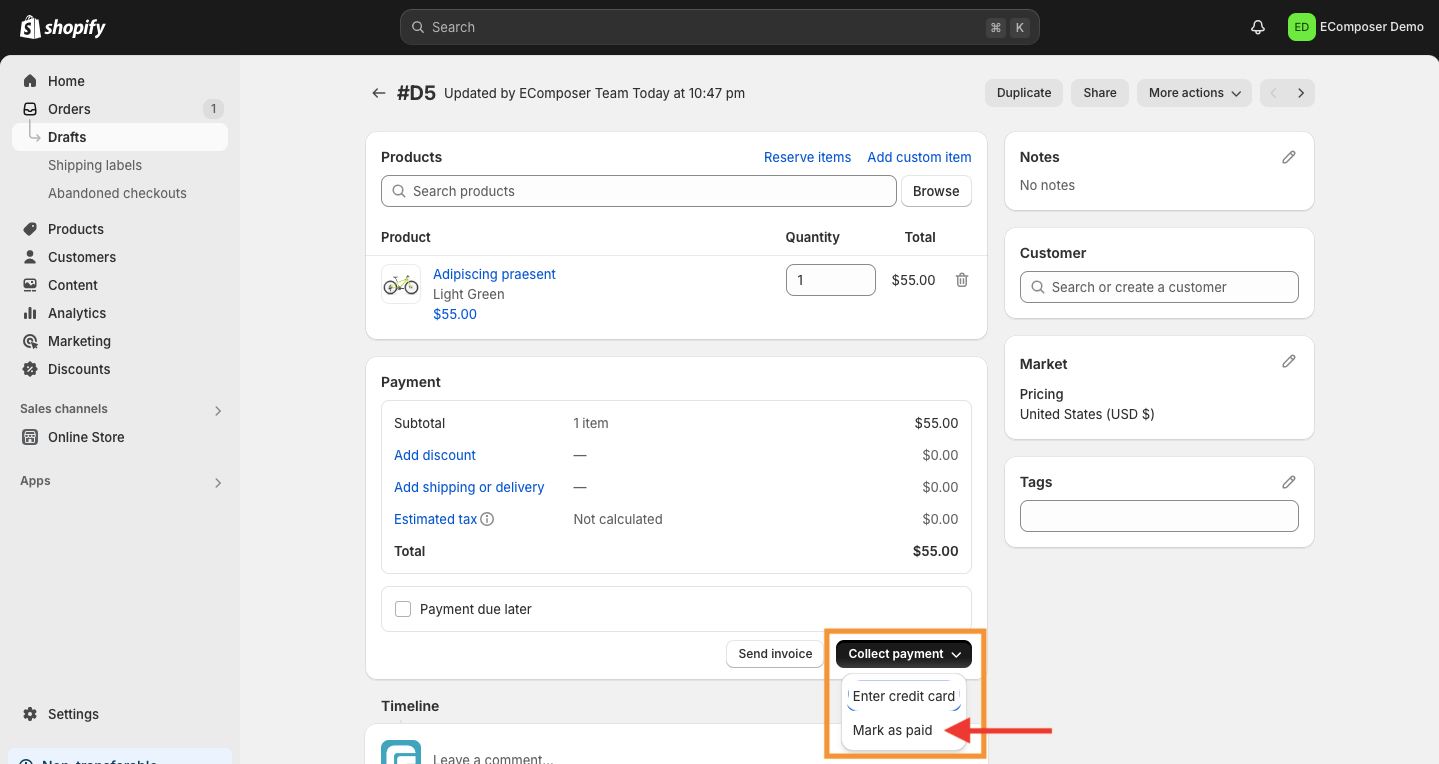

Note: Shopify notifies you that marking a draft order as paid will change it from a draft order to a regular order. This warning is displayed below.
Step 5: Add the customer's information
The customer's shipping address and details are editable or addable on the right-hand side.

Step 6: Print the Packing Slip
If your order is prepared:
- As you would with ordinary orders, click "Print".
- Go to "Print packing slips" and choose.
- Your packing slip in PDF format is available now.

Note: A shipping label and a packing slip are different. The shipping label is a sticker that is applied to the outside of the box, whereas the packing slip is normally located inside the delivered item.
Step 7: Create a Shipping Label Without an Order
As previously indicated, Shopify changes a draft order into a regular order when you mark it as paid.
After doing this, you can generate a shipping label without requiring an order. You can take the actions listed below:
- Click on the order that isn't completed and choose the Print shipping label.
- Make weight adjustments, complete customs papers if needed, select a shipment option, and add extra services.
- After checking your details, select "Purchase shipping label". After that, you may print your label.
Note: If this is your first time ordering a shipping label, check out Shopify Shipping's instructions on utilizing a certain carrier. Each shipping corporation has its own set of rules, resources, and specifications.
Tips and Best Practices

Creating a shipping label in Shopify without a corresponding order requires careful attention to detail and strategic planning. Following some best practices is essential to ensure a smooth and error-free process. These tips will help you streamline label creation, maintain accurate records, and optimize shipping operations.
Accurately Enter All Shipping Information: When creating a shipping label without an order, double-check the recipient's address, package dimensions, and weight. Use address verification tools to prevent errors that could lead to delivery delays or returned packages.
Utilize Shopify's Draft Orders Feature: Use Shopify's Draft Orders feature to create a shipping label. This allows you to input the necessary details and generate a label without placing a full order, ensuring proper tracking and flexibility.
Optimize Label Printing Settings: Ensure your label printer has the correct settings for your carrier's format. Using a high-quality thermal printer helps produce clear, scannable labels, minimizing the risk of shipping delays.
Store Common Shipping Scenarios as Templates: Save frequently used shipping scenarios as templates in Shopify. This speeds up label creation and reduces errors by providing preset package details and addresses, making your process more efficient.
Align Label Creation with Inventory Management: Sync your label creation process to maintain accurate stock levels. This prevents overselling and ensures smooth operations, even when shipping without standard orders.
Implement a System for Tracking Non-Order Shipments: Use tags or custom fields in Shopify to track shipments created without orders. This keeps your non-order shipments organized and easily traceable, reducing the risk of lost packages.
FAQs
Do I need a specific Shopify plan to create shipping labels without an order?
No specific Shopify plan is required to create shipping labels without an order. This functionality is available on all Shopify plans, allowing you to generate labels through features like Draft Orders or integrated shipping apps. At the same time, all plans support label creation. Advanced features, such as discounted shipping rates or automation, may be more accessible with higher-tier plans or third-party apps.
How do I pay for the shipping label created without an order?
When you create a shipping label without an associated order, the payment is processed through your Shopify account. The cost of the label is charged to your linked payment method and will appear on your next Shopify invoice. Keeping track of all shipping expenses in one place with this strategy may simplify record-keeping and financial management.
What if I enter incorrect information when creating the shipping label?
Suppose you enter incorrect information, such as an inaccurate address or package dimensions, when creating a shipping label. In that case, you can typically void the label through Shopify or directly via your shipping carrier's platform. This must be done before the label is used. Once voided, you can create a new, correct label. Ignoring an inaccurate label might lead to lost items, extra expenses, or delays in delivery.
Is there a limit to the number of shipping labels I can create without orders?
Shopify does not limit the number of shipping labels you can create without orders, allowing you to generate as many labels as necessary. Managing shipments that don't match specific orders is made easier with this flexibility. But to keep things clear, guarantee stock correctness, and avert any inconsistencies in your fulfillment process, you must keep precise records and manage your inventory.
Read more:
- 15 Shopify Shipping Policy Templates
- How to Disable Shipping on Shopify
- 4 Methods to Add Free Shipping on Shopify
- How to Setup Shopify International Shipping
- 3 Steps To Set Up Shopify Shipping
Conclusion
Creating a Shopify shipping label without an order is simple and manageable when you follow the right steps. Gather all necessary information, then utilize features like Draft Orders or shipping apps to generate your label. Remember to double-check details and ensure your settings are correct.
By putting these procedures in place, you may streamline your business processes and keep correct records while handling shipments without orders with confidence. Please don't hesitate to include these ideas into your workflow since Shopify's versatile features make it easy to manage this activity efficiently.
Build your highest-converting page in 15 minutes


Blog Categories


0 comments