


Shopify Draft Orders: A Complete Guide for 2026

Table Of Contents
Draft orders in Shopify provide a flexible and customizable way to create orders manually. This feature is invaluable for handling special requests, pre-orders, and custom orders that may not fit the standard online shopping experience.
"Shopify Draft Orders: A Complete Guide" covers everything you need to know, from creating draft orders to managing them effectively. Mastering draft orders can streamline your sales process, enhance customer service, and handle unique order situations efficiently. This guide ensures you make the most of this essential tool for your online store.
What is a Draft Order on Shopify?

A draft order on Shopify is a feature that allows merchants to create customized orders manually. This tool is handy for processing special requests, pre-orders, or custom items unavailable through regular online checkout. Draft orders enable the entry of order details, including products, discounts, and shipping charges, before finalizing the transaction.
Draft orders are created in the Shopify admin and can be edited before being sent to customers for review and payment. Once the customer confirms and pays, the draft order is converted into a regular order, ready for fulfillment. This feature provides a flexible way to manage unique or complex sales scenarios.
Benefits of Using Draft Orders

Flexibility in customization: Draft orders in Shopify, which allows you to tailor orders to meet specific customer needs. You can easily modify product quantities, apply custom discounts, and add special instructions, ensuring each Order perfectly suits the customer's requirements.
Enhanced customer service through personalized orders: Draft orders allow you to offer a more customized shopping experience. Create orders based on direct customer interactions, add personalized notes, and send customized invoices. This level of personalization helps build stronger customer relationships and increases satisfaction.
A streamlined process for managing complex sales: Draft orders simplify the handling of complex sales scenarios, such as bulk orders, pre-orders, and special requests. They enable you to keep track of intricate order details and manage them efficiently, reducing errors and improving overall workflow.
Improved Inventory Management: With draft orders, you can better manage your inventory by reserving stock for custom orders before they are finalized. This helps prevent overselling and ensures accurate stock levels, leading to more effective inventory control and planning.
Complete Guide: Create a Draft Order on Shopify
Creating a draft order on the Computer
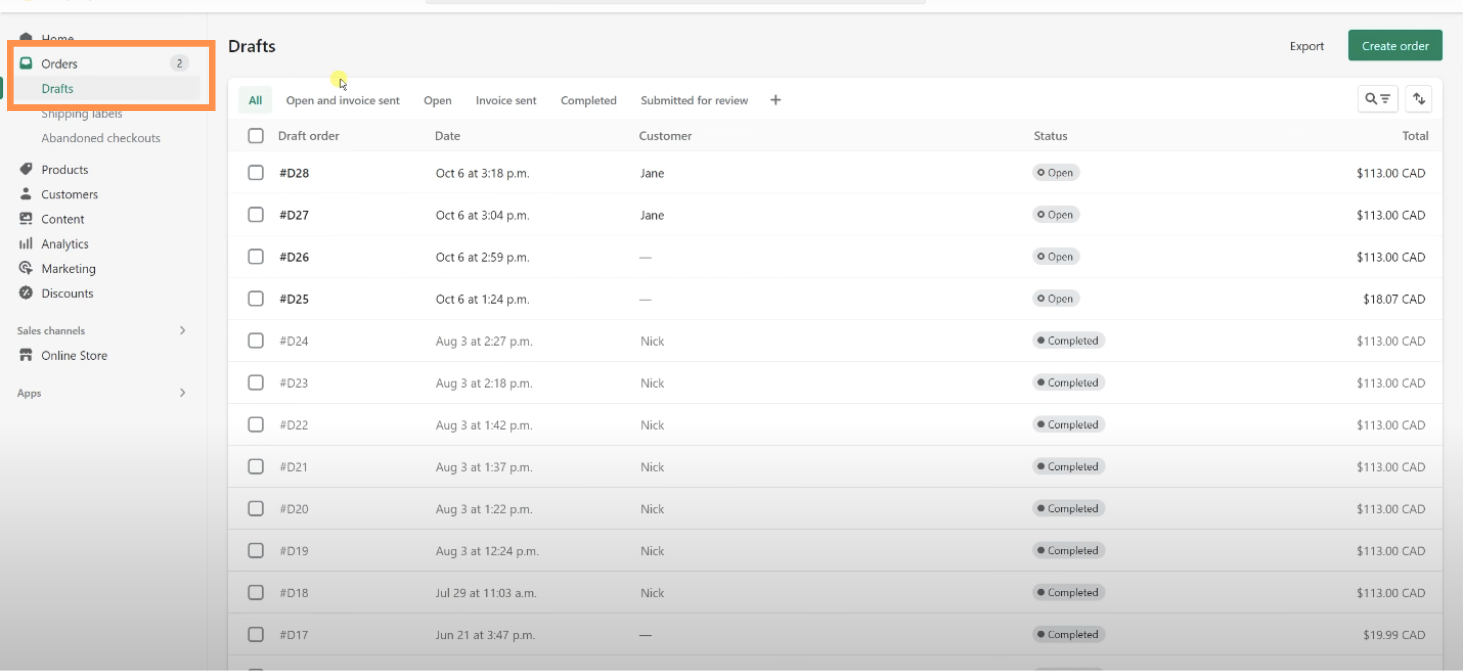
Step 1: Go to Orders
When you arrive at the Shopify admin screen, you'll see an “Orders” button on the left-hand side. Click that button to bring up the Order page.

Step 2: Click Create Order
Once you reach the Order page, locate the “Create order” button at the right side of the screen and click it to proceed.

Step 3: Add products
Following the preceding step, a new Create Order page will be displayed. As you can see, a box is located beneath the Order details field. Look through that box for the items you want to add to your draft order, then select them.

Step 4: Customize the Order
You may modify other elements seen on the Create order page, such as:
- Add a customer
- Discount
- Add tag
- Apply taxes (or not)
You can select whether or not to apply the choices to add taxes, tags, notes, and discounts.

Step 5: Choose one action to do
You have the option to take any of the following actions:
- Email invoice: You can send your customer an invoice by email. The invoice will contain a link to the checkout so they can pay for their Order.
- Select the appropriate option under the Accept Payment section to accept money from your consumers.
- Save draft order: On the Draft order page, click the Save draft order button at the bottom to save an order for later revision.

Creating a draft order on a Mobile Phone
Step 1: Go to Orders
Tap the "Orders” button, which is located next to the Home button at the bottom of the phone screen, after authenticating into your Shopify account using the app.

Step 2: Create Order
The “+” button is located at the top of the screen; hit it to create an order.

Step 3: Add products
You can select the goods for your Order by tapping “Add Products” in the Items section of the newly displayed page called Create Order.

Step 4: Customize the Order
Other components of the Create order page that you can modify include:
- Add a customer
- Discount
- Add tag
- Apply taxes (or not)
You decide whether or not to apply the options to add the tax, tag, note, and discount.
Step 5: Choose one option to follow
One of the following actions can be selected to be performed:
- Email invoice: You have the option to email your client an invoice. The invoice will contain a link to the checkout, so they may use it to make their purchase payment.
- If you want the money to be released later, mark the payment as pending in the Accept payment area.
- Indicate that the payment has been marked as paid if it was made outside of Shopify.
- You may save the Order by clicking the Save button at the top to make adjustments later on the Draft order page.
How to Create Order from Draft Order Shopify
Step 1: Choose Collect payment
If you have created a draft order in Shopify, you may want to turn it into an actual one. Here's how to do that: after creating your draft order, click "Collect payment".

Step 2: Check Credit card information
If you select "Enter credit card", you or your customers must provide the credit card information to process the payment.
After entering the card details, click "Charge...". As previously mentioned, sharing the checkout link of your draft order allows your customers to enter their credit card information themselves.
When customers request to check out a draft order on Shopify, you can share the link to facilitate the process.
Alternatively, if you choose "Mark as paid", a modal will appear where you can specify the type of payment received.

Step 3: Create Order
Be aware that if you select this option, your customers cannot enter their credit card details.
Finally, click "Create order" to convert your Shopify draft order into a finalized one.

How to Delete Draft Order Shopify
Step 1: Choose the Draft field
First, make sure you belong to your Shopify admin account. Then select "Orders" and "Drafts".
Step 2: Select the Draft order
Right now, if you wish to delete an individual order, simply open a draft order that you want to delete.
Step 3: Go to Delete Draft order
Now, scroll all the way where you see a button called "Delete draft order".

Step 4: Confirm the deletion
Finally, confirm the selection and click the red button "Delete draft order".

FAQs
What is the difference between a draft order and a regular order?
A draft order is a manually created order that allows for customization before it is finalized, making it ideal for handling special requests or complex sales scenarios. Unlike regular orders, which are automatically generated when a customer completes checkout, draft orders can be edited to adjust products, quantities, discounts, and other details.
Once all modifications are made, a draft order can be converted into a regular one, following the standard fulfillment process.
How do I mark a draft order as paid on Shopify?
To mark a draft order as paid on Shopify:
- Open the draft order from your admin dashboard.
- Click the "Mark as Paid" button in the order details section.
- Input the payment details, including the payment method and any other remarks.

Once you confirm the payment, the draft order will be converted into a regular order, reflecting its paid status and allowing you to proceed with fulfillment and shipping. You can read the detailed steps about Marking a draft order as paid.
Can I apply discounts to draft orders?
Yes, you can apply discounts to draft orders in Shopify. When creating or editing a draft order, you can add a discount code or manually apply a discount by clicking the "Add discount" button within the draft order interface. Before completing the Order, you may provide your customers with options for pricing and promotions by applying discounts to specific items or the entire Order.
How do I change my draft order number on Shopify?
Shopify does not allow you to change the draft order number directly. Shopify automatically assigns Draft order numbers sequentially to maintain a consistent record.
However, you can add notes or tags to a draft order for better identification and organization. If order numbering is crucial, consider using an external system to track custom order numbers alongside Shopify's default numbering.
How do I send a draft order to a customer?
To send a draft order to a customer:
- Open the draft order in your Shopify admin.
- Click on the "Email Invoice" button to open a window to customize the email message.
- Ensure the customer's email address and add any necessary notes or instructions.
Once everything is set, send the email. Upon receipt of payment, the buyer will get an invoice along with a link to finalize their online purchase, turning the draft order into a final one. For a step-by-step guide on managing draft orders, check out our detailed tutorial here.
How do you create a shipping label for Draft Order Shopify?
To create a shipping label for a draft order, first convert it into a regular order by marking it as paid or fulfilled. Go to your Shopify admin's order details page after it becomes a regular order.

Click the "Create a shipping label" button, enter the required shipping information, select the shipping service, and purchase the label. For shipping, kindly print the label and affix it to the package.
What happens if a customer fails to complete a draft order?
If a customer doesn't complete a draft order, it remains an open draft in your Shopify admin. You may email the consumer to remind them to finish the transaction. Draft orders can be edited, resent, or canceled if necessary. Keeping track of open draft orders allows you to manage potential sales and follow up on unfinished transactions, helping to maximize your conversion rates.
Read more:
- How to Fulfill Orders On Shopify?
- 4 Easy Steps to Unfulfill an Order in Shopify
- How to Cancel an Order on Shopify
- How To Handle Shopify High-Risk Orders?
- Shopify Test Order 101: A Comprehensive Guide
Final Words
This guide has walked you through the essentials of creating, managing, and effectively utilizing draft orders. From setting up draft orders to sending invoices and finalizing transactions, you now have the tools to enhance your sales operations.
To truly harness draft orders' potential, consider integrating them into your Shopify store's workflow. Draft orders improve inventory management, streamline complex sales processes, and enhance customer service. By leveraging these features, you can greatly enhance operational efficiency and customer satisfaction.
Are you Ready to Enhance your Shopify store with Draft Orders?
Enhance your Shopify store with the power of Draft Orders using EComposer. With Landing Page Builder, you can effortlessly create stunning pages, manage draft orders, and offer tailored purchasing experiences. Say goodbye to complex backend management with EComposer's intuitive drag-and-drop interface and extensive design library.

Stop waiting! Start your free trial on EComposer now to experience the enhanced order management with Draft Orders integration.
Build your highest-converting page in 15 minutes


Blog Categories


0 comments