How to Customize Shopify Line Item Properties on Product Page?
Table Of Contents
Custom Shopify line item properties offer a powerful way to personalize your Shopify store and provide a unique shopping experience for your customers. In this blog, we will guide you through the steps of customizing line item properties on your Shopify cart page using both manual coding and third-party apps.
What Is Line Item Properties In Shopify?
Line item properties are attributes in Shopify that are used to collect customization information for items added to the cart. It such as special requests or product options.

Example of Shopify product page.
For example, the line item properties in the image above are:
- Product: Personalized Dyed Pillow Cases
- Price: $30.00
- Quantity: 1
- Color: Teal
- Monogram: ABC (optional)
These properties represent the specific details of the product being purchased, including its name, price, quantity, and any customizable options.
How To Custom Line Item Properties On Shopify Product Page?
This guide will explore two methods to add custom line item properties to your Shopify store:
- Option 1: Manual coding for those with coding experience; we'll guide you through the steps of creating custom fields using Shopify's UI Elements Generator and modifying your theme's code.
- Option 2: Using Third-party apps. If you need to be more comfortable with coding, we'll recommend popular apps that simplify the process of adding custom line item properties.
Let's get started!
Option 1: Manually Add Line Item Properties
While Shopify doesn't provide a built-in interface to add line item properties directly, you can achieve this using custom coding.
If you have no coding knowledge, don't worry; scroll down to see our second option.
Step 1: Go To The Shopify UI Elements Generator
First, visit the Shopify UI Elements Generator page. This tool will help you create the form field for your product page.
Next, choose your field type. Decide whether you want a text box, dropdown menu, or checkbox for your attribute.
Now, add a clear label. Give your custom field a descriptive and easy-to-understand label.
For example, we have a plain t-shirt product that allows customers to customize the text on the shirt. So we chose the type of form field as text short and our form field labeled "Custom Text."
See how your form field will look on your cart page before adding it to your theme.
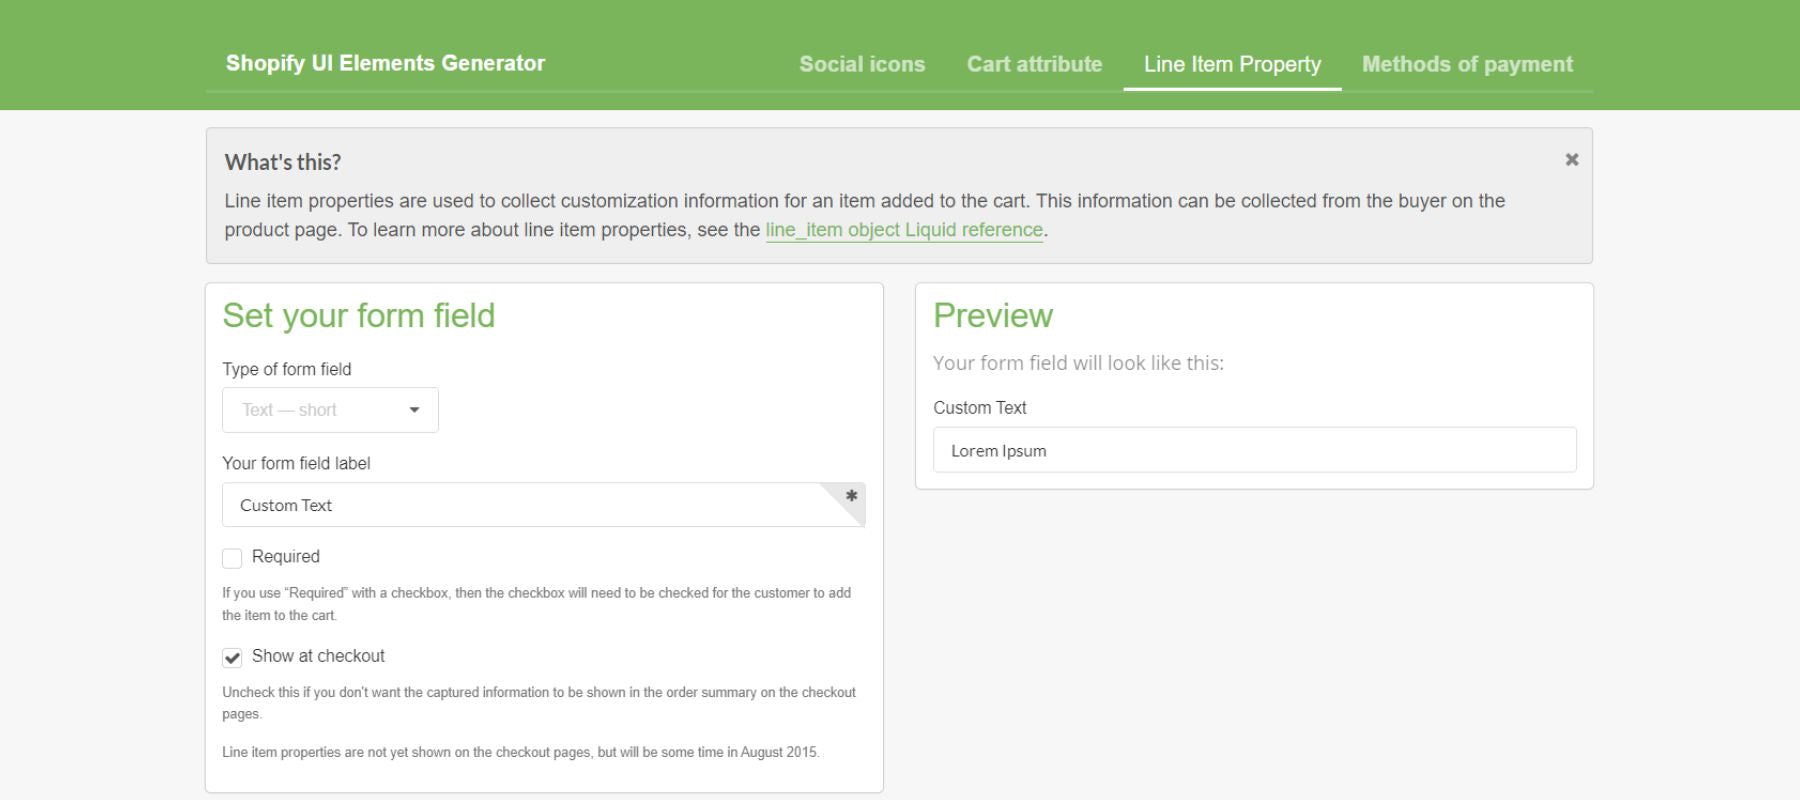
If you want customers to fill in this field before completing their purchase, make it mandatory.
Step 2: Copy Your Generated Code
Once you're happy with the design, copy the generated code from the UI Elements Generator.

Step 3: Find Your Theme's Code
After step 2, go to your Shopify admin and select Online Store > Themes.

Find the main-product.liquid in the Templates directory.
Then paste the code in Step 2 before this line:
|
<div class="product__tax caption rte"> |

NOTE: Each code snippet for Shopify stores is unique, so it is also flexible for your store. However, the Shopify item properties line likely controls how additional product information is displayed. So, you need to insert it before the product__tax section that displays tax information and shipping policy.
That's it! As you can see in our image below, the Custom Text field is shown on our product page.
Option 2: Integrating Line Item Properties With Third-Party Apps
If you don't know how to code, your best bet is to install a third-party app to add custom options like a text field for entering personalized text on your product.
In this example, we'll show you how to use the Easify Product Options app. If you want to consider other apps, scroll down to see our top 2 suggestions for custom line item properties apps for your Shopify store.
The Easify app prioritizes a user-friendly interface with pre-designed templates and in-app live previews, making it suitable for non-technical users.
Rating in 2024: 4.9 / 5.0 ⭐ (462+).
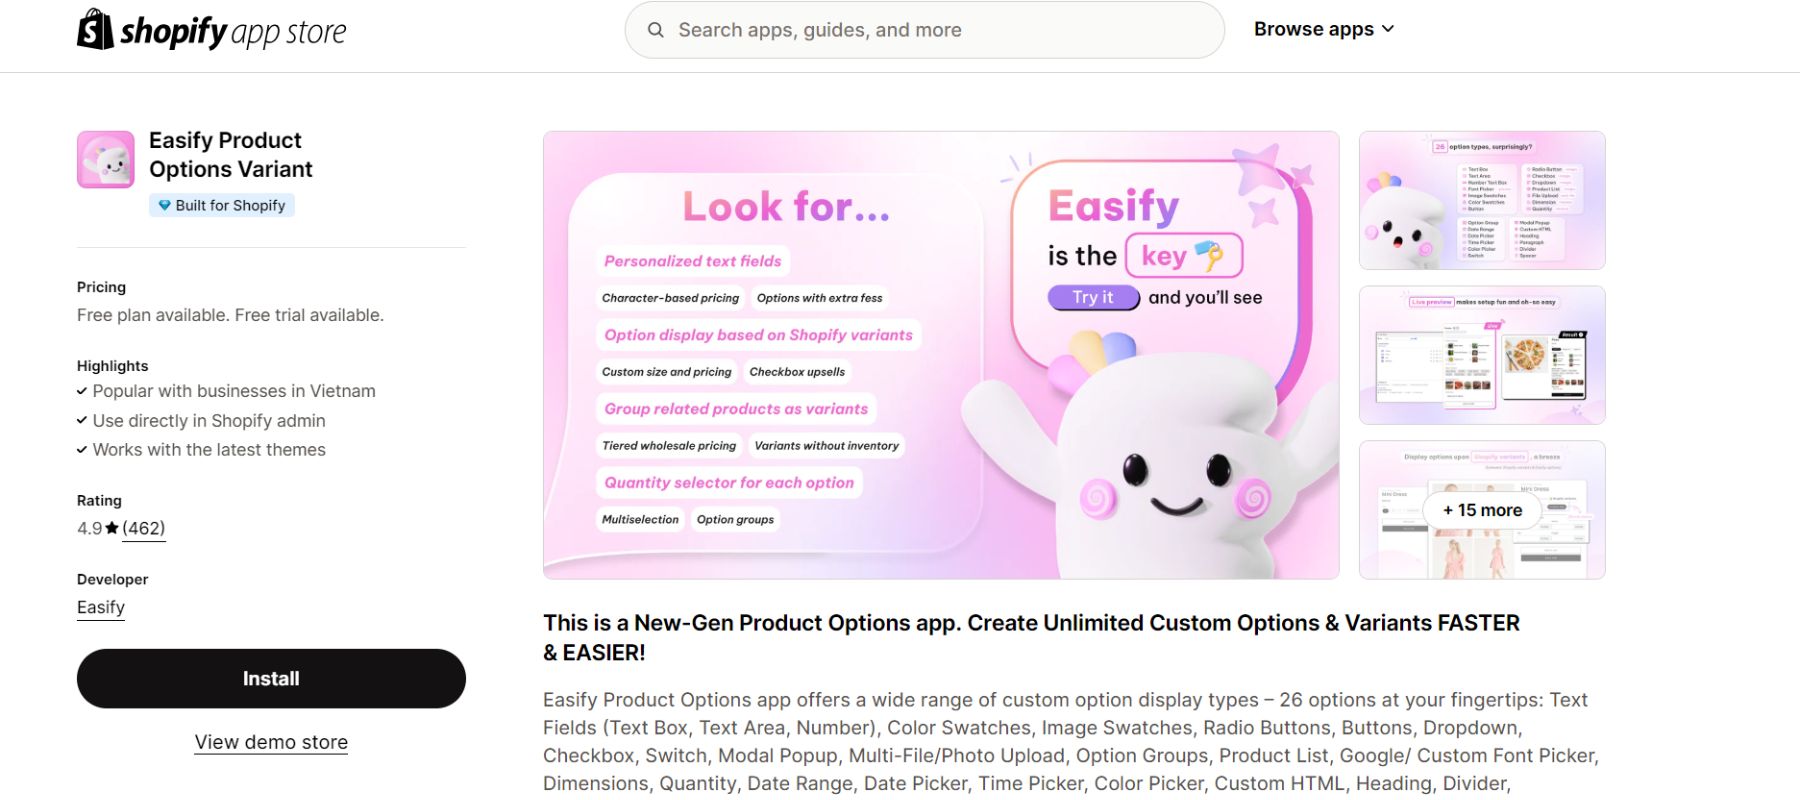
Easify Product Options app on the Shopify App Store.
Key feature:
- Choose from 26 different display types, including text fields, color swatches, image swatches, radio buttons, dropdowns, checkboxes, and more.
- 50 pre-designed templates to get started quickly.
- Easy-to-use interface for non-technical users, with an intuitive interface and in-app live previews.
- Conditional logic to create complex product configurations based on customer selections.
- Apply additional charges based on custom option selections.
- Create product bundles with customizable options.
- A quantity selector will allow customers to select quantities for custom options.
- Calculate prices based on characters, dimensions, or quantity using custom formulas.
Pricing: Free with unlimited option sets or pro plans at $9.99/ month.
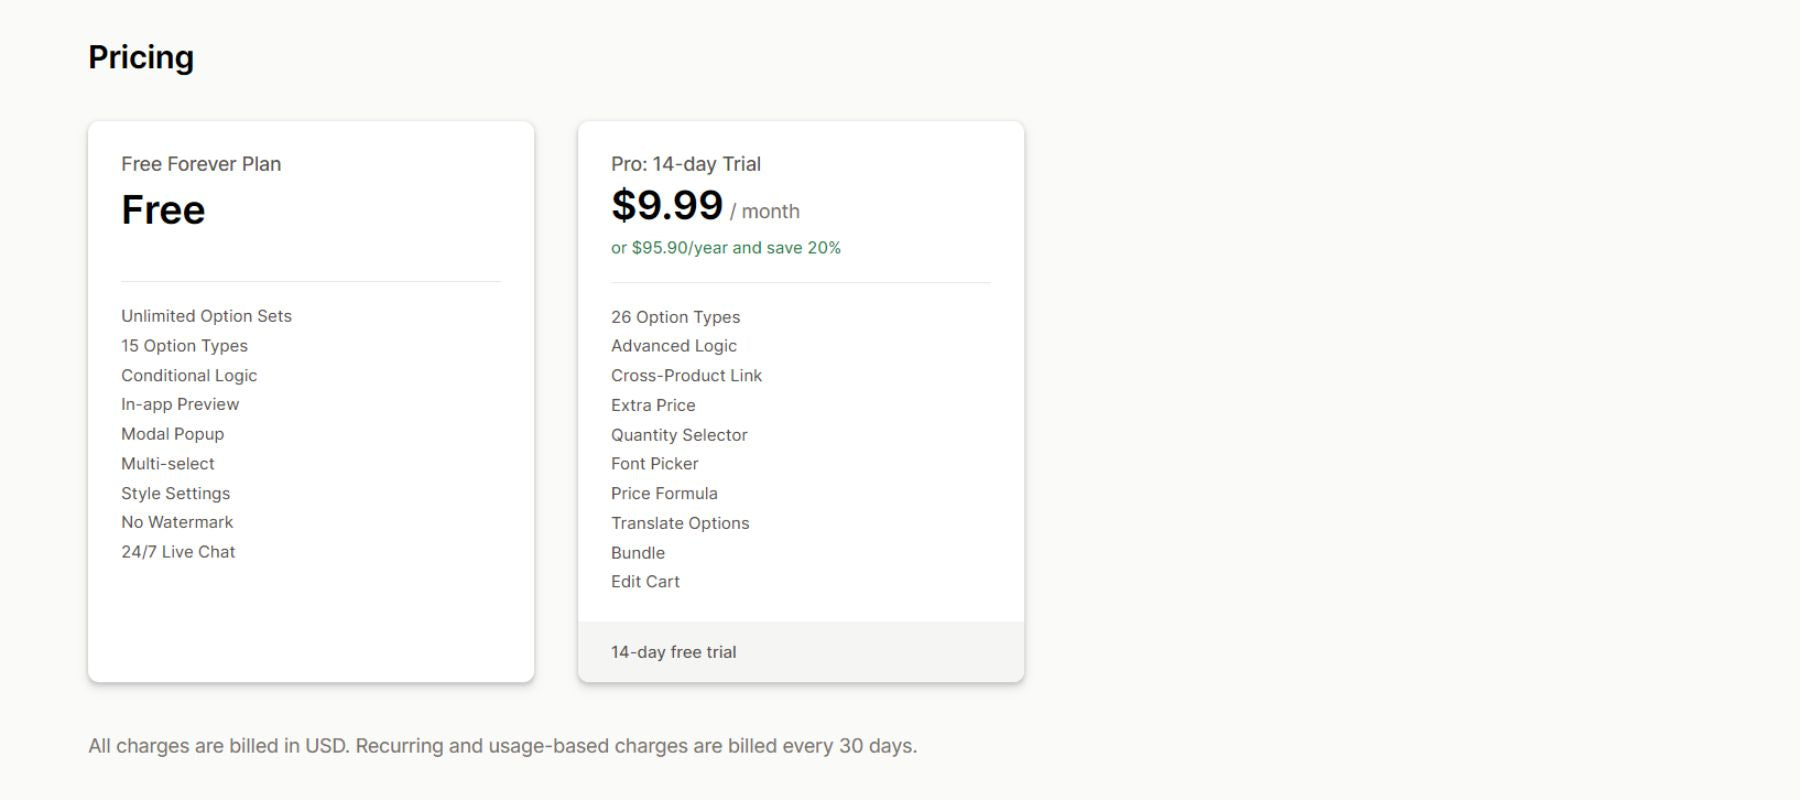
Easify app pricing.
Here is how to use the Easify Product Options app to custom your line item properties:
Step 1: Go to your Shopify store. Then, search for the Easify Product Options Variant app and install it. Or just click our button below to be taken directly to that page.
Step 2: The Easify app will guide you on how to activate it. Follow their instruction.
Step 3: After activating the app, the Easify app will give you two options:
- Line item properties template.
- Create from scratch.

In this example, we will simplify by choosing the available template.
Step 3: Customize your line item properties and see the preview on the right. The special thing is that the Easify app allows you to set line item properties for each product.
Step 4: Finally, save your custom.
This is our Shopify product page with custom line item properties using the Easify app.
#1. Globo Product Options, Variant
The Globo app offers a range of features to help you create and manage a virtually unlimited number of product options in your Shopify store.
Rating in 2024: 4.9 / 5.0 ⭐ (2,946+).

Globo app on the Shopify App Store.
Key feature:
- Diverse display types, including text input fields, file uploads, color swatches, variant images, dropdowns, and checkboxes.
- Create as many product options as you need beyond the standard Shopify limit of 100 variants.
- Apply add-on prices for custom options, allowing you to charge extra for specific customizations.
- Easily import and export product variants using CSV files for efficient management.
- Works with other popular Shopify apps like Smart Product Filter & Search and Globo Color Swatches.
- Multilingual compatibility, including English, French, German, Spanish, Japanese, Dutch, Danish, Finnish, Chinese (Simplified), Chinese (Traditional), Portuguese (Portugal), Italian, Korean, Polish, and Swedish.
Pricing: Free with 10 option sets or a premium plan at $12.90/ month.
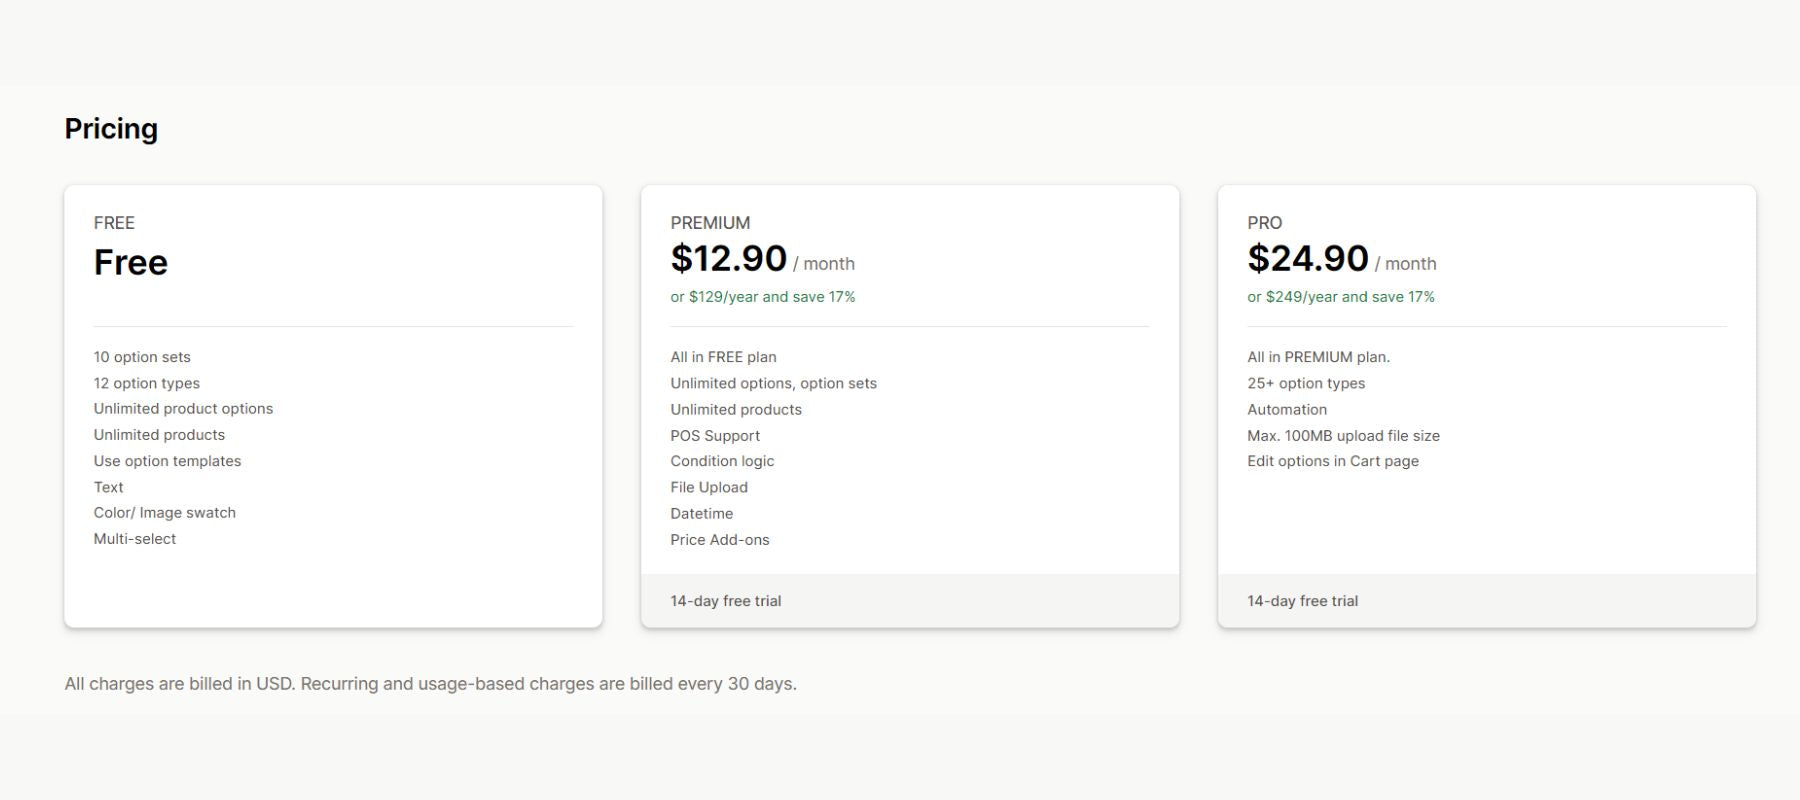
Globo app pricing.
#2. Tepo Custom Product Options
Both the Globo app and Tepo offer similar core functionalities. Still, the Tepo app has a broader focus on customization and integration, while the Globo app emphasizes ease of use and support.
Rating in 2024: 4.9 / 5.0 ⭐ (559+).

Tepo Custom Product Options on the Shopify App Store.
Key feature:
- Create more than 100 variants and 3 product options, offering customers a wider range of customization possibilities.
- Choose from over 25 option types, including text, upload, image swatch, checkbox, and dropdown, to cater to various customization needs.
- Price add-ons for custom options, such as gift wrapping or rush processing.
- Create product bundles with customizable options to encourage larger purchases.
- Works with popular Shopify apps like SEOAnt, qikify Slide Cart Drawer, Loloyal: Loyalty and Referrals, UpPromote, and Growave.
- Multilingual compatibility, including English, French, German, Spanish, Japanese, Dutch, Danish, Finnish, Chinese (Simplified), Chinese (Traditional), Portuguese (Portugal), Italian, Korean, Polish, and Swedish.
Pricing: Free with 20+ option sets or an unlimited plan at $19.99/ month.

How To Add Shopify Line Item Properties In Your Cart Page?
Line item properties on product pages are used to collect customer choices and customize products. In contrast, line item properties in the cart are used to display extra information about the items in the cart.
Line item properties on the cart page are often called Shopify cart attributes. We have a detailed tutorial on how to create Shopify cart attributes, which you can refer to.

Example of Shopify cart attributes.
Tips For Custom Shopify Line Item Properties Bring Conversion
In this part, we will explore essential tips for effectively using custom line item properties to optimize your Shopify store's performance. By following these tips, you can give your customers a more interesting and tailored shopping experience.
Defining Clear & Concise Labels
Clear labels help customers understand the purpose of each field. It reduces confusion and improves the overall checkout experience. Also, when your customers easily understand what information is required, they are more likely to complete their purchase.
Here are our tips for writing effective labels:
- Be specific by using precise language that clearly conveys the purpose of the field.
- Avoid jargon by using simple, everyday language that your customers can easily understand.
- Keep it short and easy to read.
For example, instead of: "Additional Information", you should use: "Gift Message" or "Special Instructions."
Choosing Appropriate Data Types
Customers will put the right information if they choose the right data type. It prevents errors and inconsistencies. Also, using the right data types can make it easier to store and get info, which speeds things up.
Here are some common data types and examples:
- Text for short or long text inputs, such as names, addresses, or comments.
- Number for numerical values, such as quantities, prices, or dimensions.
- Date for selecting dates, such as birthdates or delivery dates.
- Time for selecting specific times, such as appointment times or delivery times.
- Dropdown for predetermined sizes, colors, and materials.
- Checkbox for allowing multiple selections, such as additional features or services.
- Radio buttons pick one delivery or payment option from a list.
- File upload allows customers to upload files, such as images or documents.
For example, Allbirds has effectively used data types for line item properties in their Shopify store, providing a seamless and informative product selection experience.

Allbirds product page.
They use the Size with dropdown menu. This allows customers to select their desired shoe size from a predefined list easily. At the same time, the Color uses color swatches. It shows the different color choices in a way that makes it easy for customers to pick the color they want.
Combining Line Item Properties And Detailed Product Information
If your Shopify store sells personalized items or monthly services, like Death Wish Coffee, custom line item features can be very important for making the customer experience better and increasing sales.
You can create new metafields in Shopify. These versatile tools allow you to store specific data that isn't typically recorded by Shopify, enabling you to tailor your store's appearance and functionality.
As seen in Death Wish Coffee's example, metafields can be used to display additional product attributes, such as grind size or flavor profile. Customers get useful information from this, which helps them make smart choices.

Death Wish Coffee product page.
Consider Alternative Strategies
Suppose you sell unique products like handmade custom items that allow customers to customize themselves, or you sell t-shirts that allow customers to customize their prints; as in our example, there may be more effective approaches than traditional line item properties.
So, we recommend these alternative strategies to streamline the customization process and improve customer satisfaction:
- Add live chat to your Shopify store so customers can chat directly with their requests. This helps you reduce errors and improve the customer experience.
- Put a "Contact Us" button on your product page if you want them to get in touch with you to talk about their needs more before they place an order.
- Enable the option only to allow customers to have accounts to purchase to make it easier to collect their contact information.
By using these tips, you can handle requests for customizations better, make customers happier, and improve the sales process as a whole.
The Bottom Line
You can make your Shopify store work better and give customers a better experience by changing line item properties in the right way. You can make customers happier, get more sales, and learn more about your target group by giving them personalized choices and collecting useful customer data.
For more in-depth information and expert advice on Shopify customization, visit our blog to explore additional resources and articles.






0 comments