


How to Reset Shopify Store: A Comprehensive Tutorial
Table Of Contents
Embarking on a fresh start with your online business can be a game-changer, and our comprehensive tutorial, "How to Reset Shopify Store," guides you through the process. Whether you're wanting to rebrand or are struggling with bloated data or obsolete themes, a fresh start may give your e-commerce enterprise new vitality.
This tutorial offers a thorough rundown of the reset procedure, including how to update your store's layout and configurations and remove your product catalog and customer data. We'll also outline the necessary steps and tools required for a successful reset, ensuring you have all the information needed to restart your Shopify store effectively. Whether you're facing ongoing issues or want a clean slate, this tutorial will help you optimize your store's performance and align it with your business goals.
Preparation Before Resetting Your Shopify Store

Review Shopify Policies
When resetting your Shopify store, it's essential to review Shopify's specific policies and guidelines related to data management and store operations. Shopify's policies are designed to protect both store owners and customers, and understanding them can help you navigate the reset process smoothly. Here are some key policies to consider:
- Data Deletion and Retention: Shopify's policy includes data retention and deletion provisions. While you can manually delete products, customers, and orders, Shopify may still retain some data in compliance with legal and regulatory requirements. This includes transaction records and customer data, which are necessary for tax and compliance purposes.
- Closing and Reopening Stores: Shopify allows store owners to close their stores if they wish to start anew. However, certain aspects, such as transactional data and customizations, may not be recoverable once a store is closed. If you plan to reopen, you may need to set up these elements from scratch or work with Shopify's support team to restore essential data.
- Subscription and Billing: Shopify's billing policies state that subscriptions and app charges will continue unless explicitly canceled. To avoid incurring additional charges, it's important to cancel any unnecessary apps or services before closing or resetting your store.
- Domain Management: If your store uses a custom domain purchased through Shopify, policies around domain management will apply. You may need to transfer or reassign the domain to a new store or manage DNS settings to ensure continuity in online presence.
Plan Your New Store Setup
Once you're familiar with Shopify's policies, it's crucial to meticulously plan the setup of your new store. This planning phase involves outlining a comprehensive strategy and utilizing the right tools and resources to set your store up for success.
Outline Your New Store Strategy:
Establish your objectives for the new store first. Consider what aspects of your previous store setup worked well and what needs improvement. Identify your target audience, refine your product offerings, and plan a branding strategy that reflects your business identity.
Additionally, consider your marketing strategy, including SEO tactics, social media integration, and email marketing plans to attract and retain customers.
Tools and Resources for Planning:
Use Shopify's extensive range of tools and resources to aid your planning. Look through Shopify's theme collection to select a layout that complements your brand while offering a positive user experience. Leverage Shopify's SEO features to optimize your product listings and pages for search engines.
Inventory management tools within Shopify can help you streamline your product listings and track stock levels efficiently. Consider using apps for analytics and customer engagement. This might help you customize your offers and give insightful information on the behavior of your customers.
Furthermore, Shopify's community forums, help center, and tutorials are excellent resources for guidance and support during the setup process. You can keep up with the latest e-commerce trends and best practices by using these tools.
Step-by-Step Guide to Resetting Your Shopify Store
Step 1: Backup your data

Make sure you have backed up your data before restarting your Shopify store. This is crucial if you have to start again, reorganize your merchandise, or make significant adjustments. The following instructions will help you backup your data before you reset your Shopify store:
- Log in to access your Shopify admin panel.
- To export your product data, choose "Export" from the dropdown menu located in the "Products" section.
- For easy exporting, select the CSV file type.
- Choose one or more suitable categories based on the backups you need.
- Use the "Online Store"> "Themes" area to export any customized themes or settings manually.
- Examine your settings and applications to find any unique information.
- After exporting, carefully inspect the exported files to ensure the necessary data is there.
- Ensure your data is safely backed up before starting the shop reset, which will erase all your orders, customers, and goods.
You may store your Shopify shop data offline on your PC by exporting it as a CSV file. Nevertheless, Shopify lets you export information that it deems significant, like:
- Customer information
- Financial data
- Products
- Orders
- Gift card
- Discount codes
Consequently, by following these procedures to create a backup of your data before resetting your Shopify store, you'll have a safety net in place in case something unforeseen occurs. When necessary, this solution allows for quick shop restoration and guarantees company continuity.
Step 2: Remove products and collections

Resetting a Shopify store is essential for various reasons, like rebranding, starting fresh with a new product line, or resolving issues. The following is an extensive tutorial that explains how to reset a Shopify store by removing products and collections:
- Access your Shopify admin dashboard.
- To see the list of products in your store, select "Products" using the left menu option.
- Use the search or filter tools to select the items you want from the list and find products quickly.
- Use the bulk action feature by selecting each product or all, then choosing "Delete selected" to remove many products.
- Verify the deletion of selected products by confirming the action taken by Shopify.
- From the menu on the left, select "Collections" to view and control your product collections.
- In a similar vein, you can pick the collections you wish to delete, either individually or using the bulk action function.
- When requested, confirm that collections have been removed; otherwise, the goods inside the collection will remain unaltered, not the actual objects.
- Verify one more thing: no collections or goods remain in your shop.
- To reflect changes, update the navigation menus, add new sections about expired product kinds, and fix any broken links.
- If any stocks are connected to the goods that were withdrawn, update your inventory data.
- Save your changes to ensure the adjustments take effect when you have finished the removal procedure.
- Check your shop as a consumer to ensure the reset state is reflected without the deleted collections and goods.
Remember to proceed with extreme caution before making such modifications. If you have any questions about the procedure, you should consider speaking with Shopify support or reviewing the pertinent documentation.
Step 3: Delete pages and blog posts
Whether you're rebranding, starting over, or cleaning up your online store, removing pointless pages and blog posts will make your Shopify store function more efficiently and provide your consumers with a more uniform and organized experience.
How are pages deleted?
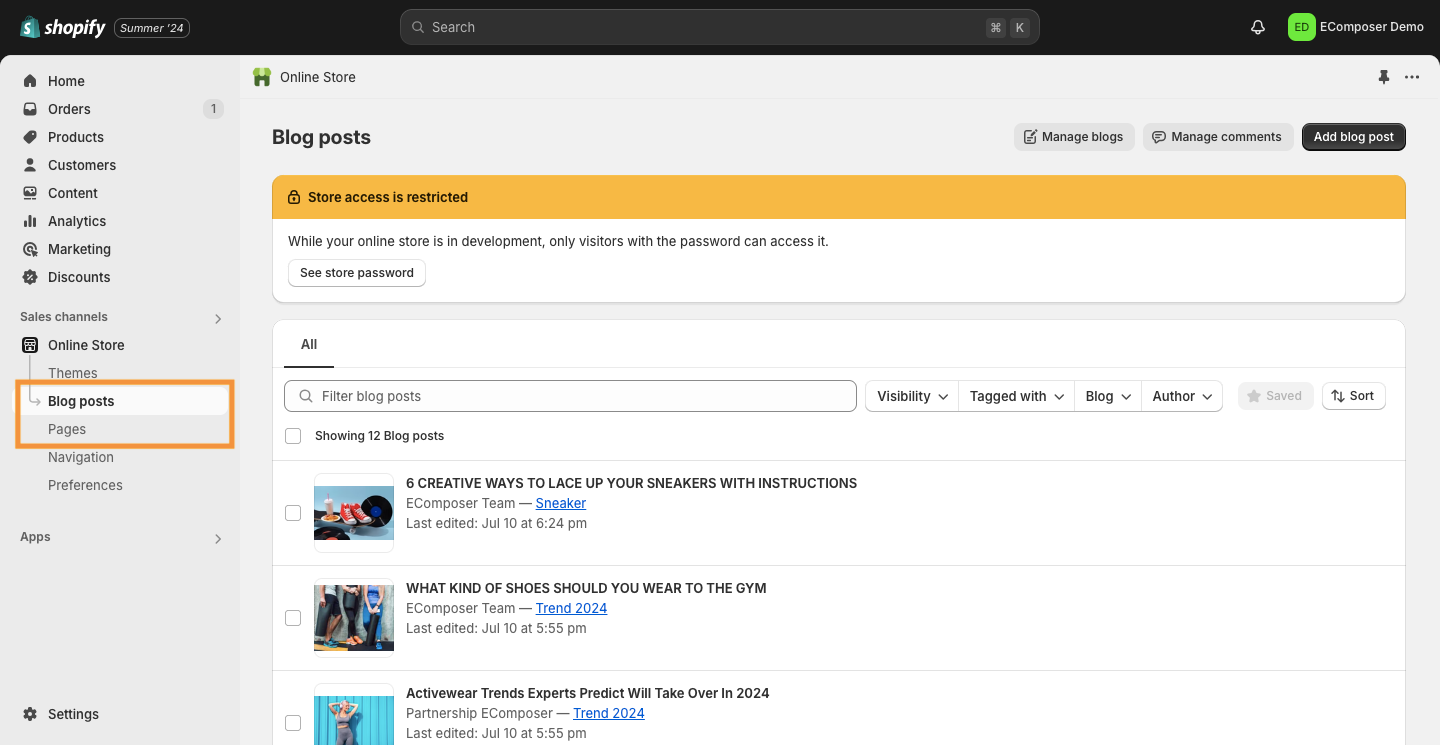
- Open your web browser, navigate to the Shopify login page, and input the details for your Shopify admin dashboard.
- Go to the "Online Store" option on the left.
- To see every page in your Shopify store, click "Pages."
- Look to find the page in the list that you wish to delete.
- To remove a page, click its title, scroll to the bottom, locate the "Delete page" button, and click "Delete" when prompted.
- Retake the same actions for every page you wish to remove.
That's the efficient way to remove pages from Shopify.
How are blog postings deleted?
- Next, choose "Online Store" from the Shopify admin panel, followed by "Blog Posts".
- Find the post that you want to be taken off the list.
- Click the blog post title, then scroll to the bottom to locate the "Delete" button. Click the button to confirm the deletion.
- Follow these instructions for each blog post you wish to remove if you have several.
Redirecting heavily trafficked sites should be done, critical content backups have to be given top priority, and post-deletion checks of navigation menu items ought to be carried out. This guarantees simple surfing and safeguards against data loss.
Step 4: Remove themes and settings

Resetting a Shopify store requires removing themes and settings to restore the platform to its initial configuration. This step is crucial if you want to restart, undo modifications, or fix issues that could be related to themes and settings.
How are themes removed?
- Open the Shopify Admin dashboard and log in to your Shopify store.
- Select the "Online Store" option from the menu on the left.
- To examine the installed themes on your store, select the "Themes" option under the "Online Store" section.
- Go to the active theme and choose "Actions" adjacent to it to turn it off for now.
- Once a theme has been deactivated, click the "Actions" button and choose "Remove" to remove it from your shop.
- Once all bespoke themes have been eliminated, perform the same procedure for every installed theme.
How are settings removed?
- Return to the main Shopify Admin dashboard.
- To see the general shop settings, select "Settings" from the menu on the left.
- Examine the "Settings" section and restore customized setups to their original defaults in each area by using the "Restore Defaults" and "Reset" options.
- For unique configurations, check the settings of third-party applications since some may retain files even after being removed from the store.
- Ensure that all of your store's policies—including shipping, refunds, and privacy—are current and meet your company's needs.
- To apply the default settings to your store, don't remember to save them.
Before beginning any resets, ensure you have a backup of any crucial data, like orders, clientele, and product specifications, to prevent data loss. Additionally, if your business is operational, inform your clients about the impending modifications, any probable outages, and any effects on their experience throughout the reset procedure.
Step 5: Reset other settings

This is a summary of the reasons behind and methods for resetting specific Shopify shop settings:
Shipping settings
If you decide to modify your delivery strategy or suppliers, you may need to reset the shipping settings to reflect your new logistics accurately.
You can adjust the shipment preferences in this way. Navigate to your admin's "Settings" menu, choose "Shipping", and change your shipping zones, costs, and techniques as necessary.
Payment settings
Resetting payment settings guarantees that your clients' transactions go through without a hitch, whether you're updating your pricing structures or payment gateways.
How do you reset? Observe this guidance. Make the necessary changes to your payment providers, currencies, and other payment-related settings by going to "Settings", selecting "Payments", and so on.
Tax settings
If your company's structure or tax rules change, you may need to modify your tax settings for them to remain valid. That means you have to do something. Choose "Taxes" from the "Settings" menu, then adjust the tax parameters, such as the tax rates and exemptions.
Integrations and apps
Resetting an app's settings ensures excellent compatibility, whether you're switching between them or considering new features.
To reset the settings of apps and integrations, go to your admin's "Apps" area, choose the particular app, and search for a reset or reconfigure option.
Stores policies
Changes in business operations or legal requirements may necessitate modifying store rules. Thus, the following is how they may be reset. Select "Legal" under "Settings", then update your store's terms of service, privacy, and refund policies.
Step 6: Review apps

Here is a thorough how-to guide for putting it into practice:
- Conduct an audit of your existing applications to determine which ones are useful or unnecessary by assessing their performance, relevancy, and effect on the objectives of your store.
- High-priority tasks include order fulfillment, customer support, and inventory control to create a more productive shop. App selection can also be streamlined.
- As you ensure that the app is compatible with the latest Shopify upgrades, assess its performance, reliability, and user experience.
- Apps that simplify checkout, speed up page loads, and enhance navigation should be prioritized when evaluating each app's contribution to the user experience.
- Consider the benefits, costs, and app's return on investment.
- Get rid of or swap out apps that aren't worth the money and look into more affordable options.
- Observe the most recent advancements in e-commerce and check out new applications that complement your business objectives.
- Engage in dialogue with consumers to learn about their concerns, emphasize their ideas, and provide guidance when choosing or replacing apps to enhance the user experience.
That being said, you may reset your shop for success by carrying out a thorough analysis, giving features a higher priority, and keeping up with the most recent changes made to the app store.
Step 7: Contact Shopify support

One crucial step that can call for help from Shopify's support staff is resetting a shop. The following procedures will help you get in touch with Shopify Help Center if you are unable to reset your Shopify store on your own:
- Enter the login credentials you used to access your store's admin panel on the Shopify login page.
- Usually found in the upper-right part of the screen, the Help Center area may be found in the Shopify admin.
- To find information about resetting a Shopify store, use the search box in the Help Center.
- Peruse pertinent articles and thorough documentation for guidance on resetting a Shopify store.
- If you cannot locate the necessary information, look for the "Contact Support" button in the Help Center or admin panel to contact Shopify's support staff.
- Shopify offers a variety of support channels, including phone, email, and live chat, to help you personalize your experience and get the help you need quickly.
- When calling support, give clear and precise details so the team can comprehend your problem and provide the necessary assistance.
- Select live chat or phone support for Shopify assistance, explain your problem, and adhere to the guidelines.
- Observe the guidance provided by the Shopify support staff and seek clarification if needed.
- Verify the shop reset as advised by Shopify support, but remember to back up your data before doing so, as it may result in data loss.
- Following the reset, adjust your shop to meet your specific requirements according to further guidelines or recommendations the support team may offer.
Restoring Your Store After Reset
How to re-import products and customer information.

To restore your backup Shopify store data, navigate to the ‘Settings’ tab on your Shopify dashboard. From there, go to “Account” and select “Data Exports”. This section provides options to either “Import products” or “Import customers”, depending on the type of data you wish to restore. Click on the appropriate option and upload the most recent backup file from your storage location.
Be cautious during this process, as uploading a backup file can overwrite your store's current data. Therefore, it's crucial to ensure that you are using the correct and most up-to-date backup file to avoid losing any recent changes or important information. Double-check the file details and consider creating an additional backup of your current store data before proceeding with the import, just to be safe. This step will help safeguard your information and ensure a smooth restoration process.
Reinstalling and configuring apps.

Third-party programs need to be reinstalled and configured if you wish to enhance your shop's features and functionality. Begin by visiting the Shopify App Store and searching for and reinstalling previously used apps.
Once installed, reconfigure each app to align with your store's new setup. Configuring integrations, modifying app settings, and making sure the app works with your new store setup are all possible steps in this process. For instance, reconfigure your email marketing tools, inventory management systems, and analytics apps to ensure they are tailored to your updated store environment.
Customizing the theme again.
Your store's theme is crucial in its visual appeal and user experience. Access the Shopify theme editor from your admin panel. To restore and enhance your store's aesthetic. Customize your theme to reflect your new branding, including updating color schemes, fonts, and layout elements. Reapply previous customizations, such as logo placement and homepage banners, to ensure consistency with your brand identity.
Make sure your theme offers your consumers a smooth, enjoyable shopping experience by giving it a thorough test run. This testing phase helps you catch design issues and ensures your store looks professional and functions flawlessly.
Suggestion: Customize Shopify theme using EComposer Landing Page Builder.
Why choose EComposer Landing Page Builder for Shopify's default editor?
The reason lies in its advanced customization capabilities. While Shopify's editor offers basic features, EComposer gives you more control with a live drag-and-drop interface.

With an impressive 5.0/5.0 rating from 3,984 reviews, EComposer is trusted by users for its exceptional quality and customer satisfaction.
EComposer provides a rich library of professional templates and elements, enabling you to create stunning landing, product, and blog pages. Features like Ajax Cart and AI Content Generator streamline the design process and enhance the user experience. Plus, with 24/7 live chat support and optimization tools, your store will run smoothly and efficiently.
FAQs
Can I undo a reset?
No, Shopify does not offer an option to undo a store reset. Once you initiate a reset and delete your store's data, it's a permanent action. It's crucial to back up all essential data, including products, customer information, and order history, before proceeding with a reset to prevent irreversible data loss.
How long does the process take?
The duration of resetting a Shopify store varies depending on the extent of the changes and the amount of data involved. The reset process can take a few hours to a few days. Factors such as the complexity of your store's setup, the need for data backup, and the time required for re-importing products and customer information will influence the total time needed.
Will resetting my Shopify store affect my SEO rankings?
Yes, resetting your Shopify store can impact your SEO rankings, particularly if you change your URL structure or domain. This might result in broken links and a drop in search engine visibility. To mitigate SEO risks, ensure you set up proper redirects, update your sitemap, and communicate changes to search engines. Maintaining consistency in your store's URL structure and implementing SEO best practices can help preserve your rankings.
How often should I reset my Shopify store?
Resetting your Shopify store should be done sparingly and only when necessary. Frequent resets can disrupt your store's operations and negatively affect customer experience. Typically, a reset is recommended when significant changes are needed, such as a complete rebranding, resolving persistent issues, or starting fresh after a substantial overhaul. Regular maintenance and updates are preferable to frequent resets.
Will resetting my Shopify store delete my sales data?
Yes, resetting your Shopify store can result in losing sales data if it's not backed up beforehand. While Shopify retains certain transaction records for compliance, custom reports and historical data may need to be recovered. It's crucial to export and save your sales data before initiating a reset to ensure you have access to all necessary records for future reference.
What happens to my store's custom code when I reset it?
Resetting your Shopify store will typically remove any custom code you have implemented. This includes custom scripts, theme modifications, and third-party integrations. If you rely on custom code, document it and back it up before resetting your store. After the reset, you must reapply your customizations to restore your store's previous functionality and appearance.
Read more:
- How to Login to Your Shopify Store
- How To Cancel Shopify Subscription?
- How to Cancel Shopify Free Trial
- How to Unpause Your Shopify Store In A Few Steps
- What happens if you deactivate or close store?
Conclusion
One effective technique to refocus your e-commerce strategy and revitalize your online presence is to reset your Shopify store. The essential actions to guarantee a seamless transfer and successful store relaunch are delineated here, ranging from backing up data to reimporting information and personalizing your theme.
To keep your store running efficiently, regularly update inventory, optimize design, and adhere to SEO best practices. If you face challenges or need specialized assistance, don't hesitate to consult Shopify experts for professional support, ensuring your reset is executed flawlessly, and your store thrives.
Build your highest-converting page in 15 minutes


Blog Categories


0 comments