How To Add New Page To Shopify Website

Table Of Contents
In Shopify there are certain pages that every store needs like Home Page, Product Page, Contact Us, About Us and so on. Each page represents each milestone in your sales journey. However, this is by no means complete enough for you. For each store will have its own sales journey and along that journey sometimes need special pages that Shopify does not have. Then you have to find ways to design the page yourself, which costs you a lot of time, money and effort.
Understanding that, in this blog, we will show you How to add pages to your Shopify website quickly and economically. Before going into the details, make sure you have built an eCommerce store on Shopify!
What are Shopify Pages?
Shopify page is a component in your website that displays the contents of your Shopify store. Beside the main pages available in Shopify like Home page, Product page, Collection, Blog, etc, Shopify allows merchants create custom pages that are suited to their needs. Each Shopify Page will have a corresponding link so users will have 2 options if they want to access Shopify Page: Visit the website to get to the pages or directly access the page with the URL.
In Shopify, many free themes allow businesses to create their own unique pages like Dawn; Refresh; Sense; Craft; Ride; and so on. But if you want to use themes/templates with more flexibility, you can use page builder apps like EComposer to create any page/section in Shopify.
Read more: +15 Best Shopify Page Builder Apps!
How to add any pages on Shopify
Step 1: Set up your Shopify store
- If you don't already own a Shopify store, you need to sign up for Shopify and build a basic Shopify store.
Step 2: Add a page to your Shopify website
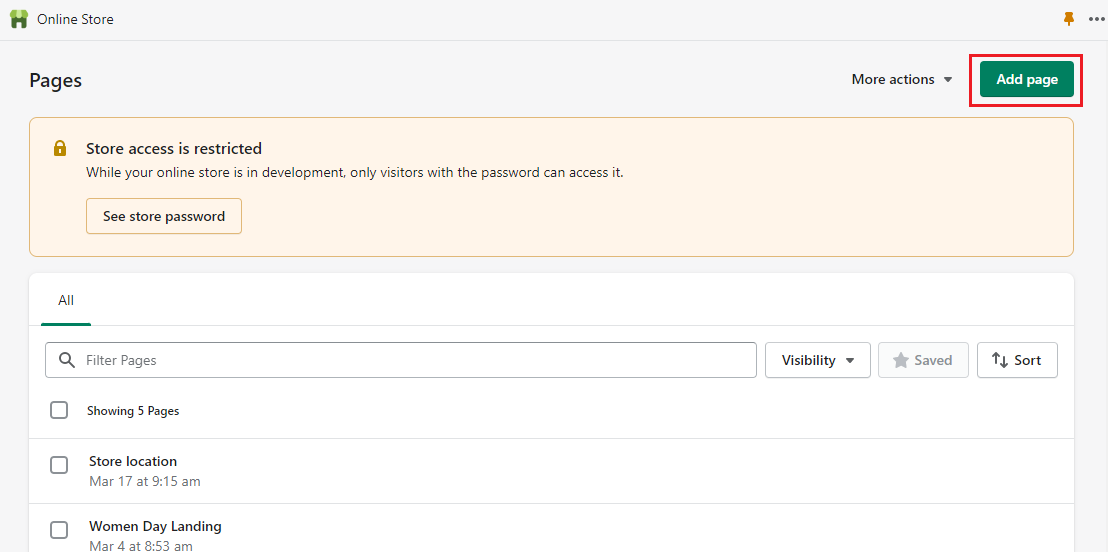
- In the Shopify dashboard, go to the Online Store to expand the options and select Page

- In the right corner of the page shows the Add Page button. Click on it to move to the page creation screen
Step 3: Set up your new page
At this step, you need to know for sure what page you want to create. This means that you must have a design idea and intended use for the new page.
We can give you some suggestions like Coming Soon Page, Contact Us, Up sell page, Landing Page, etc…
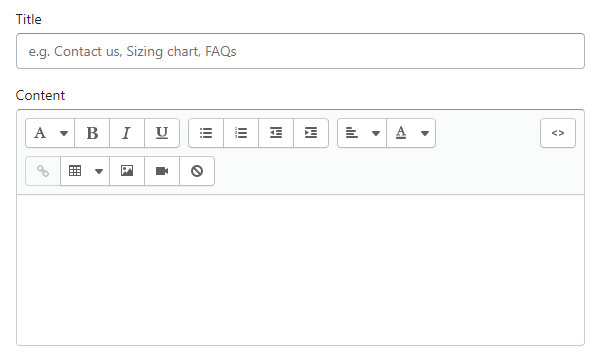
Ok, now fill in the title and content boxes that show your intentions
Then you need to edit the SEO listing by clicking Edit website SEO in the Search engine listing
Edit the title, meta description, and URL handle with SEO best practices.

Step 4: Save and Publish
After completing the page, select Visible and click Save to publish the page
[ecom-global-block]ecom-shopify-trial-block[/ecom-global-block]
How to add product pages on Shopify
Shopify Product Page is a product display page with detailed information to provide customers with the unique features and competitive advantages of the company's products.
Shopify product pages bring businesses a lot of benefits such as increasing conversion rates, optimizing search results, improving brand reputation, and so on. Therefore, it is considered as one of Shopify's most important pages
You have two ways to build a Shopify product page:
- Use Shopify default
- Use third-party apps
Follow the steps in the blog How to Create a High-Converting Shopify Product Page to build beautiful product pages for your Shopify store
How to delete a page on Shopify
Step 1: Click on Online Store and choose Pages
Step 2: Click on the Page Title that you want to delete
Step 3: Click Action and select Delete page

Create and customize any page with EComposer
It is true that Shopify has a lot of limitations in terms of customization because this ensures uncompromising performance and simplifies the store-building process. Simply put, you can customize the page with Shopify default with good conversion performance, but the page design will be monotonous.
Using Shopify third-party app - EComposer is the simplest way to solve this problem. EComposer helps you create any kind of page you need: Home page; Landing page; Product page; Collection page; Blog page; Standard page (Contact Us; About Us; FAQs; Policy; etc..).
Check out the steps below to learn how to create and customize any page with EComposer!
Step 1: Install EComposer
- Login to your Shopify account
- Type EComposer - Landing Page Builder into Shopify app store's search bar

- Select Add app and proceed to install EComposer to your store

Step 2: Open EComposer
- In your Shopify admin, go to Apps, and click on EComposer Landing Page Builder

- Choose Start Building and click Standard Page

Step 3: Create any page in EComposer
After going to the edit page, the app will direct you to a new page with many page templates. Choose Blank template

Fill in the blank to name the page, and then click Start Building.

Step 4: Customize any page in EComposer
Now start customizing the page to your liking
EComposer offers you more than 200 section layouts. Refer to the blog How to add sections on your Shopify pages

You can also find extensions such as Cross sell; Back in Stock; Custom Color Swatches; Table of Content; Frequently Bought Together and so on to help you design beautiful pages in EComposer.

Using EComposer's live drag and drop, you can easily drag elements and drop them where you want them.

Step 5: Save and publish
Once you've finished your customizations, you need to save your edits. EComposer gives you different options to save
- If you want to publish your page, select Publish, customize and select Save and publish

- If you don't want to make your page public yet, click on the little arrow next to the Publish button and choose Save as draft.

Summing up
You have two options to add pages to your Shopify website: Use Shopify default or use EComposer. With Shopify default, you are limited by your chosen theme and editor capabilities. With EComposer, you can not only be creative but also have a lot of supporting elements, extensions, and sections. In particular, you will never have to worry about code when using EComposer.
In summary, for an objective view, we recommend you use both ways and make the choice that works best for you.
If you want more information or want to learn more about EComposer, follow us at ecomposer.io or click on the message icon located in the right corner of the screen.
=================
Add EComposer Next generation page builder Here
Follow Us on Facebook
Join Official Community







0 comments