


Shopify Testimonials Section: How to add & Optimize for high conversion
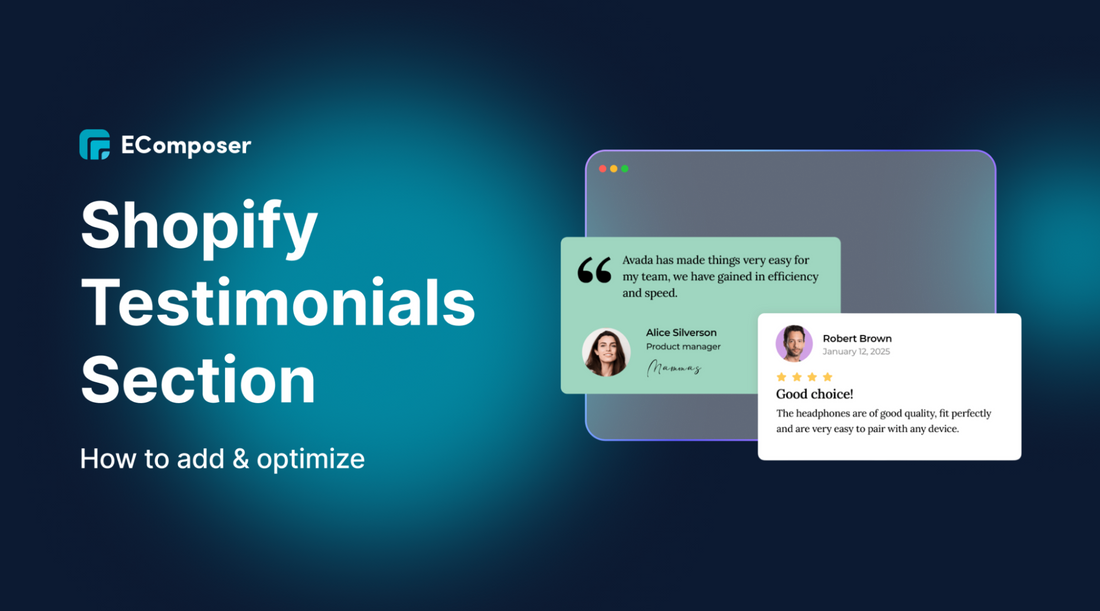
Table Of Contents
To add and optimize a Shopify testimonials section for high conversion, combine strategic placement, appealing design, and authentic content. Use apps, the Theme Customizer, or custom code to showcase diverse, credible reviews where they matter most, like product, homepage, and checkout pages. By making testimonials visually engaging, mobile-friendly, and regularly updated, you build trust, enhance SEO, and motivate customers to complete their purchase.
Have you ever noticed that you become immediately more sure about a product when you read a positive customer review about it? It is the power of testimonials; they are digital forms of word-of-mouth, and on Shopify, they are weapons that can turn casual browsers into loyal customers.
To truly boost conversions, your testimonials need to be strategically placed, beautifully designed, and optimized for maximum impact. In this blog, we’ll walk you through everything you need to know about the Shopify testimonial section — from adding them to your store (apps, custom code, theme tricks) to turning them into high-converting trust magnets. Let’s dive in and turn your happy customers into your most powerful salespeople.
What is Shopify Testimonial?

A Shopify testimonial is a customer’s personal endorsement on your store, sharing their positive experience with your product or service. Unlike simple star ratings, testimonials tell stories, show emotions, and highlight real benefits—helping build trust and credibility with new shoppers.
On Shopify, testimonials can take various forms, such as:
- Written reviews with customer names and photos.
- Video testimonials that showcase real people using your product
- Star ratings paired with personal feedback
- Quote blocks are displayed on homepage banners, product pages, or even checkout areas.
Shopify makes it relatively easy to showcase these testimonials, whether you prefer using apps, customizing your theme, or diving into a bit of Liquid code magic.
Why Your Shopify Store NEEDS a Testimonial Section?
Testimonials build trust by showing real customer experiences, easing purchase fears, and boosting conversions (up to 34%). They also improve SEO with keyword-rich content and work best when placed on homepages, product pages, and checkout areas.
Social Proof & Trust Signals: Building Credibility with Real Voices
Customers trust other customers more than marketing. In fact, 98% read reviews and 79% trust them as much as personal recommendations. Testimonials act as trust signals, easing doubts—especially for first-time visitors—and proving your store delivers on its promises.
Boosting Conversion Rates (CRO) & SEO Performance
A well-placed testimonial can directly influence a visitor’s buying decision. Spiegel Research Center claims that including social proof on product sites can boost conversion rates by as much as 34%.
Beyond conversions, testimonials also improve your SEO. User-generated content (like reviews and testimonials) is fresh, keyword-rich, and trusted by search engines. They can enhance your site's content depth and improve organic rankings, especially for product-specific searches.
High-Converting Testimonial Placements: Where They Work Best
The testimonial placements are not equal. That is where the top-performing Shopify stores place them strategically:
- Homepage: First impressions matter. Placing a few “hero” testimonials near the top can immediately establish trust.
- Product Pages: Show testimonials that speak directly about the product benefits, placed near “Add to Cart” buttons to reduce hesitation.
- Cart & Checkout Pages: Reinforce the customer’s buying decision with testimonials that confirm quality and reliability right before purchase.
How to add a Testimonial Section to your Shopify Store
There are three primary ways in which you can add a testimonial section to the Shopify store: using a third-party app, the built-in Theme Customizer, or custom Liquid code. Apps like EComposer offer drag-and-drop design, templates, and automation, while the Theme Customizer provides a quick, app-free setup using your theme’s prebuilt sections. For full creative control, Liquid code lets you build a completely custom testimonial layout with tailored HTML, CSS, and functionality.
Method 1: Add Testimonials using a Shopify App (Free & Paid Apps Comparison)
When wanting to implement a professional testimonial section of your Shopify store, the easiest and most flexible option is to use a third-party app. These apps eliminate the need for manual coding and give you access to advanced features like sliders, carousels, photo/video testimonials, and automation for review collection.
One of the top-rated solutions is EComposer - a powerful drag-and-drop page builder that’s tailor-made for Shopify users.
EComposer can turn any awesome piece of testimonial blocks or even a whole testimonial page now, without even a line of code. And now EComposer cheatsheet:
Step 1: Install & Open EComposer

Open the app on Shopify App Store and click on Install, and follow the setup steps.
Step 2: Create & Customize Your Shopify Testimonial Page
- In the EComposer dashboard, click “Start Building” on the left panel.

- In the Quick Start section, select “Blank Template”.

- Name your template (e.g., "Customer Reviews") and click “Start Building”.
Now you have two powerful options to build your Testimonial Page:
Option A: Build from Scratch

In this option, you can choose to build on a free-form layout or a structured layout.
Navigate to Element > the “Testimonial” element under the Basic category.

Drag it into your canvas and customize it in the right tab:
- Edit customer names, quotes, and photos
- Style fonts, backgrounds, spacing, and alignment
- Add animations or auto-sliding effects for a dynamic layout

Option B: Use a Premade Testimonial Template (Element Preset)

- Click the Testimonial element and choose a preset
- Explore dozens of layout styles: sliders, carousels, grids, and more.
Step 3: Save & Publish

Once you’re happy with your design:
- Press the button Publish on the right side of the top.
- Choose “Save and Publish” to make the page live on your store.
Just like that, your testimonial section (or full page!) is live — beautifully styled and fully mobile-responsive. Besides EComposer, many powerful apps in the Shopify App Store can help you create a Testimonial section. Here’s a quick comparison to help you decide:
|
App Name |
Free Plan |
Best For |
Key Features |
Pricing (Paid Plans) |
|
EComposer |
✅ Yes |
Full-page design, custom sections |
Drag-and-drop builder, testimonial elements & templates, SEO tools |
From $19/month |
|
Loox |
✅ Yes |
Photo reviews |
Beautiful photo widgets, UGC galleries, review request automation |
From $9.99/month |
|
Judge.me |
✅ Yes |
Quick review collection |
Email requests, product reviews, Q&A, SEO snippets |
From $15/month |
|
Stamped.io |
✅ Yes |
Scaling businesses |
Review automation, loyalty integration, NPS, and social proof tools |
From $23/month |
|
Ali Reviews |
✅ Yes |
Dropshippers |
Import reviews from AliExpress, review popups, and widgets |
From $9.90/month |
|
Yotpo |
✅ Limited |
Enterprises & DTC brands |
Photo/video reviews, deep integrations, multi-product review forms |
Custom pricing |
Method 2: Add Testimonials using Shopify Theme Customizer
If you prefer to keep things simple, fast, and app-free, Shopify’s built-in Theme Customizer is your best friend. Most modern Shopify themes — especially the popular Dawn theme — come with a ready-to-use testimonial section (sometimes called “Quotes”, “Reviews”, or “Testimonials”).
In this section, I will use Kalles Theme as an example.
Step 1: Open the Theme Customizer
- Go to Online Store → Themes.
- Next to your current theme, click Customize.

Step 2: Add the Testimonials section
- Click Add section → Search for “Testimonial” or “Quote.”
- In Kalles, it’s called “Testimonials” and usually features a clean, minimal slider layout by default.

You can customize the testimonial as you like in the right sidebar.

Step 3: Preview and save
- Testimonials should look just as good on a phone as they do on a desktop.
- Use the mobile preview toggle to check formatting before publishing.
Method 3: Add Testimonials using Liquid Code
If you’re ready to get your hands a little code-y, Shopify’s Liquid templating language lets you create a fully customized testimonial section from scratch — no apps, no pre-built constraints. This method is perfect if you:
- Want a unique testimonial layout beyond what your theme offers?
- Need advanced customization (custom HTML, CSS, or JavaScript
- Do not want to depend on performance-wise third-party apps.
Step 1: Access Your Theme Code
- In your Shopify Admin, go to Online Store → Themes.
- Next to your live theme, click Actions → Edit code.
Step 2: Create a New Section File
- Under the Sections folder, click Add a new section.
- Name it something like testimonial-section. liquid.
Step 3: Add the Liquid Structure
Here’s a basic example you can start with:
|
{% comment %} Custom Testimonial Section Created by [Your Brand] {% endcomment %} <section class="testimonial-section"> <div class="page-width"> <h2 class="section-title">What Our Customers Say</h2> <div class="testimonial-grid"> {% for testimonial in section.settings.testimonials %} <div class="testimonial-item"> <p class="testimonial-quote">"{{ testimonial.quote }}"</p> <p class="testimonial-author">— {{ testimonial.name }}, {{ testimonial.location }}</p> </div> {% endfor %} </div> </div> </section> {% schema %} { "name": "Testimonials", "settings": [ { "type": "list", "id": "testimonials", "label": "Testimonials", "settings": [ { "type": "text", "id": "quote", "label": "Quote" }, { "type": "text", "id": "name", "label": "Customer Name" }, { "type": "text", "id": "location", "label": "Location" } ] } ], "presets": [ { "name": "Custom Testimonials" } ] } {% endschema %} |
Step 4: Style It with CSS
In your theme’s CSS (usually in base.css or theme.css), add something like:
|
.testimonial-section { background: #f9f9f9; padding: 40px 0; } .testimonial-grid { display: grid; gap: 20px; grid-template-columns: repeat(auto-fit, minmax(250px, 1fr)); } .testimonial-item { background: white; padding: 20px; border-radius: 8px; box-shadow: 0 2px 8px rgba(0,0,0,0.05); } .testimonial-quote { font-style: italic; margin-bottom: 10px; } .testimonial-author { font-weight: bold; color: #555; } |
Step 5: Add It to Your Theme
- In the Theme Customizer, go to the page where you want it to appear.
- Click Add section → Select Custom Testimonials (the one you just created).
- Fill in your quotes, names, and locations directly from the editor.
Advanced Testimonial Layouts for Shopify Stores (Sliders, Carousels & Grids)
Advanced testimonial layouts like sliders, carousels, and grids make customer stories more engaging and space-efficient compared to plain text. By following best practices—such as limiting visible items, ensuring mobile responsiveness, and placing testimonials strategically on high-impact pages—you can boost credibility and conversions.
Shopify Testimonial Slider Code Examples
The testimonial slider is convenient because it does not to overload users with too much activity on each page. It is a rotating carousel with a collection of mostly positive reviews that can be up to 6 slides.
Here’s a basic example of how you can create a testimonial slider using Shopify Liquid and Slick.js (a popular jQuery slider library):
|
<div class="testimonial-slider"> {% for testimonial in testimonials %} <div class="testimonial-item"> <p>{{ testimonial.content }}</p> <h4>{{ testimonial.author }}</h4> </div> {% endfor %} </div> <script> $(document).ready(function(){ $('.testimonial-slider').slick({ autoplay: true, autoplaySpeed: 4000, dots: true, arrows: false }); }); </script> |
Pro Tip: Shopify templates such as Dawn lack in-built support of Sliders, thus you would have to manually incorporate a slider library such as Slick or Swiper.js, or use an app, should you not be at ease with code.
Carousel Design Best Practices
A carousel done right can make testimonials feel more interactive and digestible. But if done poorly, it can hide valuable content or become a UX nightmare. Here are the key best practices:
- Limit Visible Items: Show 1-3 testimonials per slide to avoid clutter.
- Autoplay (with pause on hover): A nice auto-scroll keeps the users interested, yet gives them manual control.
- Control Speed: Set slide transitions between 3-5 seconds to give users enough time to read
- Dots over Arrows: Dots are cleaner and save space, but arrows can work on n desktop.
- Responsive Design: Ensure the carousel adapts well on mobile and tablet devices.
Where to Place Testimonial Sections for Maximum Impact
Even the most stunning testimonial layout will fall flat if it’s buried in the wrong spot. Here’s where advanced layouts like sliders or grids shine the most:
- Homepage Hero Section: A full-width slider or grid right beneath the banner immediately builds credibility.
- Product Pages: Use carousel sliders showcasing product-specific testimonials next to the “Add to Cart” button.
- Landing Pages: For ads or email traffic, place testimonial grids mid-page to reinforce value propositions.
- Cart Page Sidebars: Subtle testimonial snippets in a sidebar can reduce cart abandonment.
- Pop-ups or Slide-ins: Dynamic testimonials that appear based on scroll behavior or exit intent can boost conversions without being intrusive.
Mobile Optimization Tips for Testimonial Displays
As more than 70% of Shopify shops are reached with mobile traffic, rational testimonial designs with mobile devices are not up for negotiation:
- One Testimonial Per Slide on Mobile: Avoid cramming too much text; keep it clean.
- Touch-Swipe Enabled: Ensure users can swipe through sliders/carousels smoothly.
- Font Size & Spacing: Opt for larger fonts and ample padding to maintain readability.
- Optimize Load Times: Compress images and avoid bloated scripts to ensure sliders don’t slow down mobile page speeds.
How to design an effective testimonial area?

Putting a testimonial page up will not just be a matter of sticking two or three customer testimonials on your site and calling them in the day before. This is the way in which you can create an awesome testimonial section that inspires the purchase.
Strategic placement: Put testimonials where they influence decisions
Placement is everything. You want testimonials to nudge customers forward at key decision-making moments:
- Homepage: Here, first impressions are achieved. Display glowing testimonials above the fold in order to get instant trust from new visitors. A turning slider of 4-5 outstanding reviews could do miracles here.
- Product Pages: Position testimonials close to the “Add to Cart” button or below product descriptions. Seeing other customers rave about the exact product they're considering can reduce purchase hesitation.
- Checkout Page: A subtle testimonial near the checkout button or in a sidebar reassures customers they’re making the right decision before completing their order.
- Dedicated Testimonials Page: Make a page of the Best Reviews by our customers. This helps tremendously with SEO and would provide a place to binge social proof to skeptical purchasing parties.
- Landing Pages for Ads or Campaigns: Write testimonials that line up with a product or offer on the landing page. The testimonials in this case can play an important role in increasing conversion rates to hyper-relevance.
Design elements that build credibility
Once you’ve nailed down placement, it’s time to focus on design elements that enhance credibility and engagement:
- High-Quality Customer Photos: Faces build trust. Including a photo of the customer adds authenticity and makes testimonials feel more personal.
- Names & Locations (If Available): A full name and city (e.g., Jane D., Austin, TX) humanizes the testimonial. If privacy is a concern, even just a first name and location adds credibility
- Ratings & Certifications: Displaying star ratings, badges (e.g., “Verified Buyer”), and third-party certifications reinforces the legitimacy of your testimonials.
- Slide-In Forms (Sliders/Carousels): To keep things clean and space-efficient, use sliders or carousels that cycle through testimonials. This allows you to display more social proof without cluttering the page.
- Mobile-Responsive Design: More than 70 percent of eCommerce traffic occurs on mobile. Make sure your testimonial content can be viewed on a smaller screen without problems. Vertical layouts and swipable sliders are preferable and will help render the optimized mobile experience.
Focus on authentic content (not just fluffy praise)
Good design can’t make a bad review better. The concept itself must feel real, relatable & relevant:
- Detailed Testimonials: Encourage customers to share specific benefits they’ve experienced, not just generic praise like “Great product!” The more detailed, the more convincing.
- Show Imperfect Ratings: A few 4-star reviews mixed in with 5-star reviews make your testimonials feel genuine. Overly perfect reviews can come off as staged.
- Fresh & Updated Content: Outdated testimonials lose relevance. Keep adding new reviews and ensure certifications (like Trustpilot scores) are up-to-date.
How to Collect Powerful Testimonials (That Actually Convert)
The kind that tells a mini success story, speaks to buyer pain points, and highlights clear benefits. But how do you get reviews like that? Here’s how to build a system for collecting testimonials that actually drive sales.
Send automated post-purchase emails (timing is everything)
Don’t wait and hope customers will leave a review — ask them. The key is sending your request at the right time:
- 1–2 weeks after delivery: Gives them time to try the product and form an opinion.
- Use personalized subject lines: Like “How are you liking your [Product Name]?” to boost open rates.
- Include direct links to leave a testimonial — don’t make them search for the review form.
Pro tip: Use Shopify apps like Loox, Judge.me, or Stamped to automate the timing and collection of reviews with reminders and follow-ups.
Offer incentives (ethical bribes that work)
Customers can be persuaded to take action with a modest incentive:
- Discount codes for future purchases
- Free shipping on their next
- Entry into a monthly giveaway
You want to get honest feedback, not only a 5-star review. It must be incentivised rather than about false optimism.
Create Simple, User-Friendly Collection Forms
Friction is the enemy. Make it ridiculously easy for customers to leave feedback:
- Embed a short testimonial form on your website or “Thank You” page.
- Ask focused questions like: What made you choose this product? What results have you seen? Would you recommend it to a friend?
- Use emoji ratings or star sliders for quick impressions.
Bonus: If you're collecting reviews for multiple products, offer a dropdown to select the item purchased — this helps with product-specific testimonials.
Leverage social media & branded hashtags.
Customers are already talking about you online — you just have to listen:
- Track brand mentions and tags on Instagram, TikTok, and X (Twitter).
- Encourage customers to use a branded hashtag (e.g., #MyStoreStory).
- Repost user-generated content (UGC) to show real people loving your products.
These organic testimonials are often more impactful than traditional reviews — and they double as authentic marketing assets.
Reach out directly to loyal customers.
Your best testimonials often come from your best customers.
- Identify repeat buyers or high-spending customers using your Shopify analytics.
- Reach out with a personal message or even a video request.
- Ask if they’d be open to sharing a short quote or recording a video testimonial.
Use Post-Purchase Surveys to Extract Powerful Soundbites
Instead of a single review box, try surveys that guide users into writing better testimonials:
- Use Typeform, Google Forms, or built-in app features.
- Ask open-ended questions that lead to storytelling
- Collect quotes you can split and reuse across different sections of your site (homepage, product page, checkout, etc.).
Free vs Paid Shopify Testimonial Solutions: What Should You Choose?
When it comes to adding testimonials to your Shopify store, you’ll find no shortage of apps, tools, and custom code solutions — ranging from free to premium. The big question is: Do you really need to pay for testimonial features, or will free tools get the job done?
The answer depends on your goals, your technical skills, and how scalable and customizable you want your testimonial section to be.
|
Feature |
Free Solutions |
Paid Solutions |
|
Ease of Use |
Beginner-friendly, but limited options |
Drag-and-drop interfaces, more intuitive customization |
|
Customization (Design/Layout) |
Basic (limited themes, styles) |
Advanced layout options (sliders, carousels, grids, CSS) |
|
Automation (Review Requests) |
Manual setup or limited automation |
Fully automated post-purchase emails, reminders |
|
Photo/Video Testimonials Support |
Often unavailable or limited |
Most paid tools support photo & video uploads |
|
Integration with Email/SMS Tools |
Minimal or no integration |
Sync with Klaviyo, Mailchimp, SMSBump, etc. |
|
Schema Markup for SEO |
Usually missing |
Structured data included for Google Rich Snippets |
|
Mobile Optimization |
Basic responsiveness |
Fully mobile-optimized with adaptive layouts |
|
Moderation & Spam Filtering |
Minimal control |
Advanced filters, moderation tools, and profanity control |
|
Customer Support |
Community forums or no support |
Dedicated support, onboarding, and live chat available |
|
Price |
$0 |
$5–$30/month (on average), sometimes higher for enterprise |
|
Example |
Shopify’s built-in testimonial section, free themes, simple Liquid code snippets |
The4 themes (e.g. Kalles, Ecomus, Unsen,...), Loox, Judge.me (paid plan), Stamped.io, Yotpo |
What Should You Choose?
Free is great if:
- You’re just starting and want something simple.
- You’re comfortable using Shopify’s Theme Customizer or basic code snippets
- You don’t need fancy layouts or automated systems.
- You’re on a tight budget and can manage reviews manually.
Paid tools make sense if:
- You want to automate review collection (post-purchase flows, reminders, integrations).
- You need photo/video testimonials to increase authenticity
- You care about design — and want beautiful sliders or carousels.
- You want rich snippet SEO (Google stars in search results).
- You manage a high volume of orders and need moderation tools.
Frequently Asked Questions
1. How to add testimonials to Shopify without an app?
You can add testimonials manually using the Shopify Theme Customizer or by editing the theme’s Liquid code. Here's how:
- Use a custom section (like "Rich text" or "Custom HTML") to insert testimonials into your homepage or product pages.
- Create a dedicated testimonial section in the theme files (sections or snippets folder) using HTML and Liquid code.
- Add styling via CSS to create basic grid or list layouts.
This is free and lets you have more control over the design, and also requires some coding knowledge.
2. Can I create a testimonial slider in the Shopify Dawn theme?
Yes! The Dawn theme is flexible and supports custom sections, so you can:
- Use a Shopify app that’s compatible with Dawn and provides a slider block (e.g., Loox, Judge.me).
- Or, for a code-based approach, add a custom Liquid section with slider functionality using a JavaScript library like Swiper.js or Flickity.
Just be sure the slider is mobile-optimized and not too fast — users should have time to read each testimonial.
3. What’s the best free Shopify testimonials app?
Here are a few reliable free options (with limitations):
- Shopify Product Reviews: Simple, native app by Shopify, easy to use.
- Ali Reviews (Free Plan): Basic review import and display features, ideal for dropshippers.
- Rivyo Product Reviews: Good customization even on the free plan, with options for Q&A
If you want more design flexibility or photo/video reviews, consider upgrading to a paid plan on apps like Judge.me or Loox.
4. How to display customer reviews on Shopify product pages?
There are three main ways to do this:
- With a review app, Most apps offer automatic review widgets that appear below the product description.
- Using Shopify’s built-in Product Reviews app: Add a review block to the product template via the theme editor.
- Manual coding: Edit your product.liquid or main-product.liquid file and insert review sections manually.
For the best results:
- Put reviews directly on the Add to Cart button.
- Use star ratings and verified buyer badges.
- Include images when available — visual reviews significantly boost credibility.
Final Thoughts
Your Shopify testimonial section isn’t just a pretty element; it’s one of the most persuasive sales tools in your arsenal. The best testimonial section doesn’t scream “look how great we are” — it whispers “people just like you already trust us… and here’s why.” If you follow the strategies in this guide, you’ll be well on your way to building that kind of quiet, conversion-driving confidence into every corner of your store.
You may also like
Build your highest-converting page in 15 minutes


Blog Categories


0 comments