


How to Create Sub Collections on Shopify in minutes
Table Of Contents
Need help with a cluttered product catalog? Subcollections are your secret weapon for creating a streamlined and user-friendly shopping experience. In this quick guide, we'll explain how to set up sub collections in Shopify in minutes so you can showcase your products in a way that keeps customers engaged and coming back for more.
What Are Sub Collections in Shopify?
Sub-collections in Shopify are a way to further organize products within a larger collection. They allow merchants to group related items under a central collection, enabling customers to navigate and discover products more efficiently. Here's how it works:
- Regular Collections: These are the foundation of Shopify's product organization. You create collections to group related products together, like "For Men," "For Women," or "Accessories."
- Mimicking Sub Collections: You can create the illusion of sub collections by strategically nesting collections within other collections on your navigation menu. For example, a "Sale" collection could contain child collections like "For Men," "For Women," and "Accessories," which would then be displayed on your store's menu.

This hierarchical structure helps improve the browsing experience and makes it easier for shoppers to find what they want.
Why is it Necessary to Include Sub-Collections in Shopify?
Creating nested collections in Shopify offers numerous benefits. Firstly, it enhances user experience (UX) and improves user interface (UI), making shopping more convenient for customers. This streamlined browsing experience increases customer satisfaction, conversions, and revenue.
Additionally, organizing products into sub-collections is a crucial strategy for Shopify. It not only aids in SEO but also improves search rankings. Even without detailed descriptions, these focused sub-collections perform well in search results.
To further optimize them, ensure each sub-collection has a specific description, align URLs with product hierarchy, and create unique meta titles and descriptions. Implementing sub-collections can give your new Shopify store a competitive edge and boost initial sales.
2 Methods to Create Sub-Collections in Shopify
Two primary methods for creating Shopify sub-collections are through the navigation menu or by incorporating collections within collection pages. The former approach, altering the website structure via the admin panel, is exceptionally user-friendly. Furthermore, utilizing the collection metafield allows for the inclusion of custom images for each navigation menu item.
However, establishing sub-collections by integrating collections within collections necessitates a basic understanding of HTML. Although this method is more technically demanding, it offers the opportunity to expand sub-collection functionality. There are two options for creating a sub-collection:
1. Using Navigation Menu
Incorporating sub-collections into the navigation menu offers a more straightforward approach, especially for those unfamiliar with the theme.liquid files, HTML, and website code editing. Assuming you've already created all desired collections and configured their details, follow these steps:
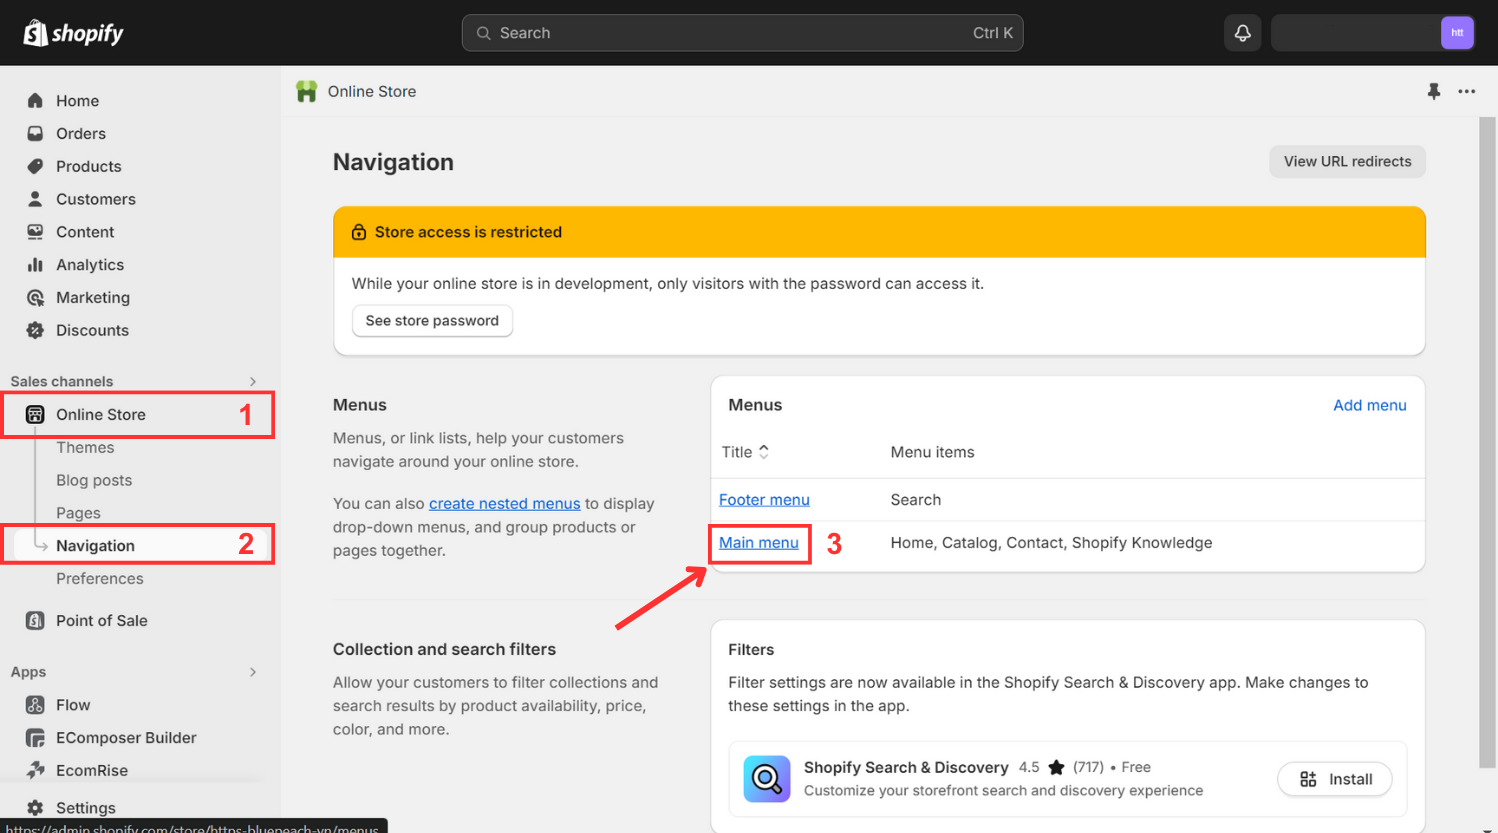
Step 1: Access Navigation under Online Store.
Log in to your Shopify account and navigate to the Sales Channels section. Choose “Online Store,” and from the options list that appears, click “Navigation”, the fourth option listed.
If you haven’t had one, sign up Here
Step 2: Select or create the main menu.
Within the Navigation section, locate the Menus part and view your list of menus. Identify the one titled Main Menu and select it.
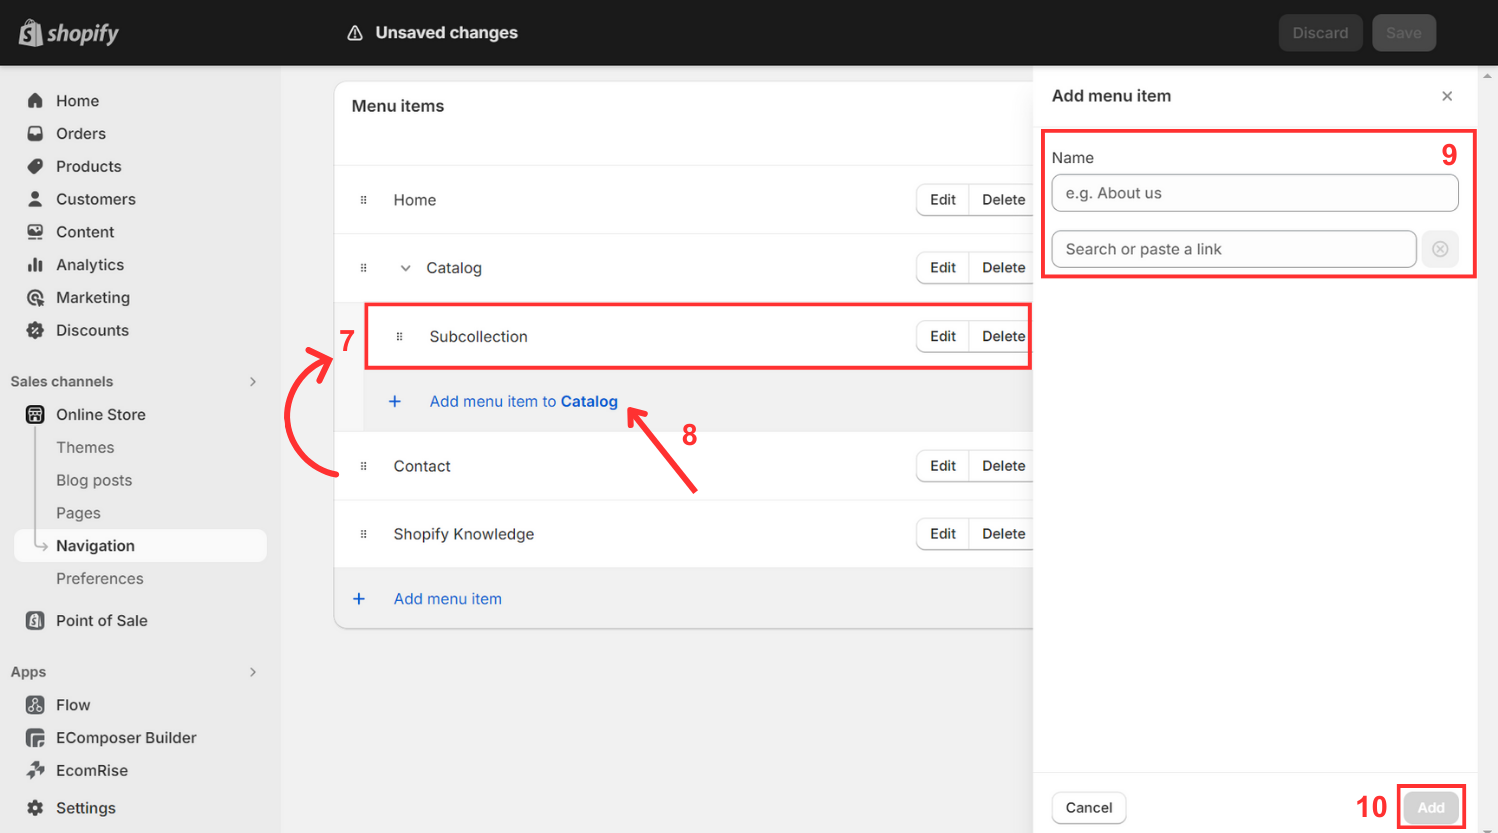
Step 3: Add the desired sub-collection and link it.
From your menu list, choose an item to serve as the name of your drop-down menu. Alternatively, create a new one by clicking on "Add Menu Item." You will be prompted to enter the Name and Link in a dialog box before clicking Add. If the header doesn't need a reference, you can enter "#" in the Link field.
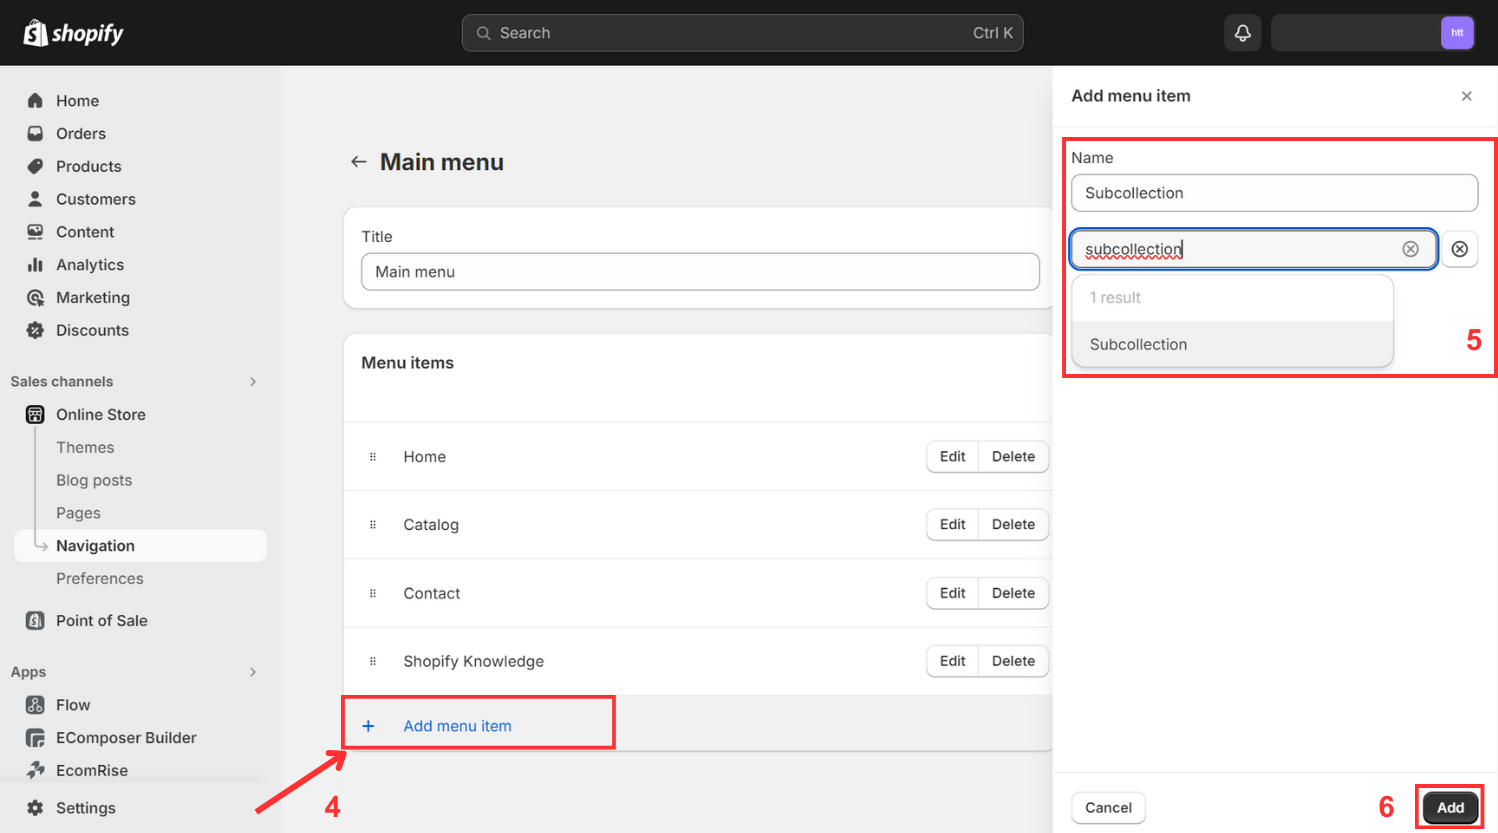
Step 4: Drag and nest the sub-collection under the appropriate menu item.
- Drag the item using the ⋮⋮ icon and place it beneath the header of your menu.
Step 5: Add more sub-collections directly to the nested collection.
- Click "Add menu item to _____" to add new sub-collections straight to that collection later on.
Step 6: Repeat these actions as needed.
Step 7: Save the menu.
- Once you've made all the required modifications, find and click the "Save Menu" option at the bottom of the page to finish the process and save your changes.
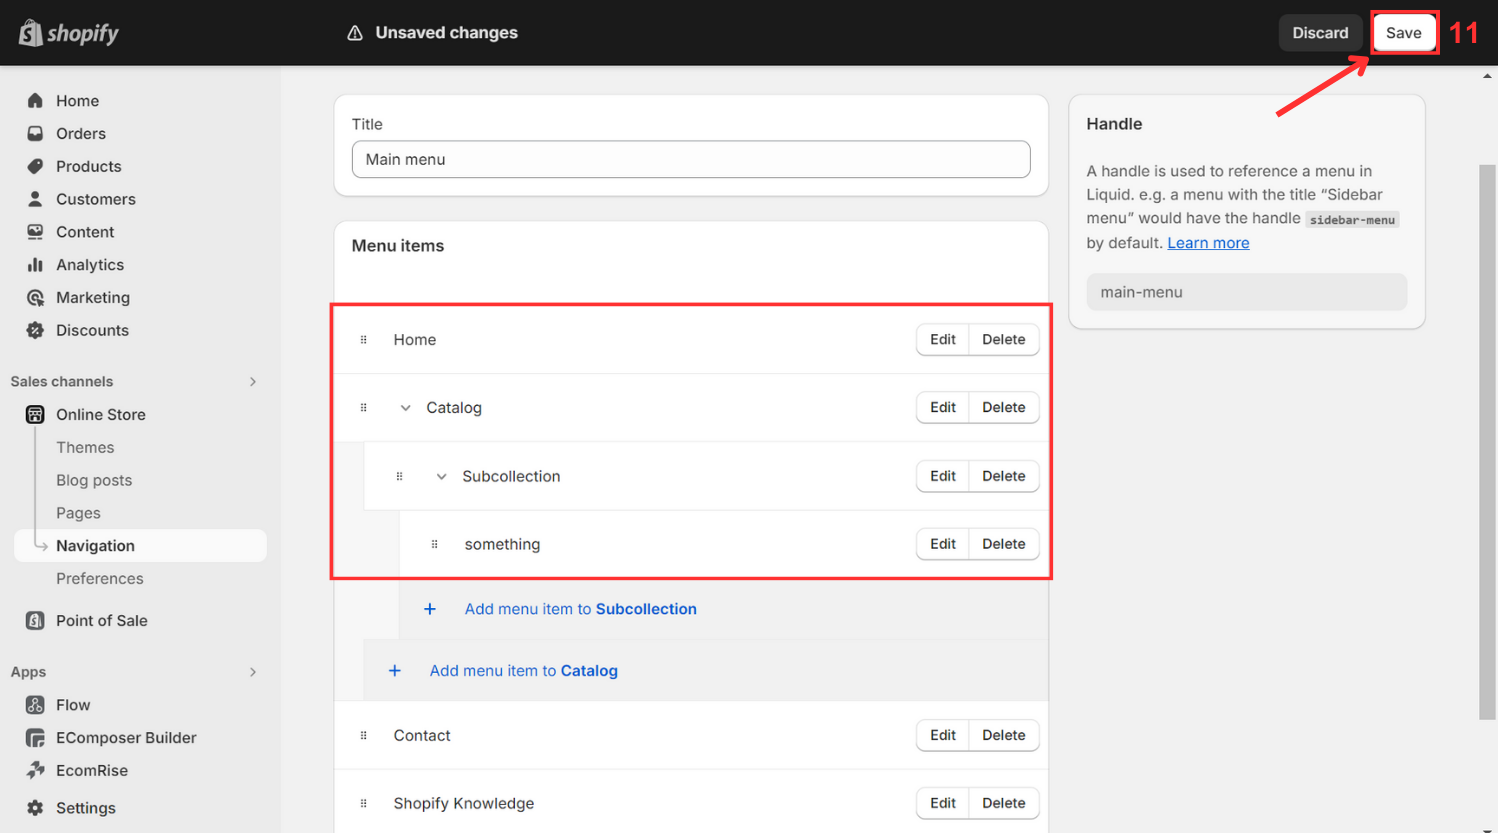
It should be noted that this procedure just impacts the website's visual structure; the flat collection URL (/collections/product-group) will not inherently nest. For that, adjustments within the theme.liquid files are required.
2. Incorporating Collections within Collection Pages
You can also incorporate sub-collections as a list within the parent collection page. To achieve this, you'll need to create a new template type in your theme.liquid files, which entails a more advanced understanding of HTML. Before proceeding, it's advisable to create a backup of your store to mitigate any potential issues.
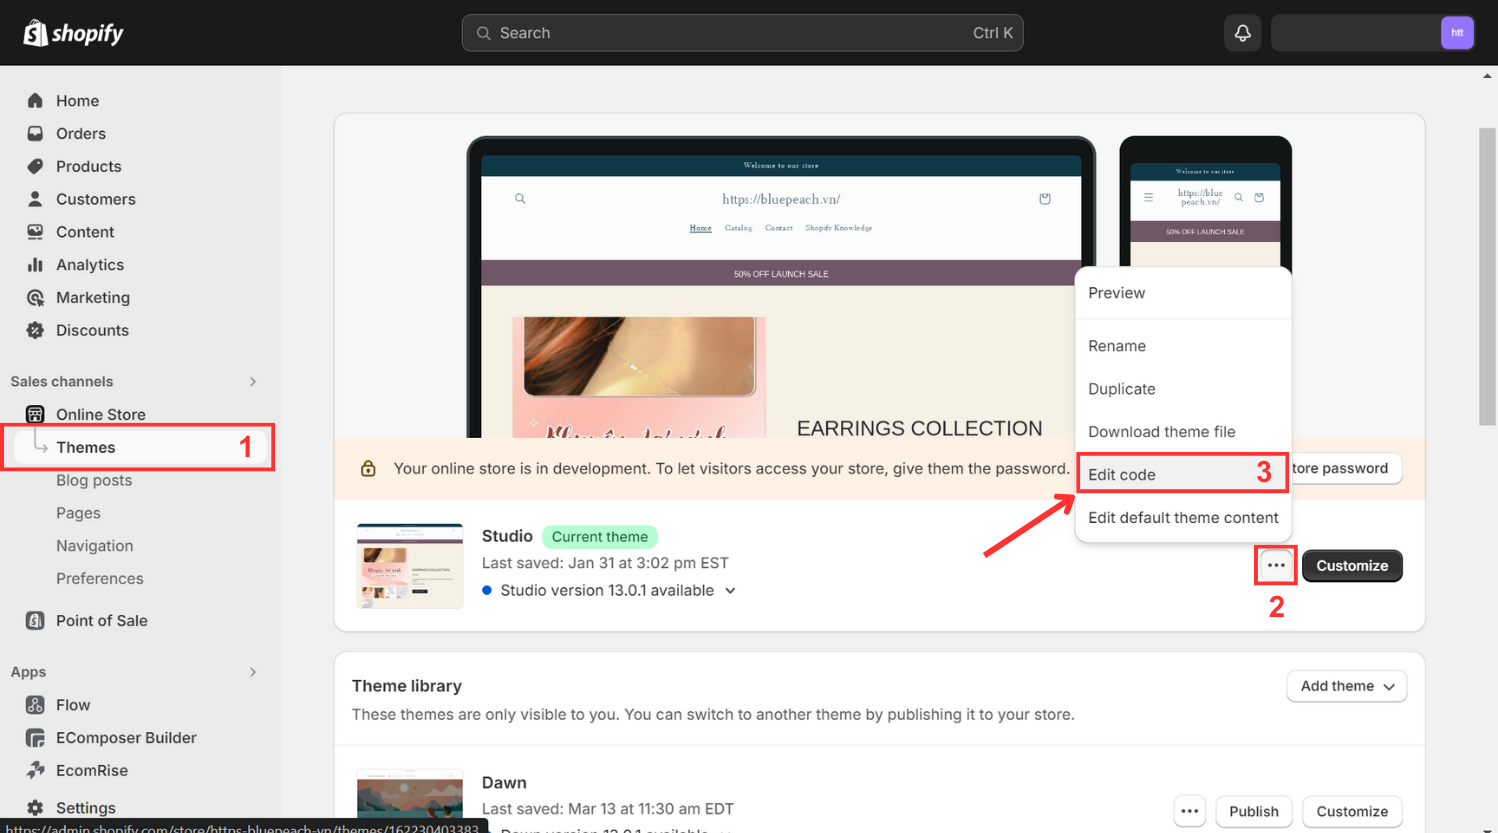
Step 1: Access the theme code editor.
- Once your site is backed up and you're prepared to make changes, navigate to Online Store > Themes.
Step 2: Create a new template.
- Select your active theme and choose Edit Code.
Step 3: Customize the template.
- Under “Templates," click Add a new template.
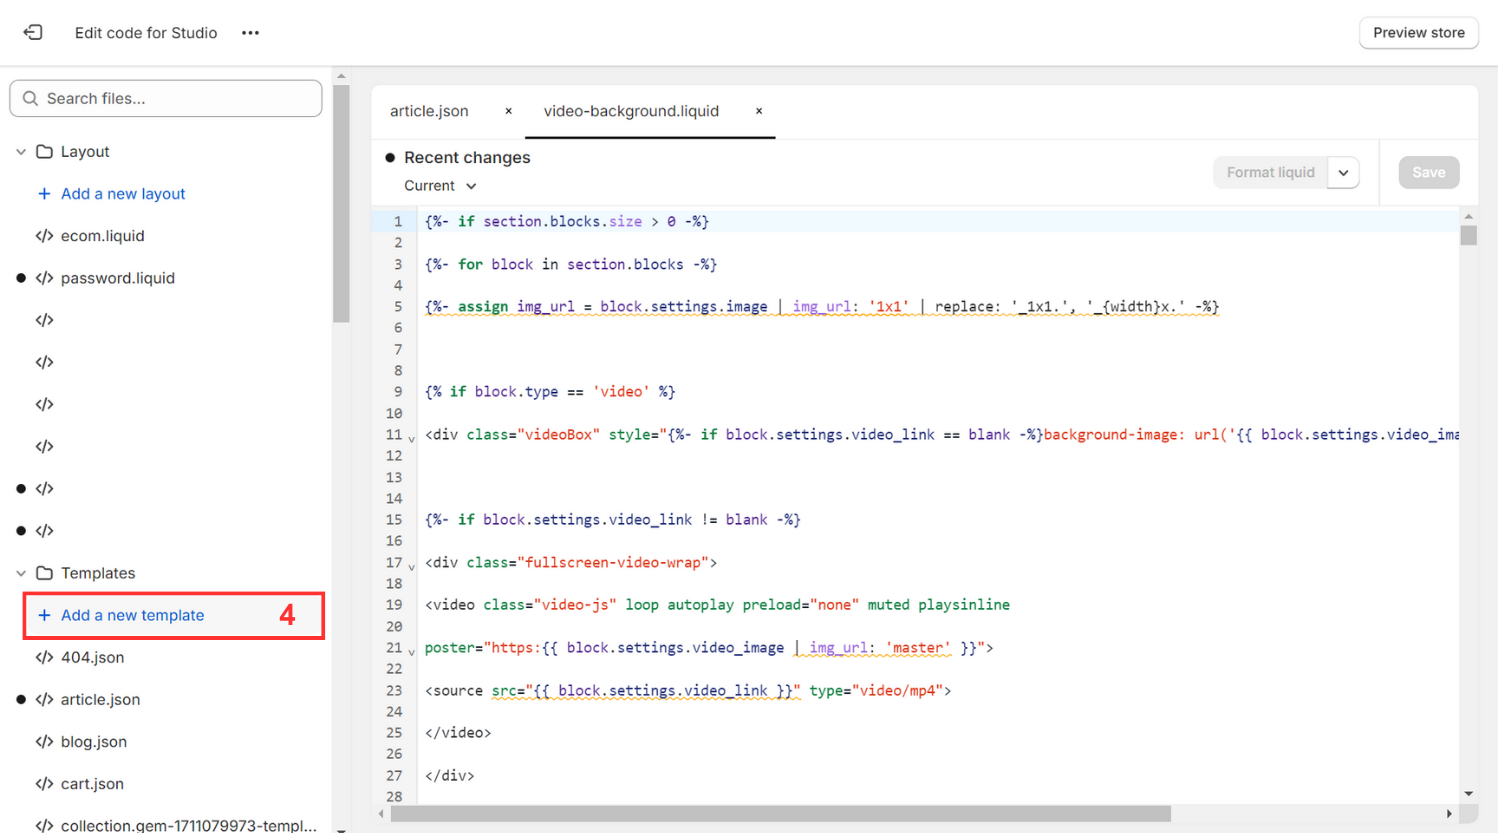
Step 4: Replace the default collection template.
- Select the template type: collection > Liquid > Collection.sub-collections.liquid and click Done.

Step 5: Insert code
From here, you'll start with a blank canvas, likely intending to customize the template to align with your brand's aesthetic and website design.
Here is the code:
{{ collection.title }}
{% assign collection_handle = “collection-” | append: collection.handle %}
<ul>
{% for link in linklists[collection_handle].links %}
{% assign sub_collection = link.object %}
<li><a href=”{{ link.url }}”>{{ link.title }}</a></li>
{% endfor %}
</ul>

For some themes, you may need to create a sub-collections.liquid section to code the design. Be sure to review your theme documentation for guidance.
Once you've customized the sub-collection list template to your satisfaction, you'll replace the default collection template with the sub-collection template. This process may vary depending on your theme setup and typically involves adjusting the default theme template in your Shopify admin.
After creating all desired collections and sub-collections for your website, it's essential to establish a collection tree. Structuring your collections hierarchically and considering future store growth will improve navigation for customers and prevent the addition of duplicate pages.
Incorporating sub collections into your Shopify store is just one aspect of ensuring a comprehensive website that prioritizes customer satisfaction and easy product access. EComposer offers an ideal solution, providing a cost-effective and efficient method for building an attractive online platform.
Known as one of the best Shopify page builders, EComposer makes the design process easier with its user-friendly drag-and-drop editor and eye-catching templates. This allows users to create engaging landing pages, eye-catching homepages, educational blogs, and more.
Creating optimized pages is further facilitated by a wide range of components and add-ons available within the Landing Page Builder. Enhanced features like an AJAX cart, AI content generator, and image compressor contribute to your store's efficiency, offering a comprehensive solution that saves time, resources, and expenses while enabling the rapid development of sophisticated Shopify stores.
Elevate your e-commerce ventures with EComposer—try it out for free! For those without a Shopify account, take advantage of a special offer: just $1 per month for the first three months.
An Easier Way: Using EComposer to Simplify the Steps
There are methods to streamline this process with a little investment. Venturing into your website's code can feel daunting, especially if you're worried about making errors that could affect your entire site.
If you're hesitant to rely on a developer for ongoing sub-collection additions or seek long-term self-management, exploring EComposer could be beneficial.
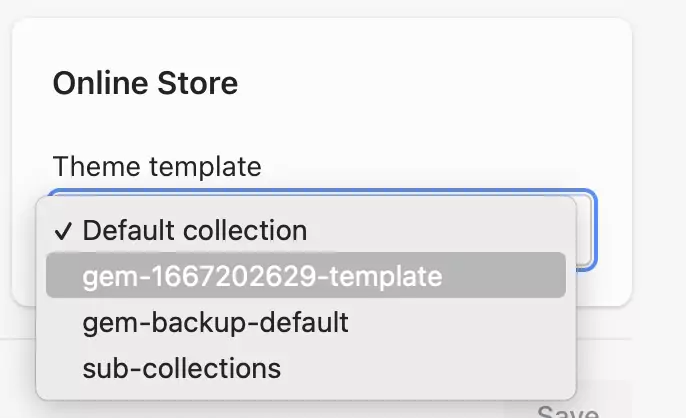
To include sub-collections via the Collection metafield and display them in EComposer, follow these steps:
- In the Shopify admin, navigate to Products -> Edit Collections -> Metafield -> Show all. Add the collection URL to the "Define sub-collections for the current collection" field, separated by commas.
- In the Collection element, choose the "From metafield of current collection" option in Collection Source. Assign the collection template to the desired collection and preview the changes. For detailed instructions, refer to the video provided here.

Others also read
10+ Effective collection page templates in Shopify
How to Add a Collection to a Page in Shopify?
How to Remove a Product from a Collection on Shopify
Steps to Remove Sub Collections in Shopify
Step 1: Before you delete the collection, make a note of the collection URL.
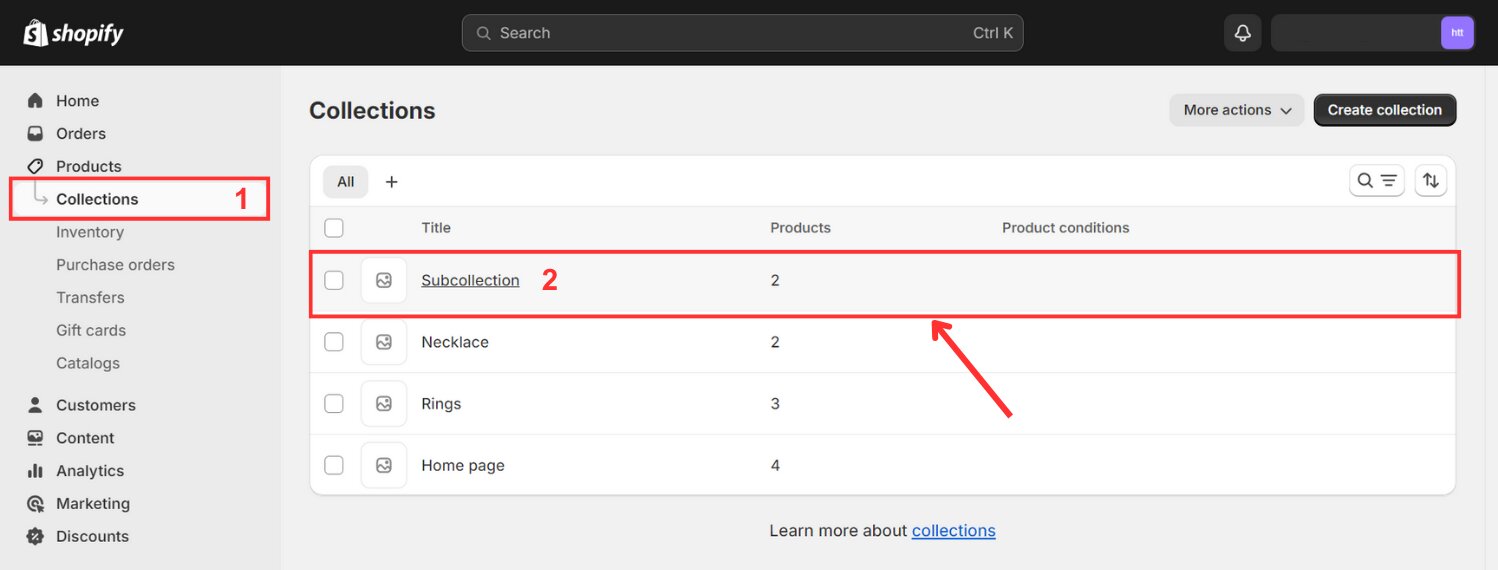
Step 2: Navigate to Products > Collections.
Step 3: Select which collection to remove.
Step 4: Click Delete Collection at the bottom of the page.
Step 5: You’ll be prompted to confirm your choice.

Go to Online Store > Navigation > View URL Redirects (found in the upper right corner of the desktop screen) to manually create a 301 redirect.
Addressing Common Problems When Creating Sub Collections in Shopify
 While the process of creating and managing sub collections in Shopify is generally straightforward, several common issues may arise. Here are some troubleshooting tips:
- Products not showing in sub collections: Verify that products are correctly assigned to the relevant sub collections and that any rules or conditions for automatic collections are properly configured.
- Sub collections not appearing on the store: Ensure that your sub collections are correctly published and set to display in the intended location, such as the homepage or navigation menu.
- Problems with sub collection images: If you encounter issues with images not displaying correctly or appearing distorted, check the image sizes to ensure they meet Shopify's recommended dimensions.
Should you encounter any other difficulties or require further assistance, feel free to contact Shopify's support team. They are available to help you troubleshoot and resolve any issues that may arise during the creation or management of your sub collections.
Final Words
In just a few simple steps, you've learned how to effortlessly create sub collections in Shopify, enhancing the organization and navigation of your online store. With these newfound skills, you can efficiently manage your product offerings and provide customers with a seamless browsing experience.
Ensuring convenient product access and customer satisfaction is also paramount for the success of your Shopify store, thus it's crucial to ensure your website is comprehensive. Well-designed Shopify pages featuring vibrant images, quick loading times, and thorough information are integral to your shop's overall success.
EComposer provides the flexibility to design engaging pages, offering a range of choices from standard layouts to fully customized designs. Explore EComposer's exceptional templates with a complimentary trial and embark on your journey today!
=================
Add EComposer Next generation page builder Here
Follow Us on Facebook
Join Official Community
Build your highest-converting page in 15 minutes


Blog Categories


0 comments