


How to Create or Edit Shopify Drop-down Menu

Table Of Contents
Welcome to our ultimate guide on mastering Shopify's drop-down menus! Did you know that among over 600 web users, 94% believe that making a website easy to navigate is more crucial than ever? Whether you're a newbie or a seasoned pro in the e-commerce world, sprucing up your store's navigation is non-negotiable.
In this guide, we'll unveil the secret sauce behind creating and editing drop-down menus on Shopify. From organizing your product galaxy to jazzing up menu styles, get ready to dazzle your customers with a shopping experience they will remember.
Understanding the Importance of Well-Structured Drop-down Menus
Picture this: You're navigating a chaotic marketplace without any signs or directions. Frustrating. Well-structured drop-down menus serve as clear signposts in the online world, organizing products logically and making navigation effortless. Like in a well-organized marketplace, easy-to-use menus enhance the online shopping experience, keeping visitors engaged and increasing the likelihood of conversions.
By guiding users seamlessly to their desired destinations, these menus are crucial in improving user experience and ensuring visitors find what they're looking for quickly and efficiently.
Advantages of Implementing a Drop-down Menu on Shopify
Discover how implementing a drop-down menu on Shopify can revolutionize your online store experience.
- Enhanced Navigation: Streamline user experience by organizing products into categories, facilitating quicker browsing and navigation through your Shopify store, and improving overall usability and customer satisfaction.
- Space Optimization: Utilize limited screen real estate efficiently, especially on mobile devices, by condensing menu options into a compact drop-down format, maximizing visibility for essential content without clutter.
- Improved Organization: Arrange products hierarchically within drop-down menus, allowing for logical grouping and sub-categorization, enabling visitors to locate desired items with ease, ultimately leading to higher conversion rates.
- Customization Flexibility: Customize drop-down menus to your brand's aesthetics and unique requirements. You may choose from various designs, colors, and animations to create a unified, eye-catching interface that appeals to your target market.
By incorporating a drop-down menu, you can enhance navigation, optimize space, organize products effectively, and maintain a personalized touch, ultimately driving higher engagement and sales on your Shopify platform. Let's get started with a step-by-step tutorial on creating a Shopify drop-down menu.
Steps to Create a Drop-down Shopify Menu
Think of a drop-down menu on Shopify like organizing a closet. Just as you group similar items in labeled boxes or shelves, a drop-down menu neatly contains different categories of products in your online store. It's like having a well-organized closet where you can easily find what you need without rummaging through clutter.
When you click on a central category in the menu, it's like opening one labeled box, revealing the subcategories neatly tucked inside, just like when you open a shelf to find specific items neatly arranged. This makes it easier for shoppers to navigate your store, just like seeing what you need quickly in a well-organized closet.
Let’s embark on a seamless journey to enhance your Shopify store with a user-friendly drop-down menu.
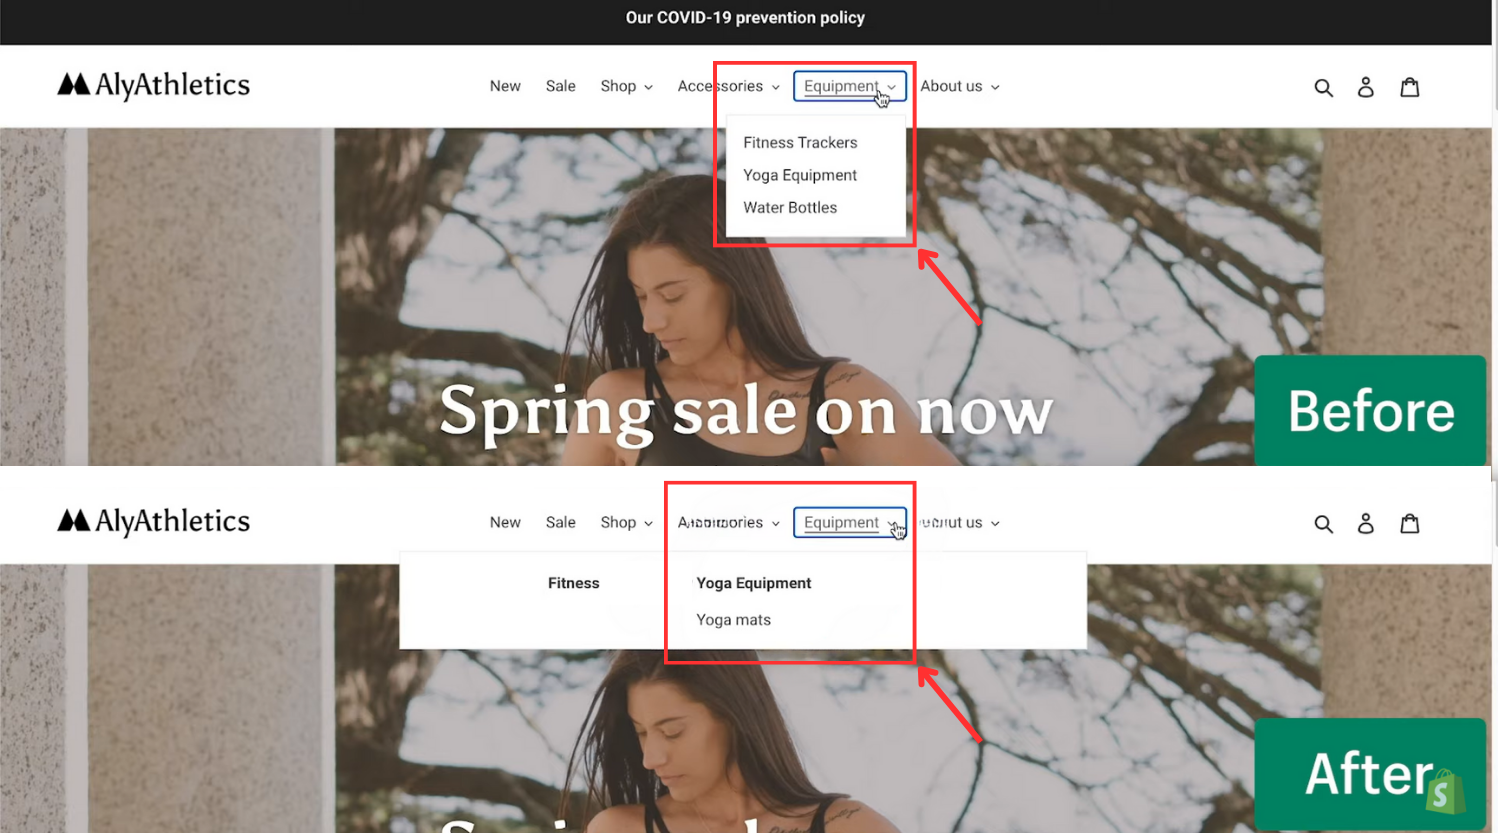
1. Nesting Menu items to Build Drop-down Menu
You can construct drop-down menus by arranging or relocating menu items to be "nested" under a top-level item. This top-level item is visible in the primary menu of your online store, while the nested menu items are accessible via a drop-down menu.
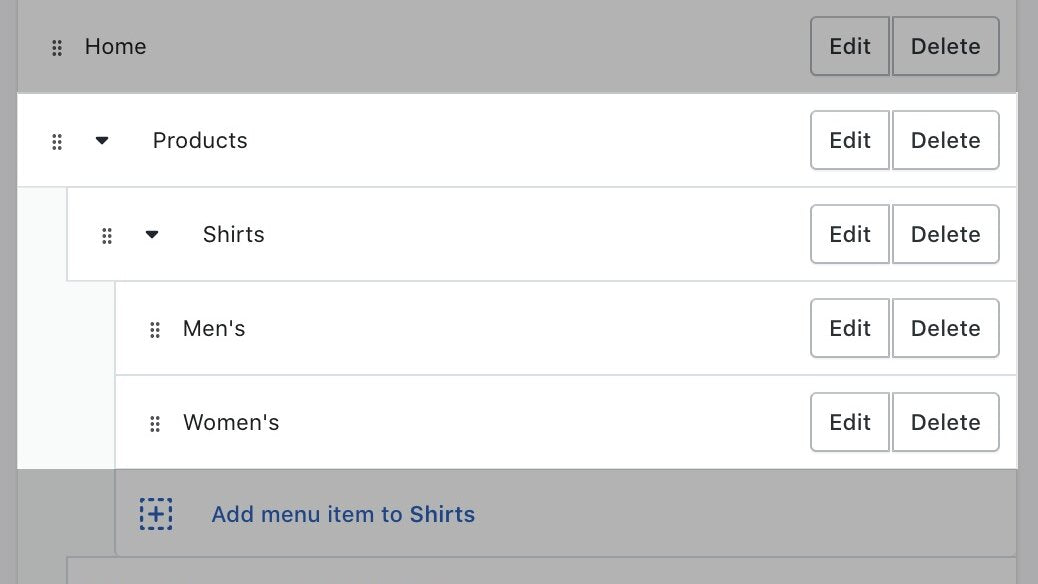
The top-level item can include up to two layers of nested drop-down menus.
All themes will exhibit nested items as drop-down menus from the primary menu, and some themes may display them as drop-down menus in alternative locations.
The appearance and placement of the primary menu and drop-down menus within your online store are contingent on your store's theme. Certain themes may incorporate an icon beside the drop-down menu name in the primary menu to aid customers in recognizing its presence.
Note: Ensure that you update your theme to accommodate the display of all three menu levels on your online store.
2. Utilize the Main Menu to Add a Drop-down Menu
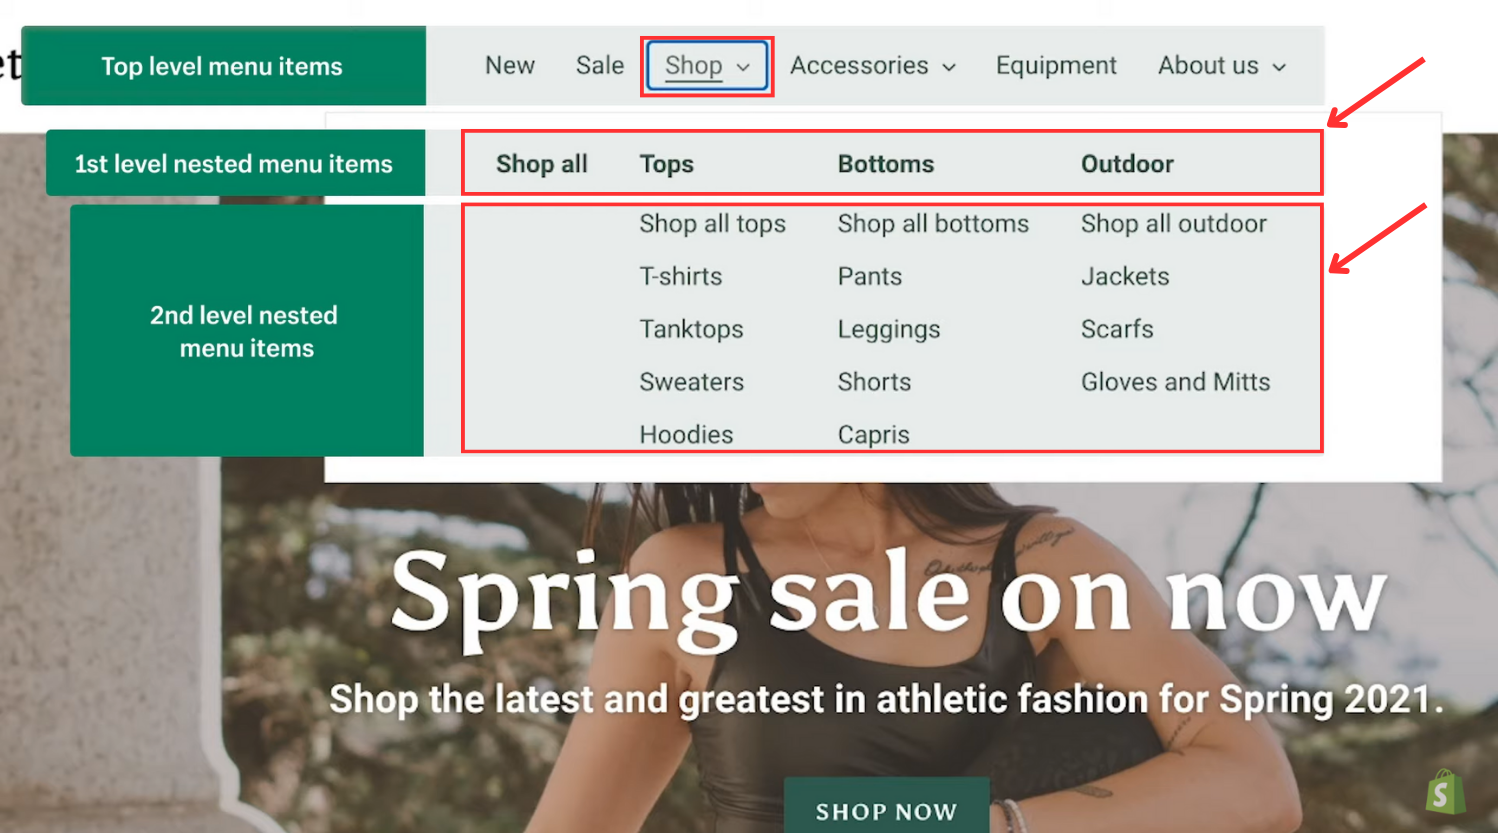
There are three types of nested menu items: top-level menu items, 1st level nested menu items, and 2nd level nested menu items.
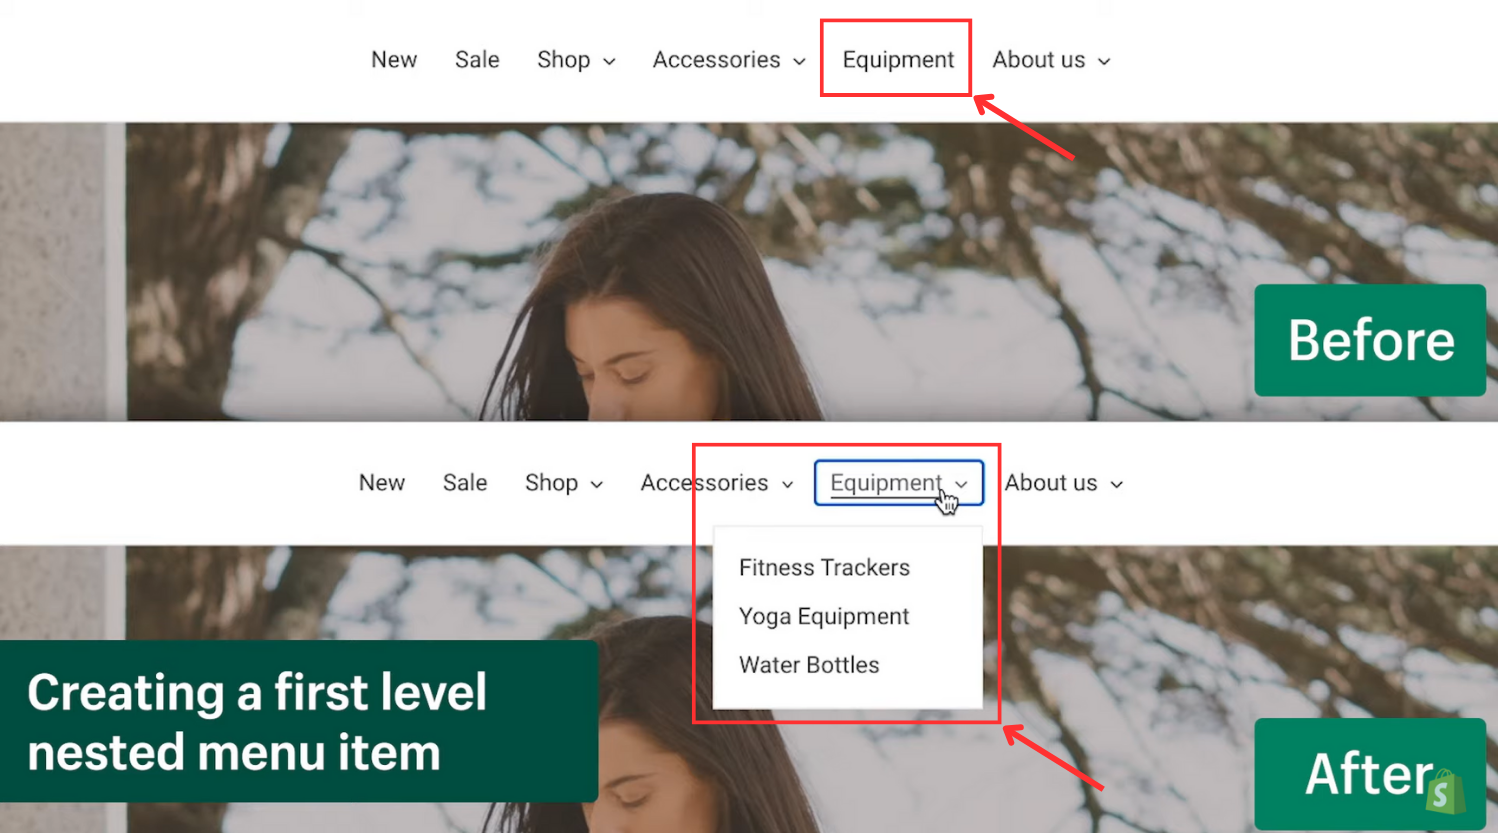
Here are the steps to create a first level nested menu item:
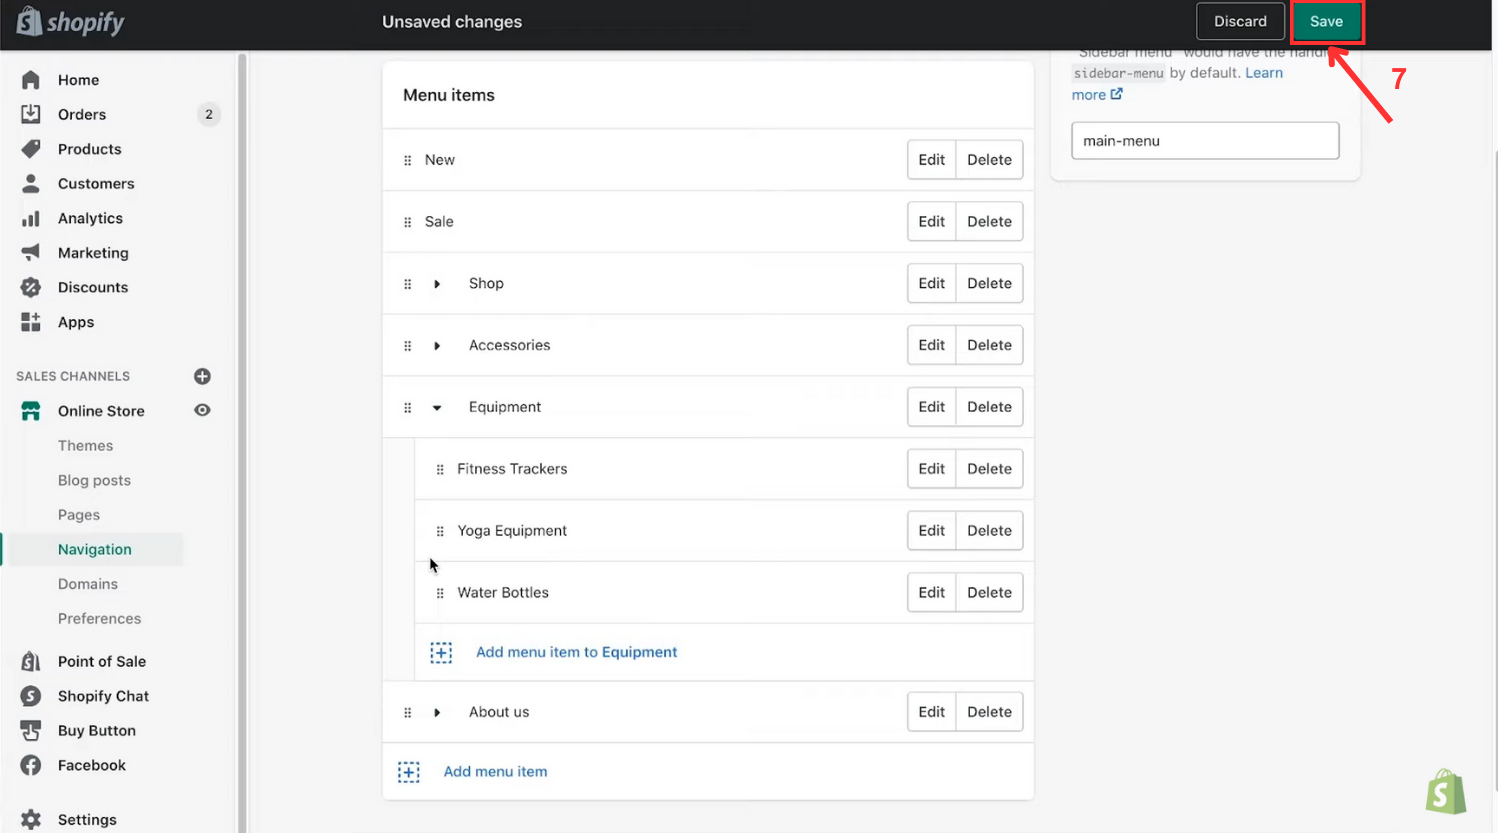
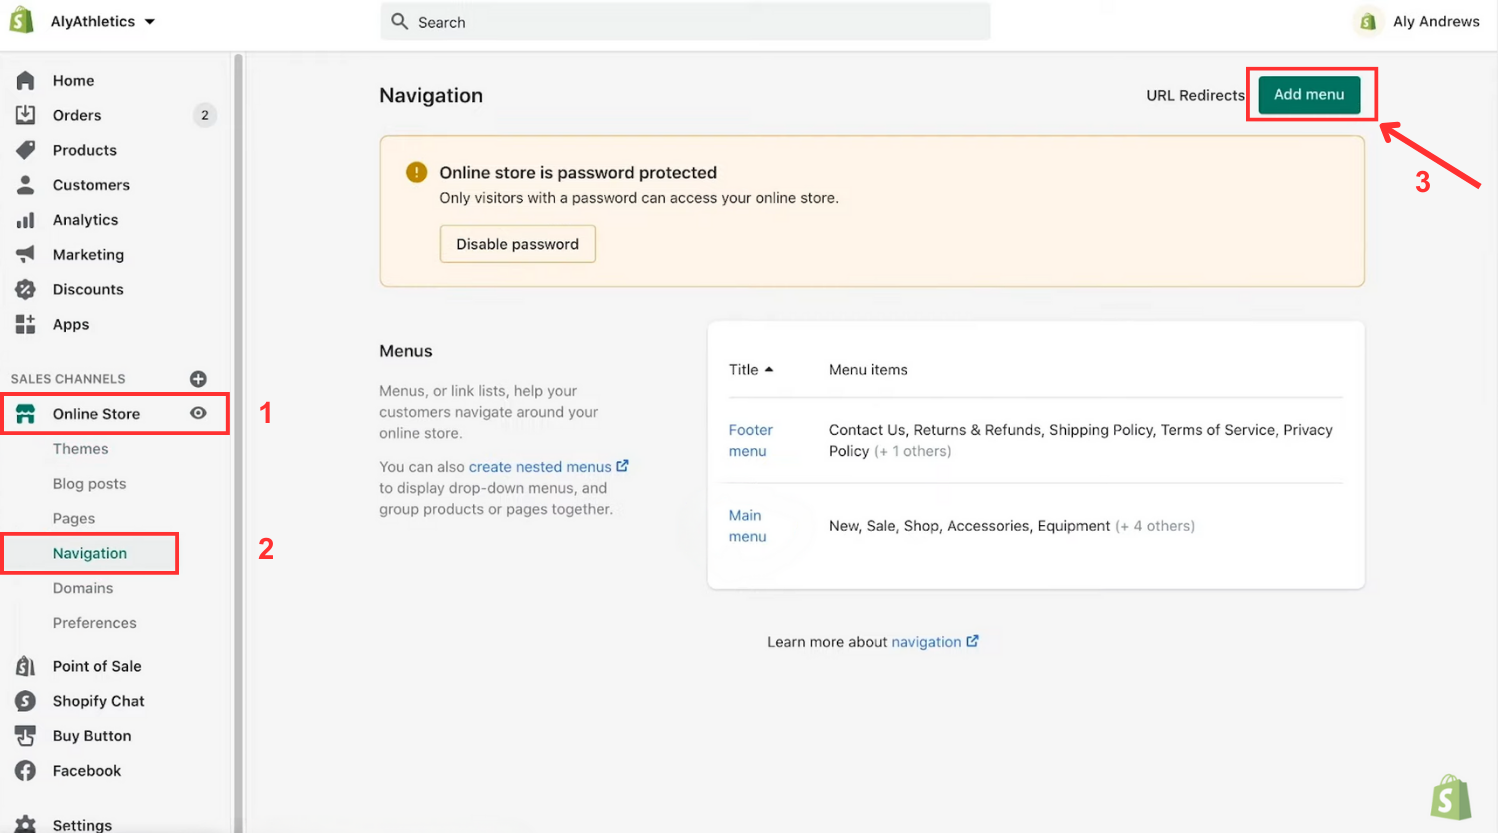
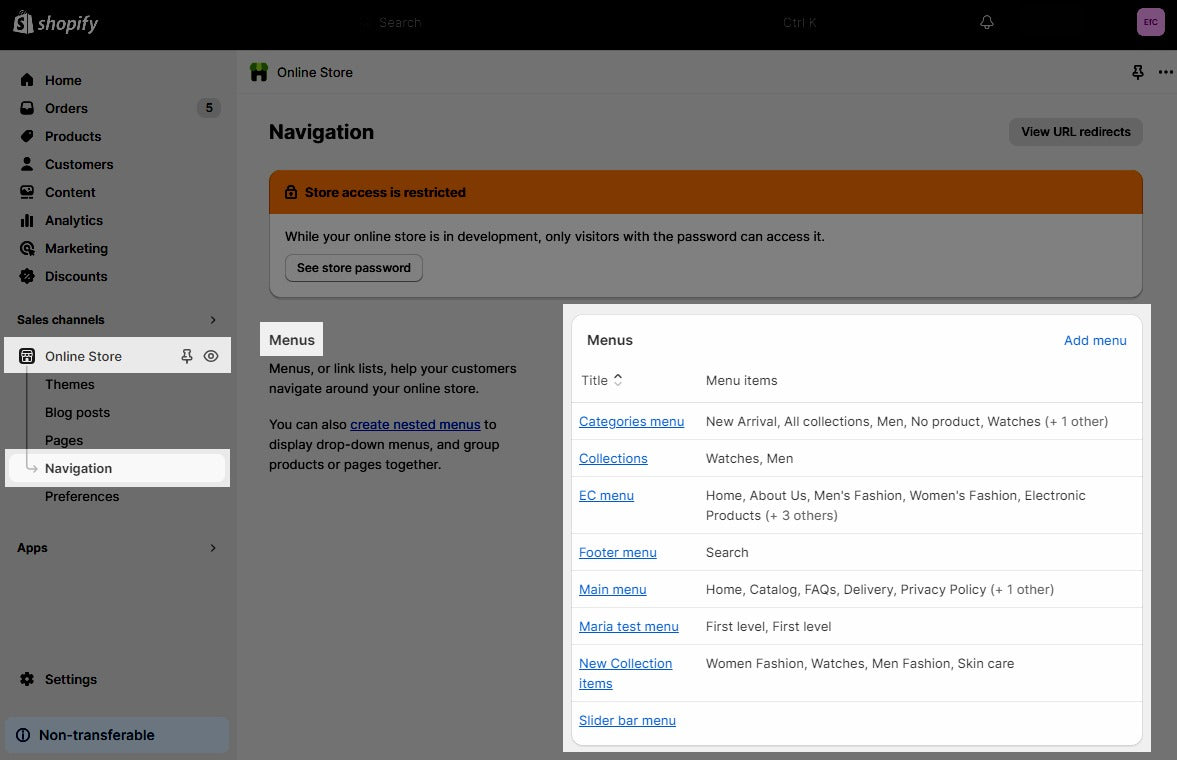
Step 1: Access Navigation
Log in to your Shopify account and navigate to the Sales channels section. Choose “Online Store”, and from the options list that appears, click on “Navigation”, which is the fourth option listed.
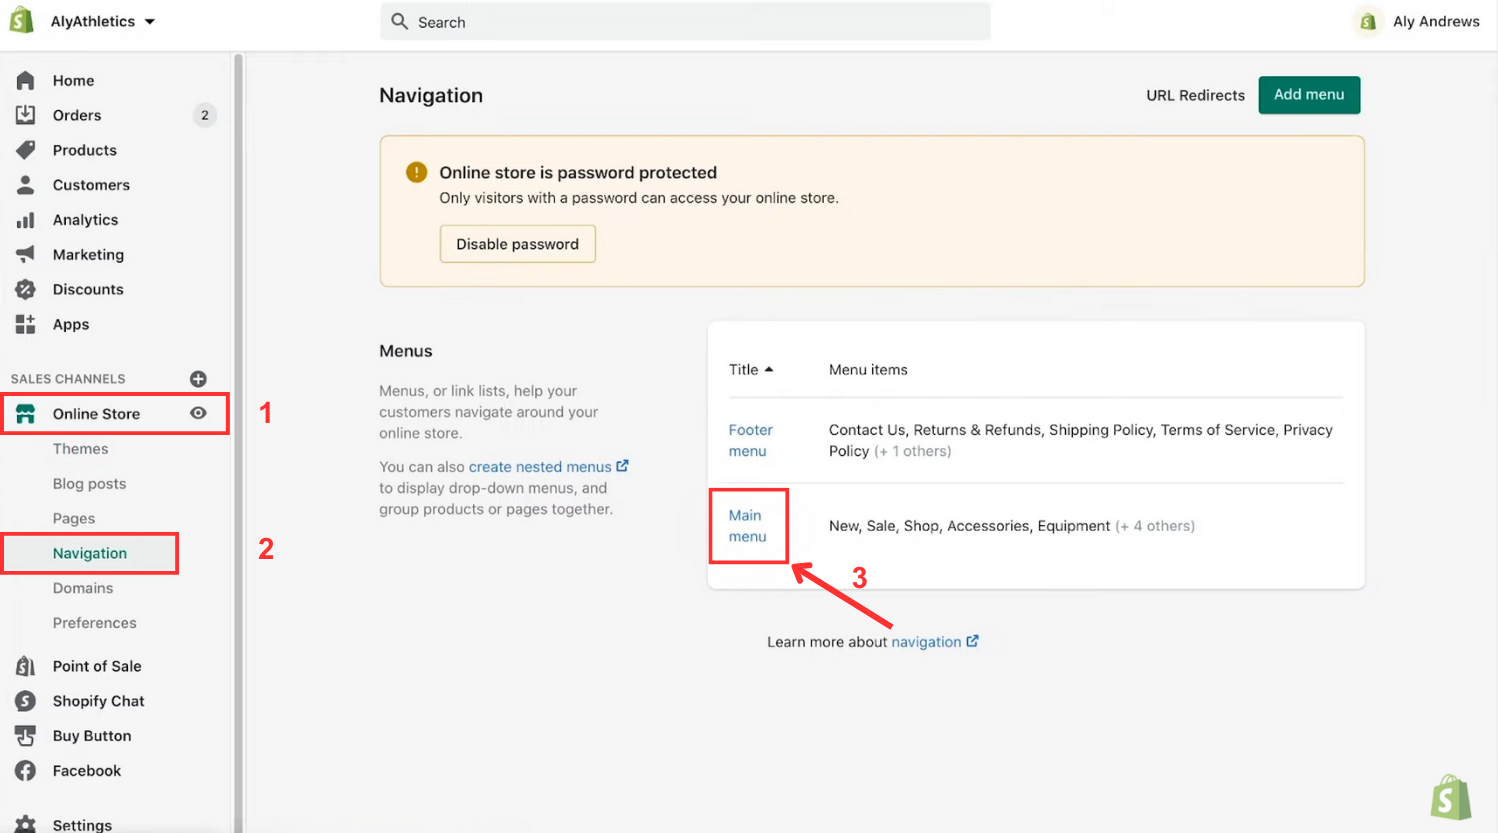
Step 2: Navigate to Main Menu
Within the Navigation section, locate the Menus part and view your list of menus. Identify the one titled Main Menu and select it.
Step 3: Select a Header Item
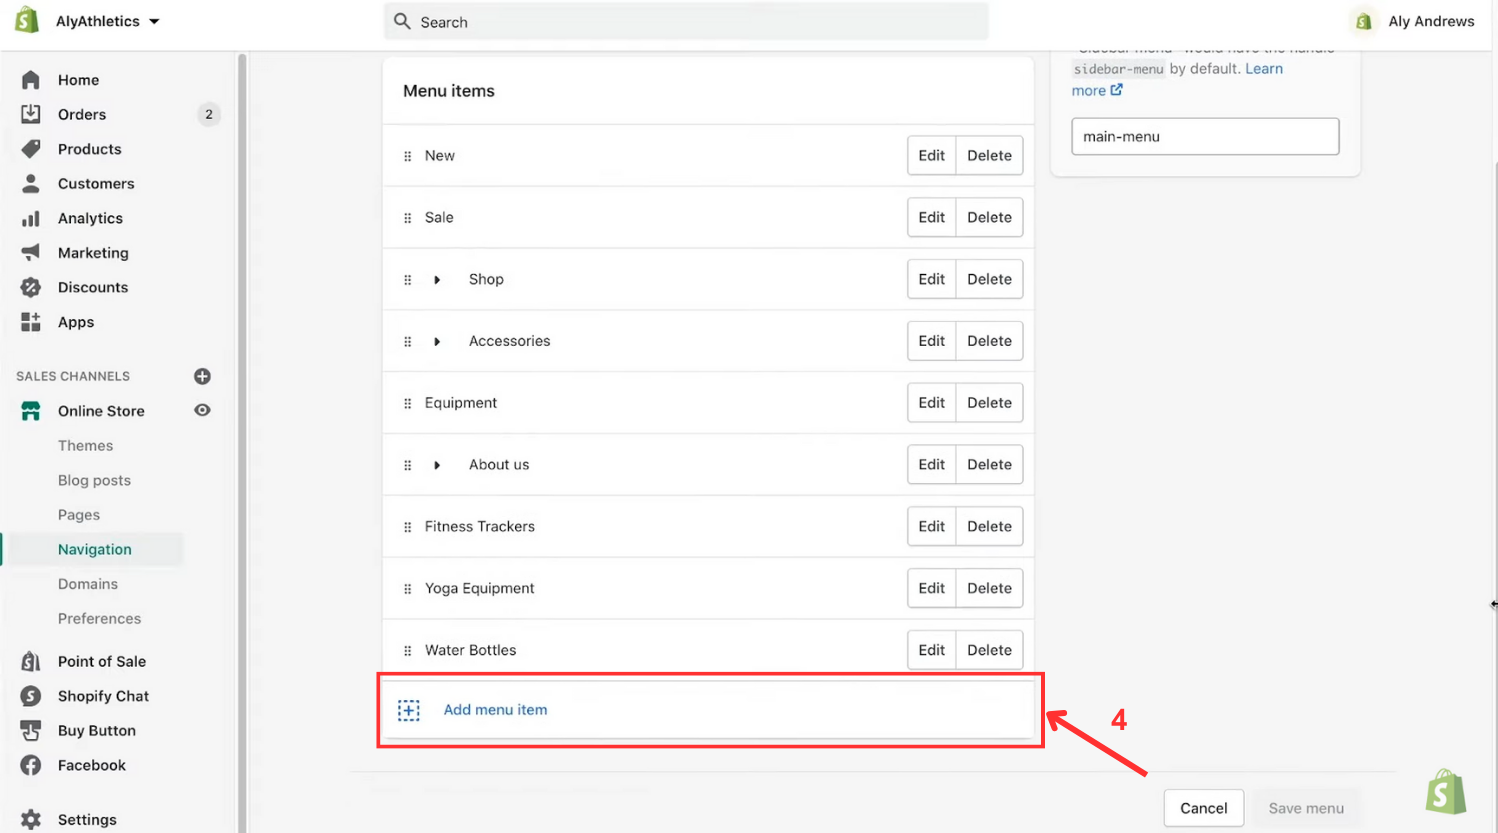
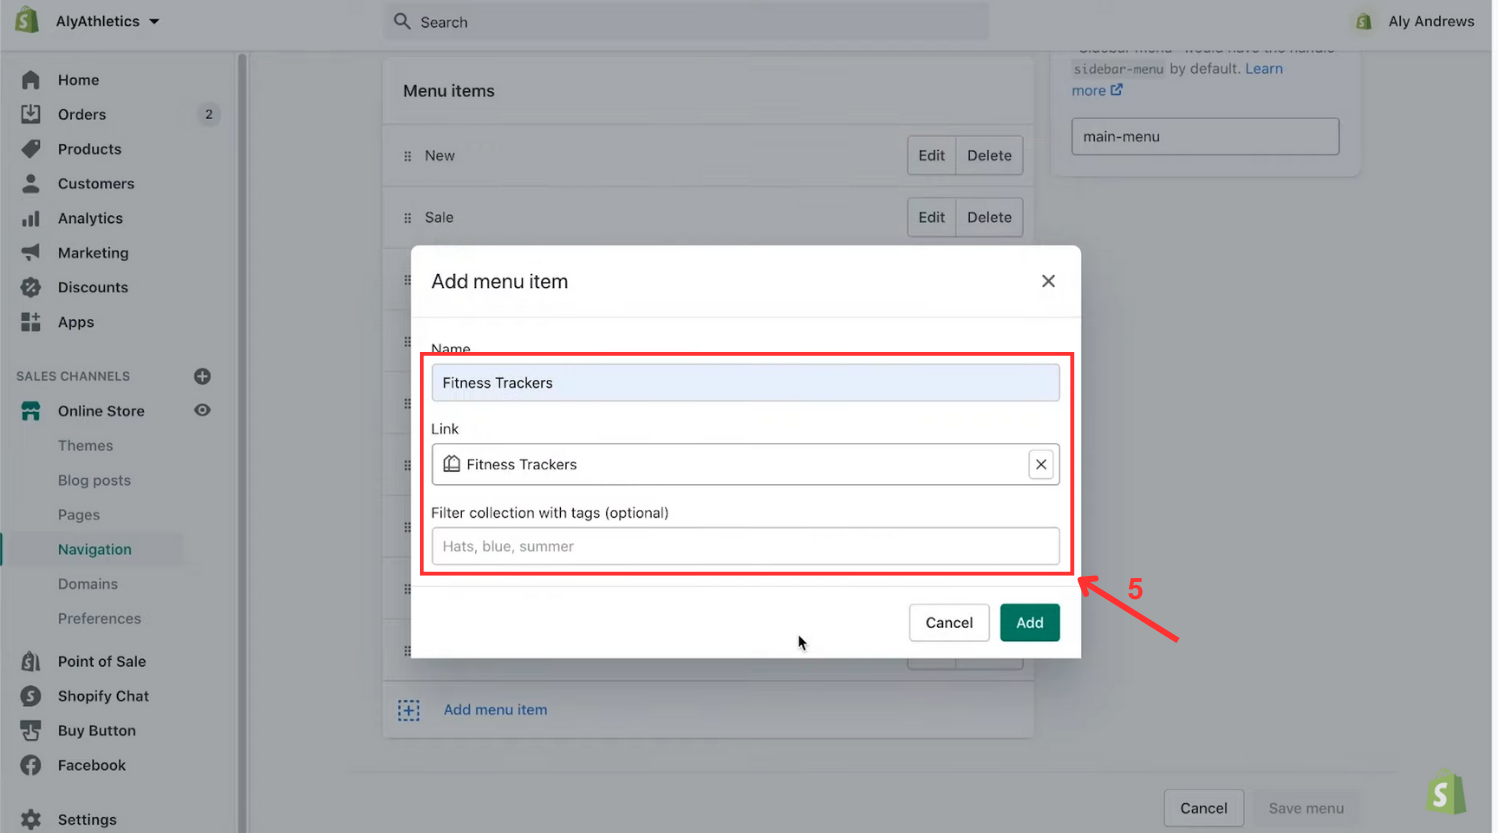
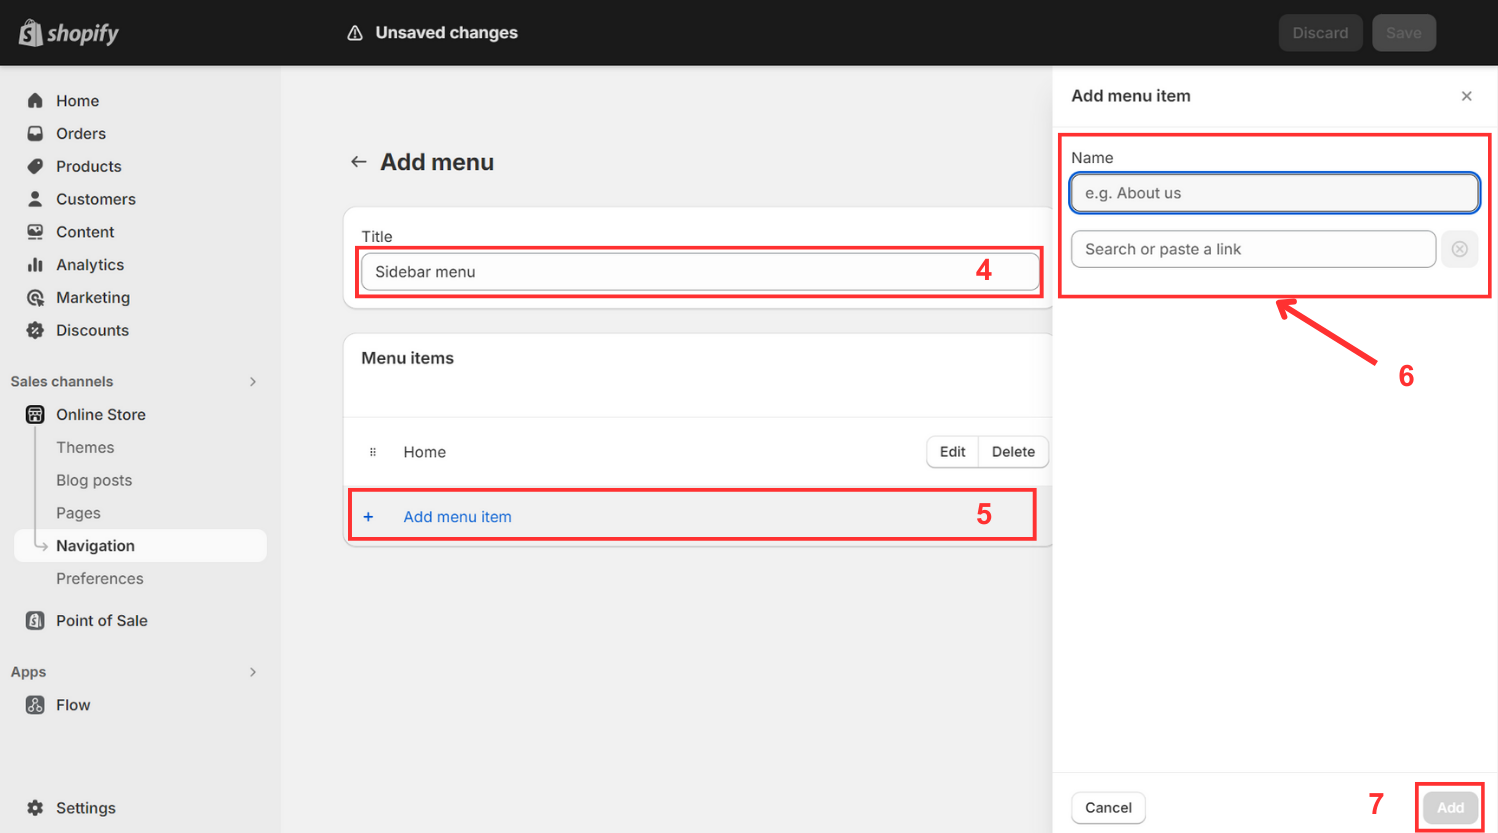
From your menu list, choose an item to serve as the name of your drop-down menu. Alternatively, create a new one by clicking on "Add Menu Item." You will be prompted to enter the Name and Link in a dialog box before clicking Add. If the header doesn't need a reference, you can enter "#" in the Link field.
Step 4: Include Menu Items
If you're using a new header for the drop-down menu, repeat the process to add items to that menu. Choose "Add Menu Item" and enter the title and link destination.
Step 5: Arrange the Item
Drag the item using the ⋮⋮ icon and place it beneath the header of your menu.
For instance, if your menu title is "Equipments" and you want it to include options "Fitness Trackers" and "Yoga Equipments" follow the instructions accordingly.

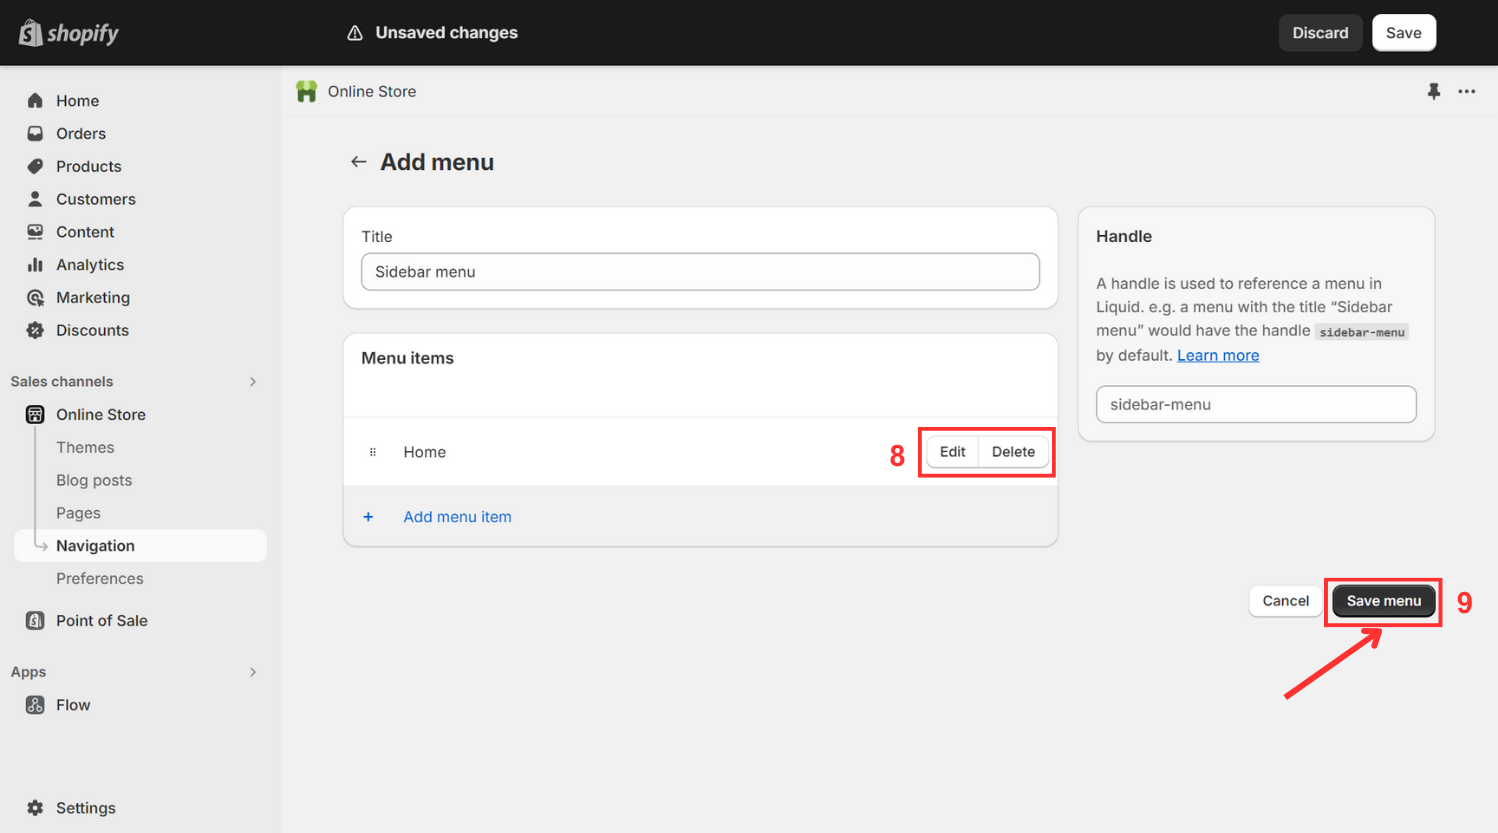
Step 6: Save Changes
Once you've made all the required modifications, find and click the "Save Menu" option at the bottom of the page to finish the process and save your changes.
Once you've created top and first level nesting menu items, follow these steps to add 2nd level nesting items:
Step 1: Drag and drop the desired item under the first level nesting item.
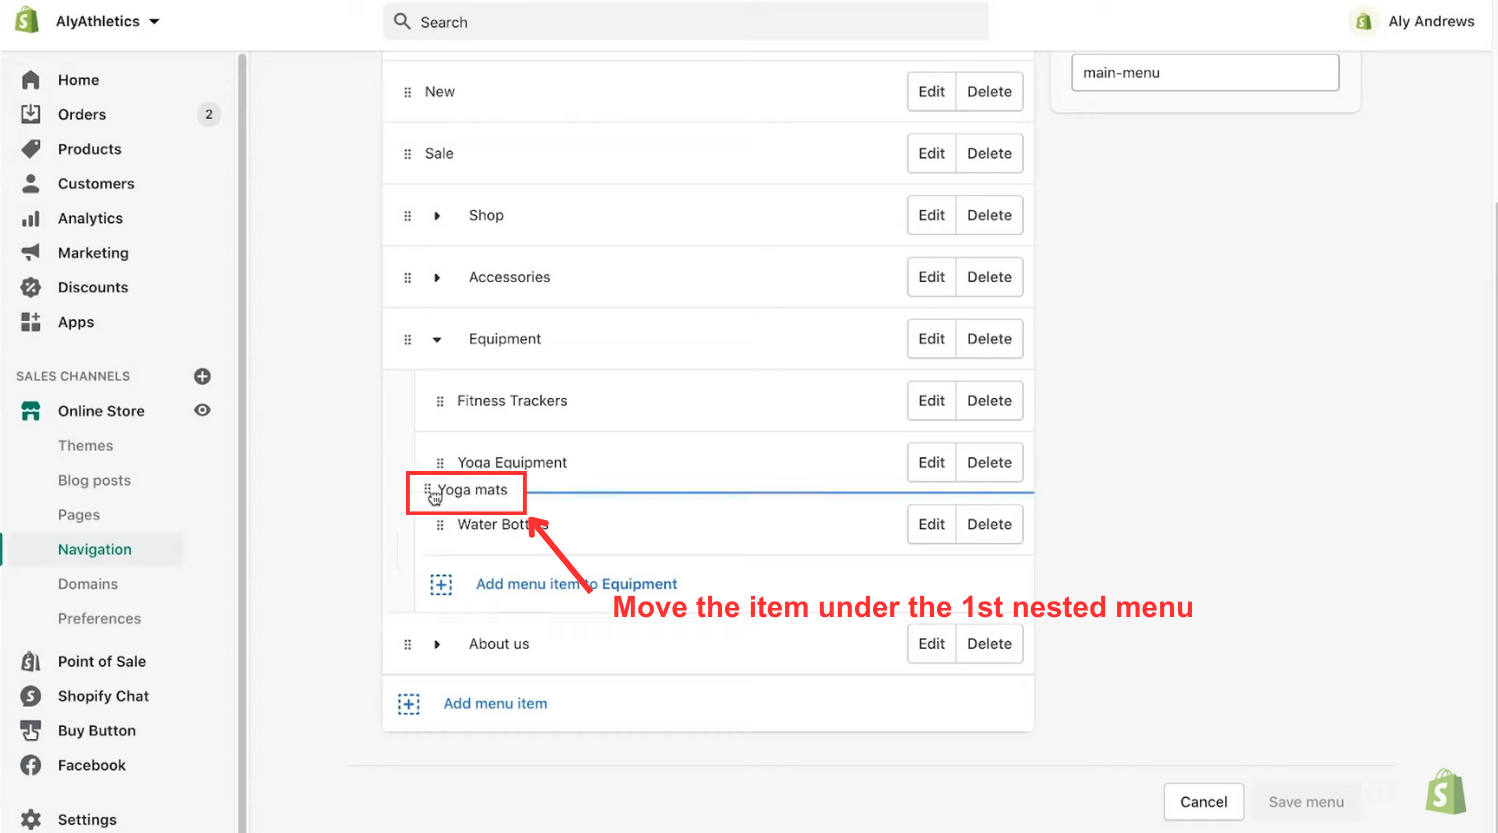
Step 2: Repeat this process for other items.
Step 3: Click "Save."

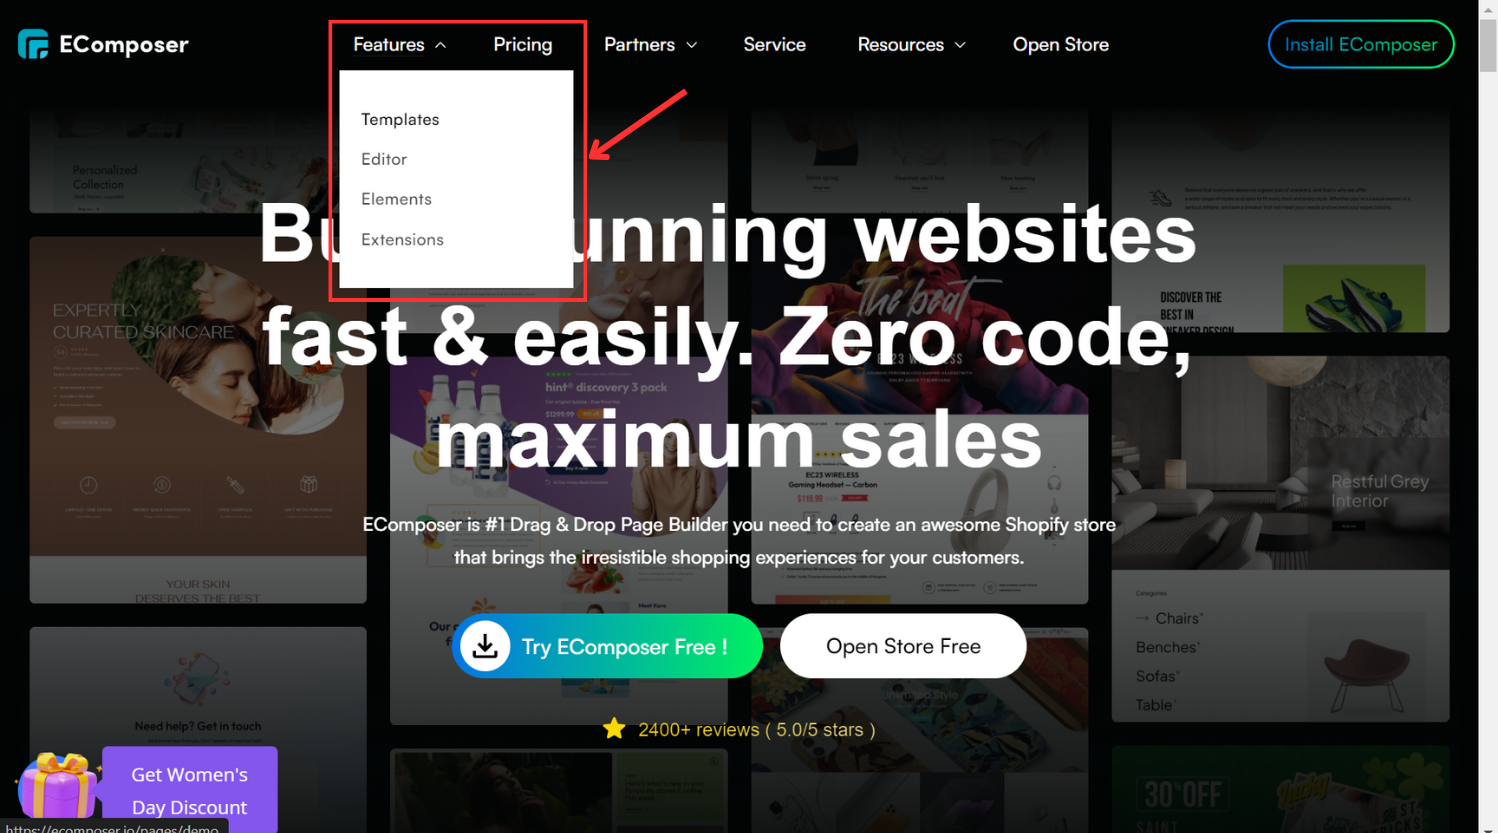
In addition to integrating a drop-down menu into your Shopify store, ensuring customer satisfaction and facilitating easy product access are vital for a well-rounded website. EComposer emerges as an optimal solution, offering a cost-effective and efficient method for crafting an appealing online platform.
Renowned as a premier Shopify Page Builder, EComposer simplifies the design process through its user-friendly drag-and-drop editor and impressive templates, allowing for the creation of captivating landing pages, appealing homepages to informative blogs, ect.
 The creation of optimized pages is now more streamlined with a plethora of components and add-ons available. Enhanced features within the Landing Page Builder, such as an AJAX cart, AI content generator, and image compressor, elevate your store's efficiency, providing a comprehensive solution that saves time, resources, and expenses while facilitating the rapid development of sophisticated Shopify stores.
Elevate your e-commerce ventures with EComposer—try it out for free! For those without a Shopify account, take advantage of a special offer: just $1 per month for the first three months.
With these steps, you've successfully created fully nested menu items. Now, let's explore how to add a drop-down menu by using iPhone/Android
3. Add a Drop-down Menu by Using iPhone/ Android
Step 1: Navigate to Store and Online Store
Access the Store section from your admin display, then click on the “Online Store” located below the Sales channels section.
Step 2: Access Navigation
Locate “Navigation” within the settings list of the Online Store; it's positioned fourth and also found under Pages.
Step 3: Open Main Menu
Within the Navigation detailed page, you'll find a list of all menus in your store. Click on the one labeled “Main Menu”.
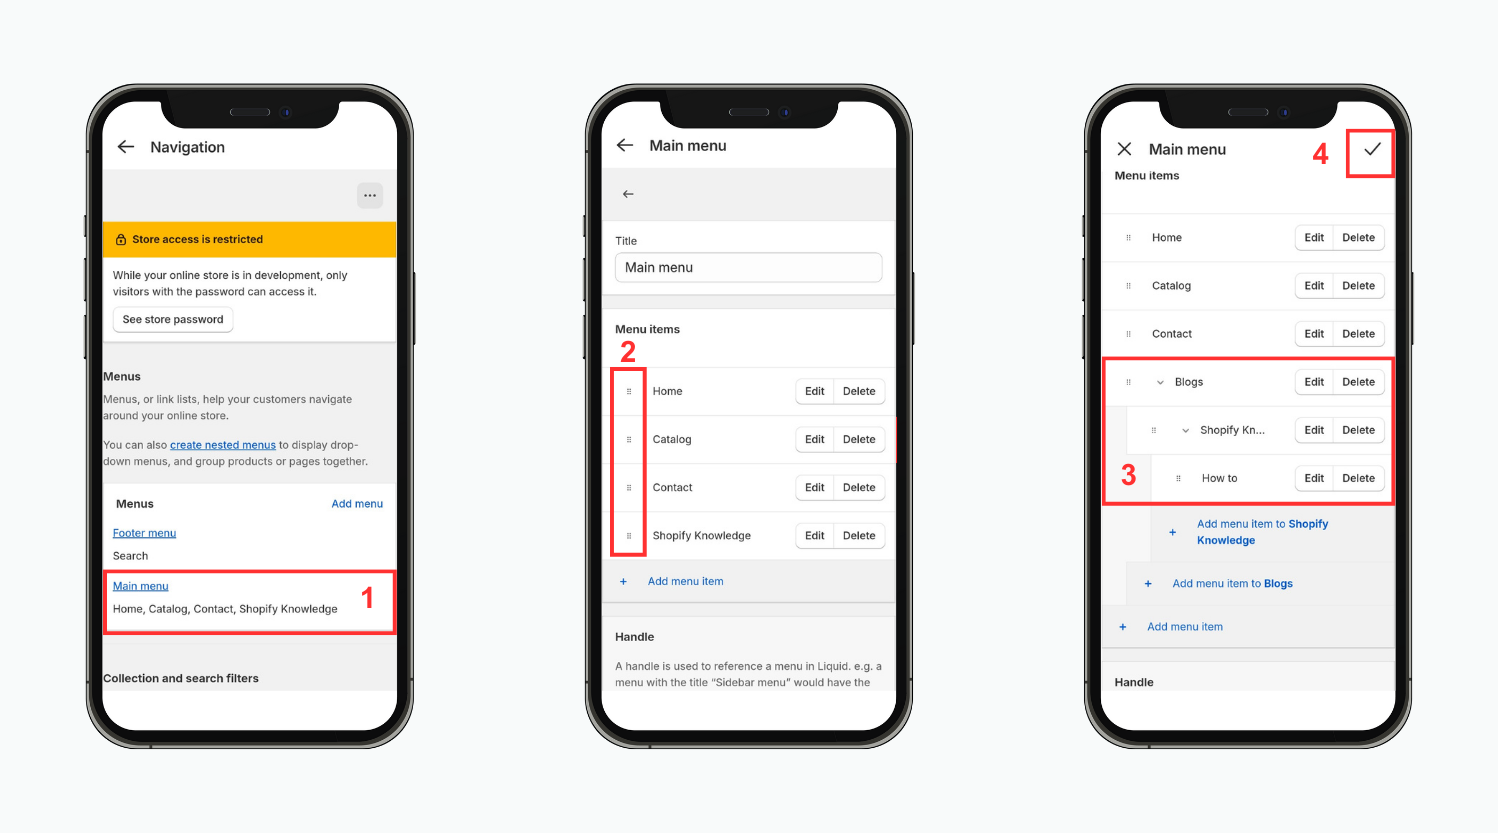
Step 4: Select a Title Item
Under the Main Menu title, find the Menu Items section containing all items in the Main Menu. Choose one to serve as the header for your drop-down menu or add a new item.
Step 5: Add Menu Items
Opt for "Add Menu Item" to create a new item for the drop-down menu. Upon clicking, a new box will appear where you can input the name and link for the item. Alternatively, you can use "#" to denote that there's no reference for this item.
Step 6: Rearrange Items
Move the ⋮⋮ symbol to nest beneath the drop-down menu's title by clicking on it. When you move an item, you'll notice a 🔻 icon next to the header.
Step 7: Save Changes
Once you've completed the above steps, select "Save Menu" to finalize and ensure that all your adjustments are recorded by the system.
Follow these steps to effortlessly create a drop-down menu on Shopify, empowering your customers with streamlined navigation and a delightful shopping experience.
Navigating to the Drop-Down Menu Editor
Step 1: From your Shopify admin panel, navigate to Online Store > Navigation.
Step 2: On the Navigation page, select the title of the menu you wish to modify.
Step 3: Click on "Add menu."
Step 4: Provide a name for the menu item. This name will be visible in the menu and can include special characters or emojis.
Step 5: Select the Link field and input a web address for an external site or choose a link type:
- Home: directs to your online store's home page
- Collections: specifies a particular collection or all collections
- Products: designates a specific product or all products
- Pages: takes users to a webpage inside your virtual shop.
- Blogs: connections to a blog on your web shop
- Blog posts: links to a certain blog entry on your online shop
- Policies: provides a link to a policy for your shop. Use the syntax "mailto:youremail@example.com" to establish an email link.
If you choose a collection or all collections, you can filter the collection using tags to display products that match all entered tags.
If you selected a link type, choose a specific destination. If Home is selected, the destination is automatically set to your online store's home page.
Step 6: Click "Add" to save your menu item.
Step 7: You can choose Edit or Remove depends on your purpose
Step 8: Finally, click "Save menu" to ensure your changes are saved.
5 Shopify Drop-down Menu Templates
Explore five versatile Shopify drop-down menu templates designed to enhance navigation and streamline user experience on your online store.
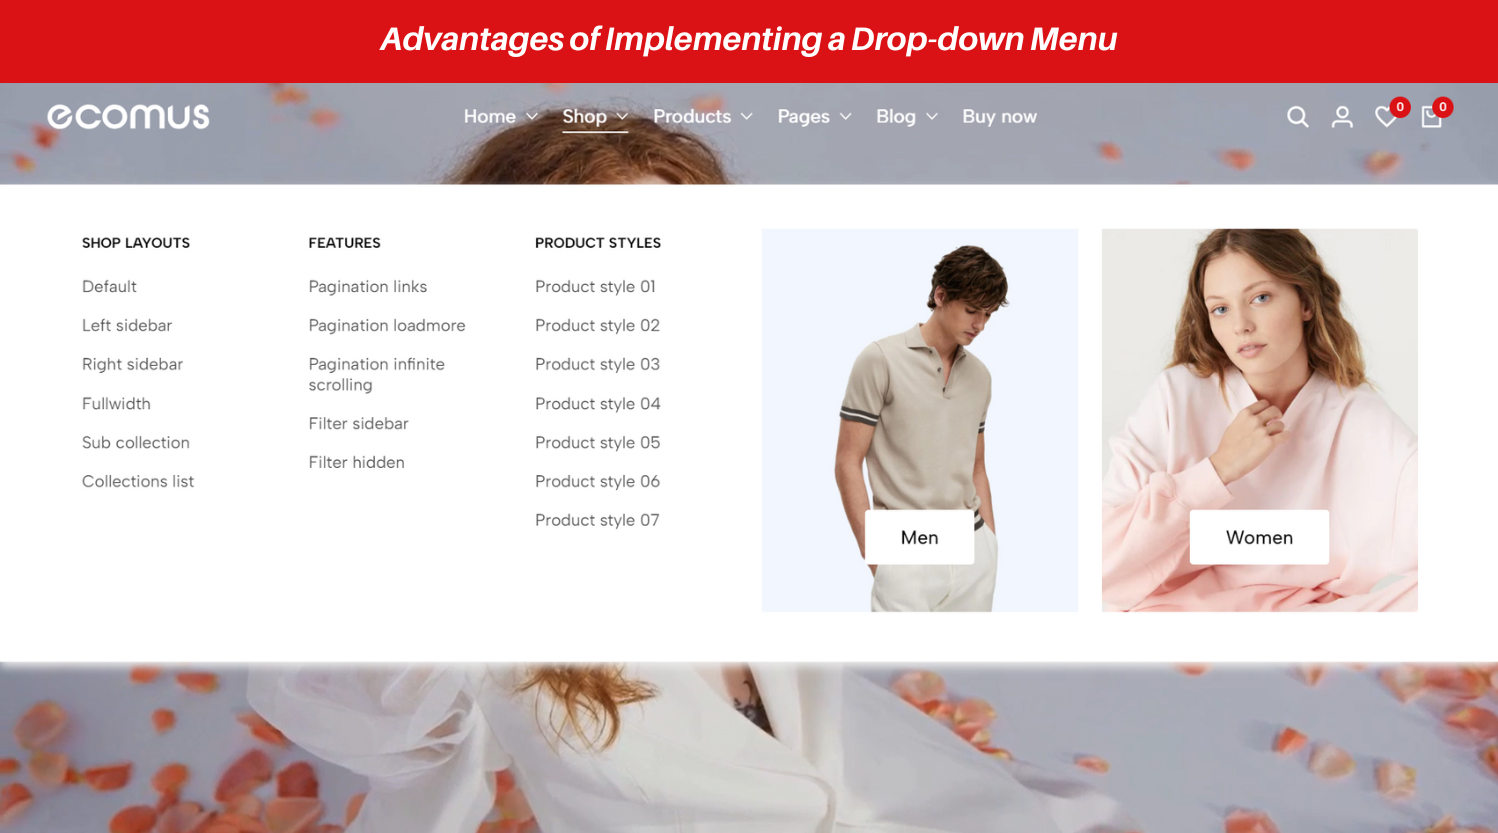
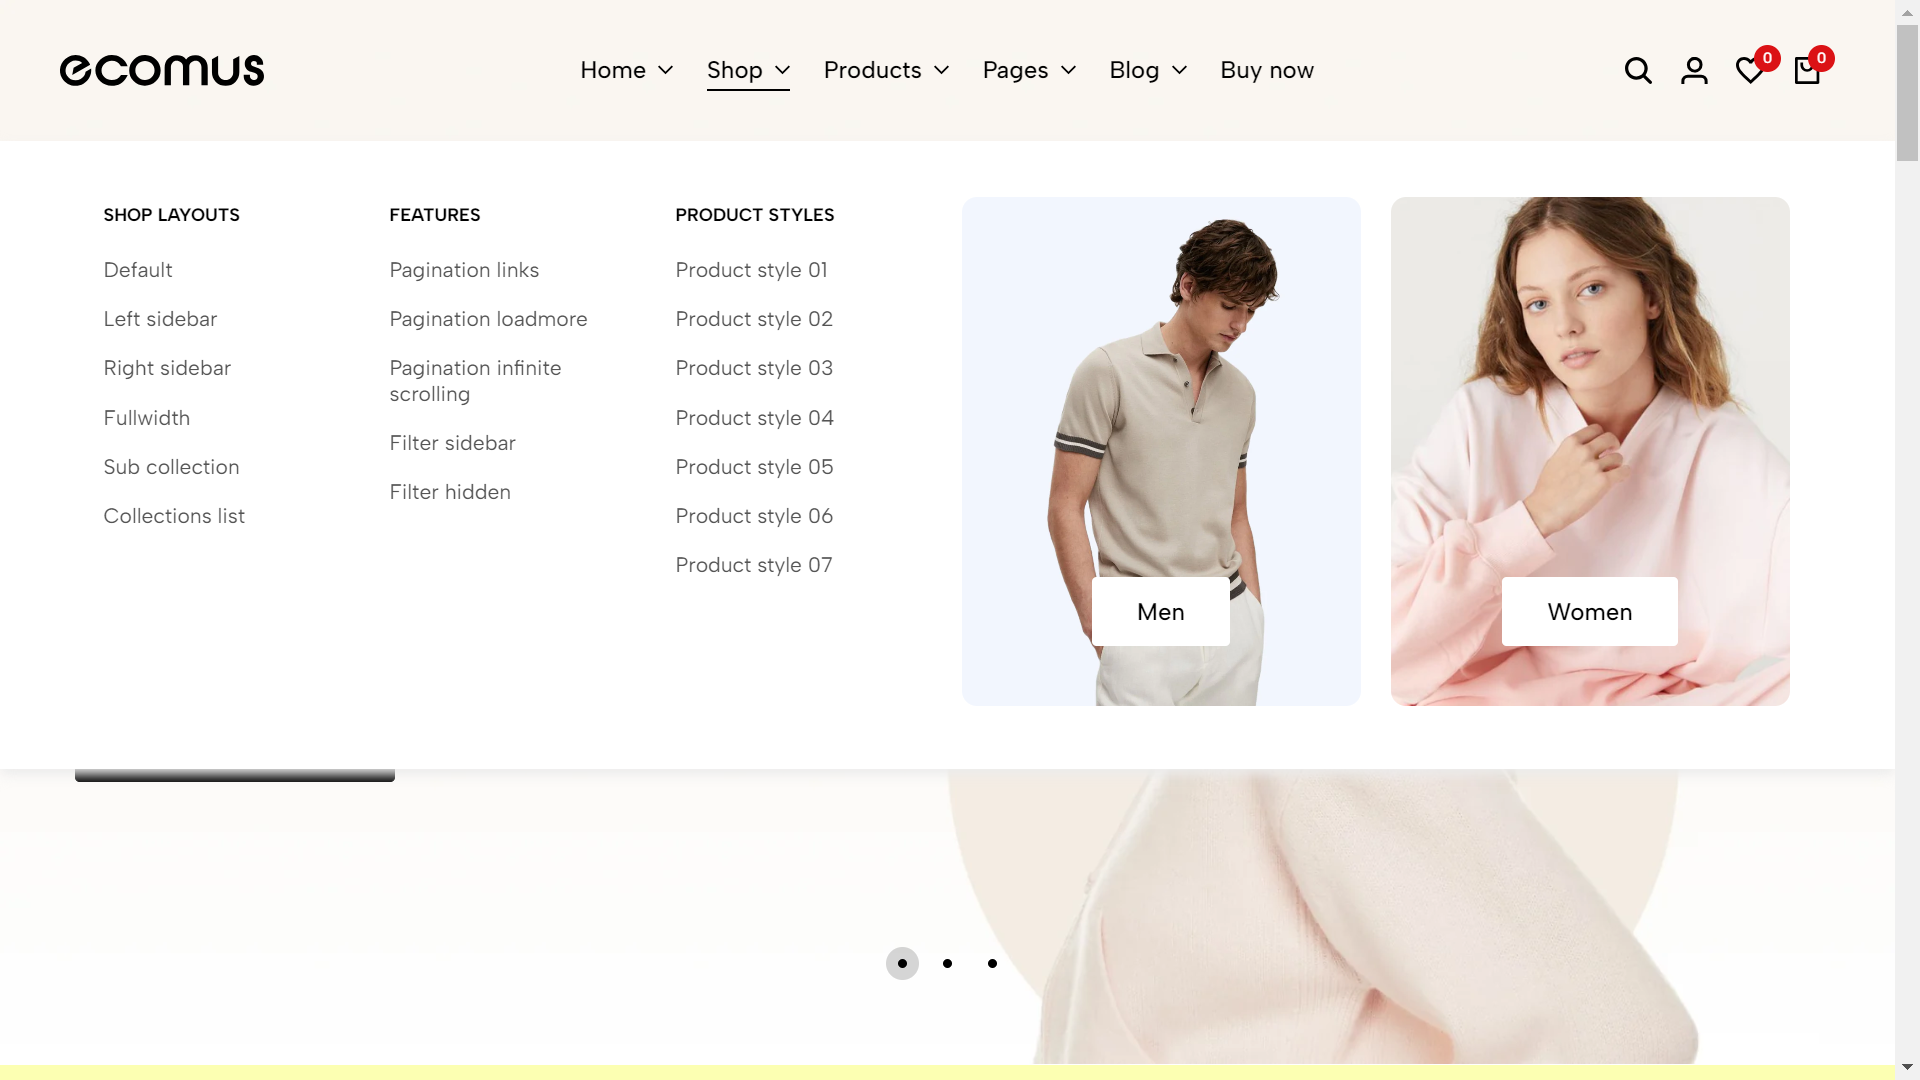
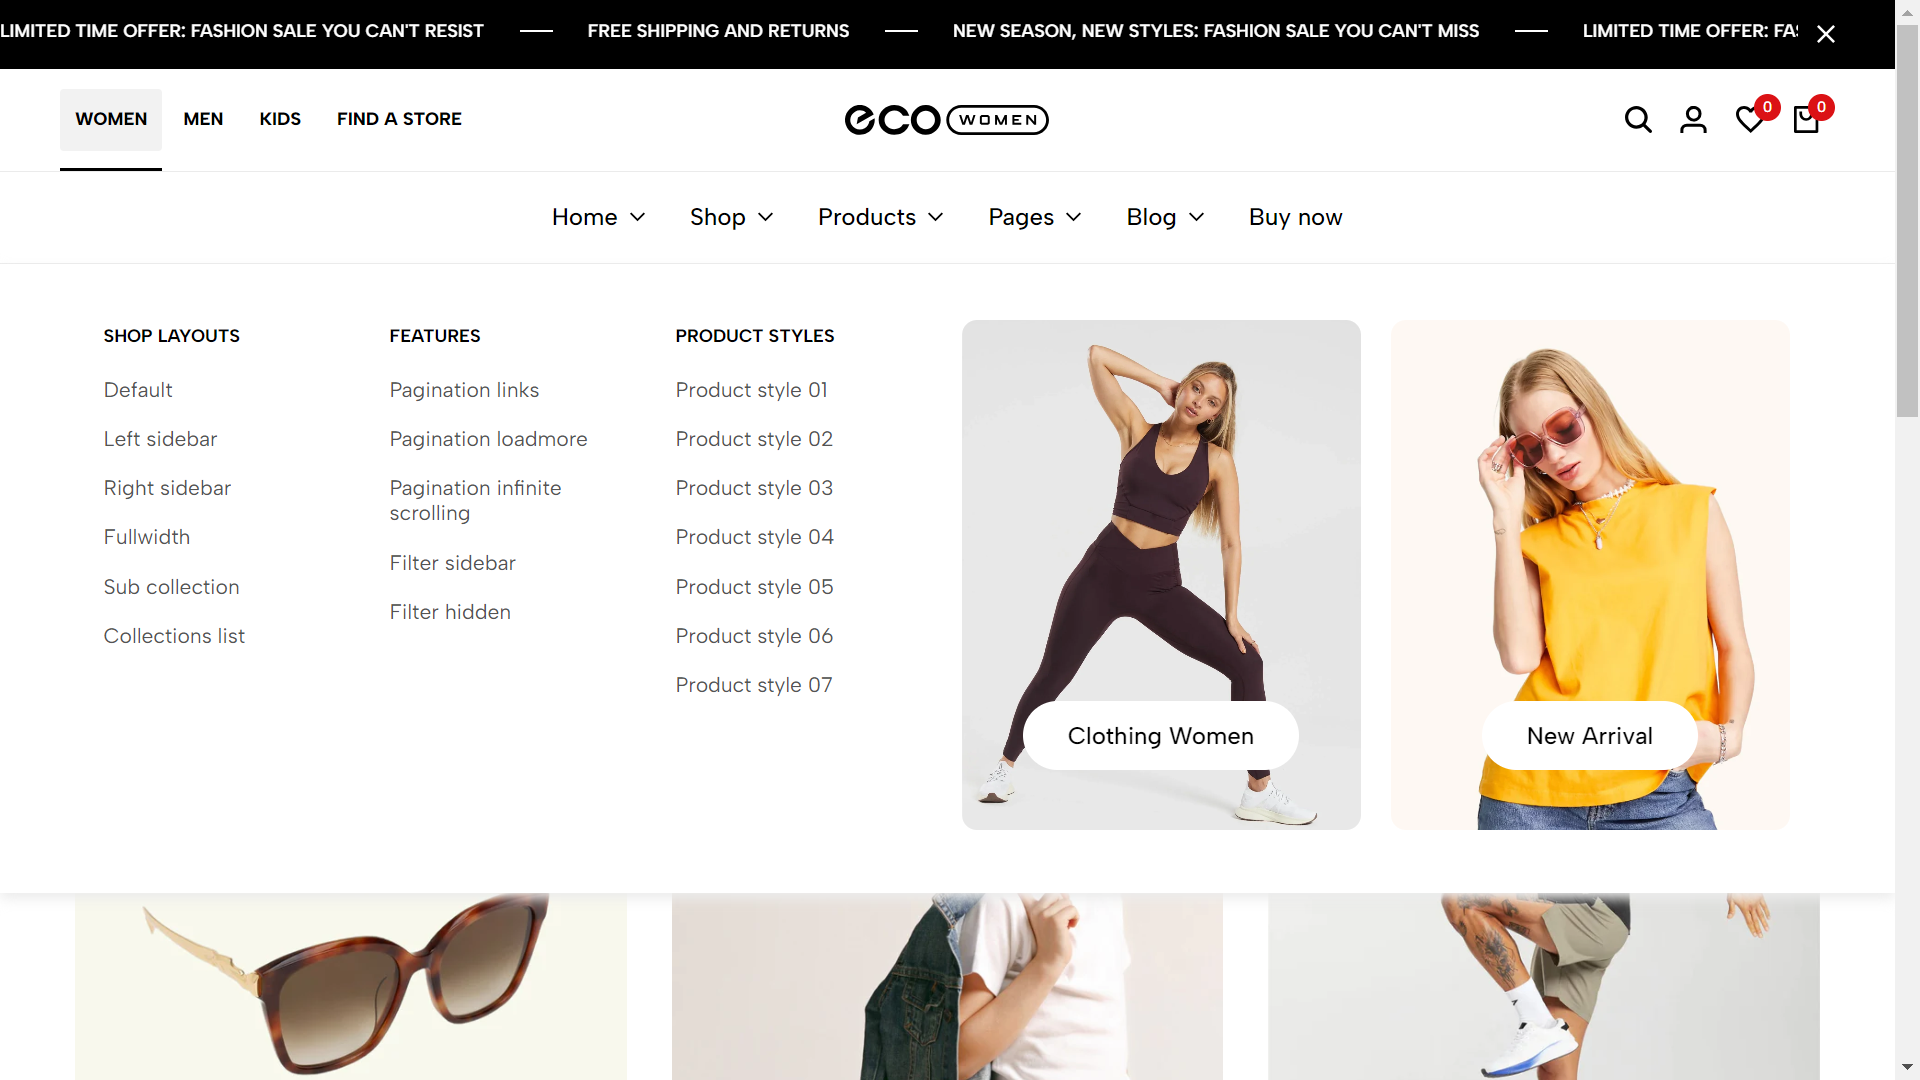
1. Ecomus - Ultimate Shopify OS2.0 Theme

The Ecomus theme boasts a dynamic versatility with more than 20 carefully curated demonstrations, serving diverse product types and industries. Each demo exemplifies responsive design, ensuring seamless adaptability across various screen dimensions. Whether it's fashion, electronics, or outdoor goods, Ecomus effortlessly aligns with any business niche.
Beyond their aesthetic appeal, these demos offer comprehensive e-commerce functionalities. Whether you run a small boutique or a large tech enterprise, Ecomus ensures a personalized and captivating online presence. Explore the pinnacle of e-commerce themes with Ecomus, where each demo serves as a gateway to a lively and adaptable business display.
So, why does Ecomus excel in mobile experience? Here are some standout reasons:
- Responsive Design for All Screen Sizes
- Mobile Bottom Navigation and Drop-down Menu Templates
- Optimized Elements for Swift Loading Times
- Streamlined Cart and Checkout Experience
- Real-Time Updates for Every User Interaction
Refer these examples:
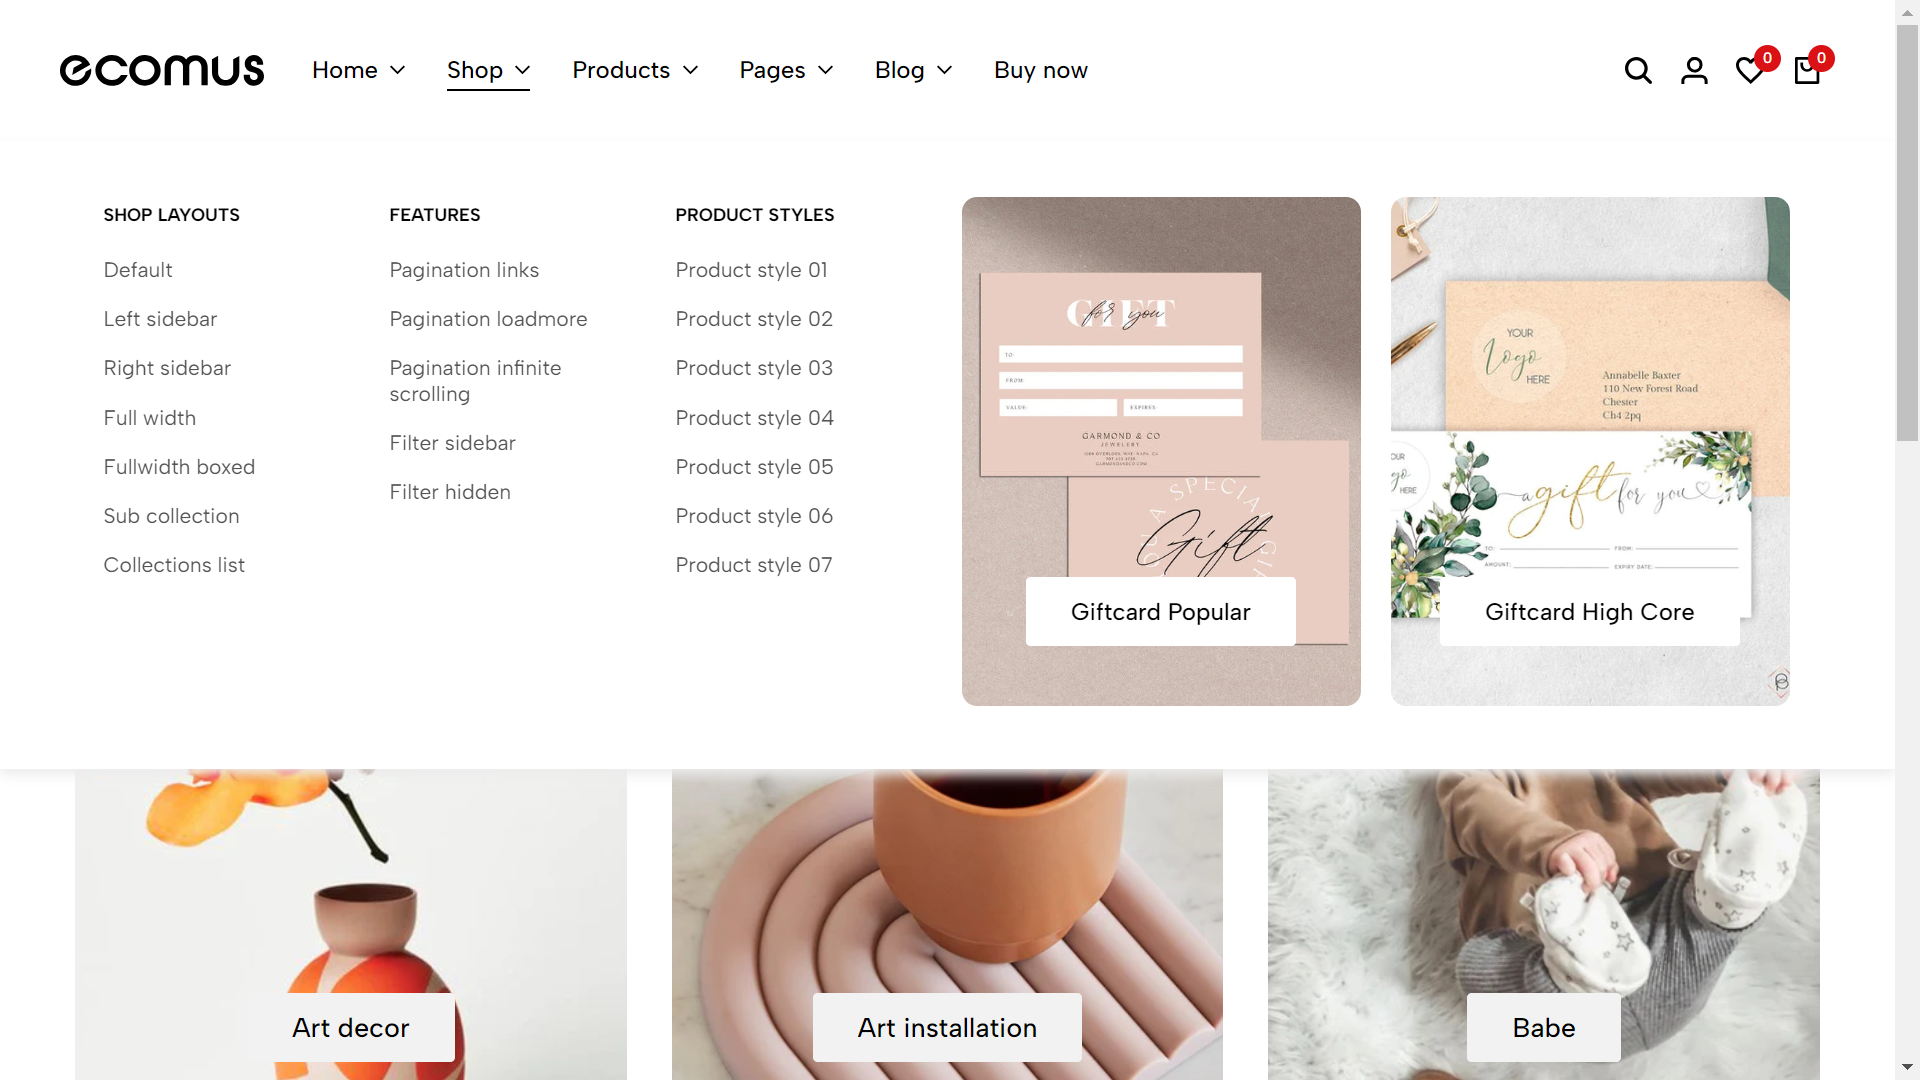
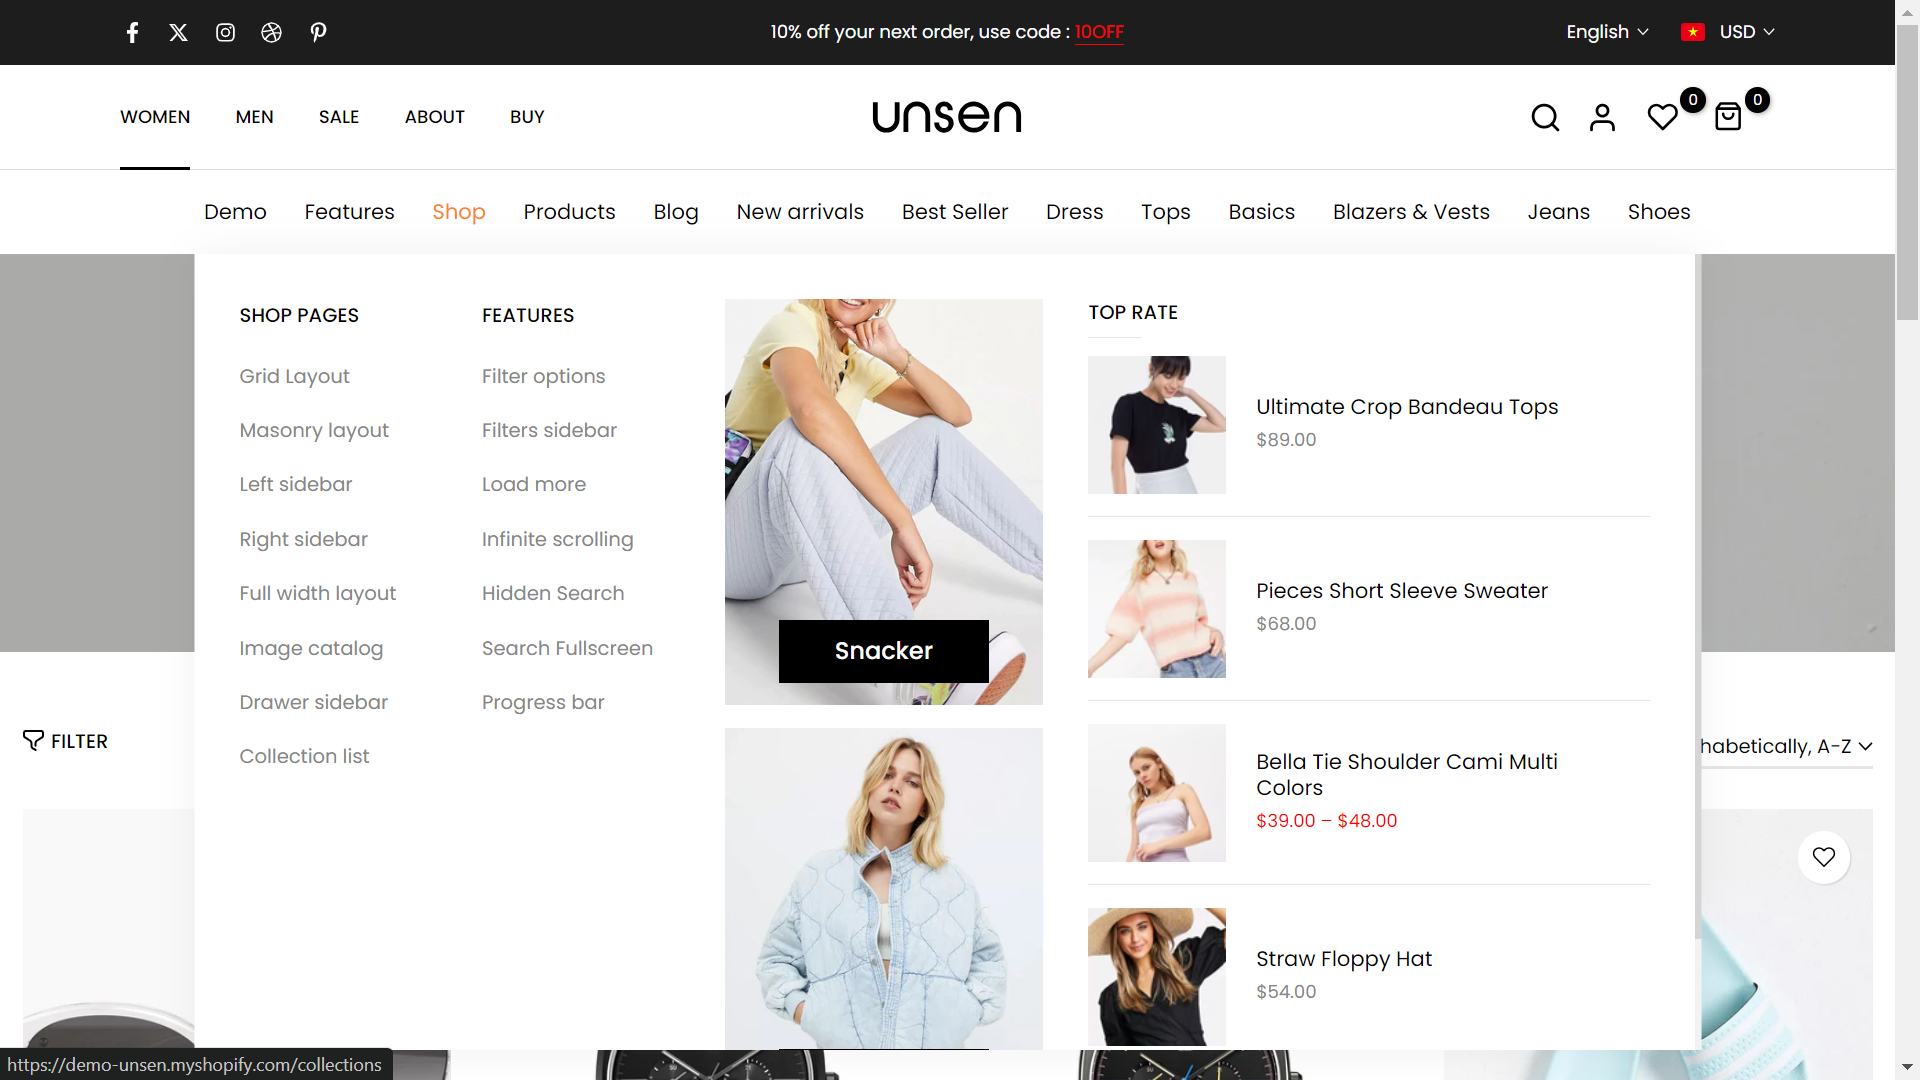
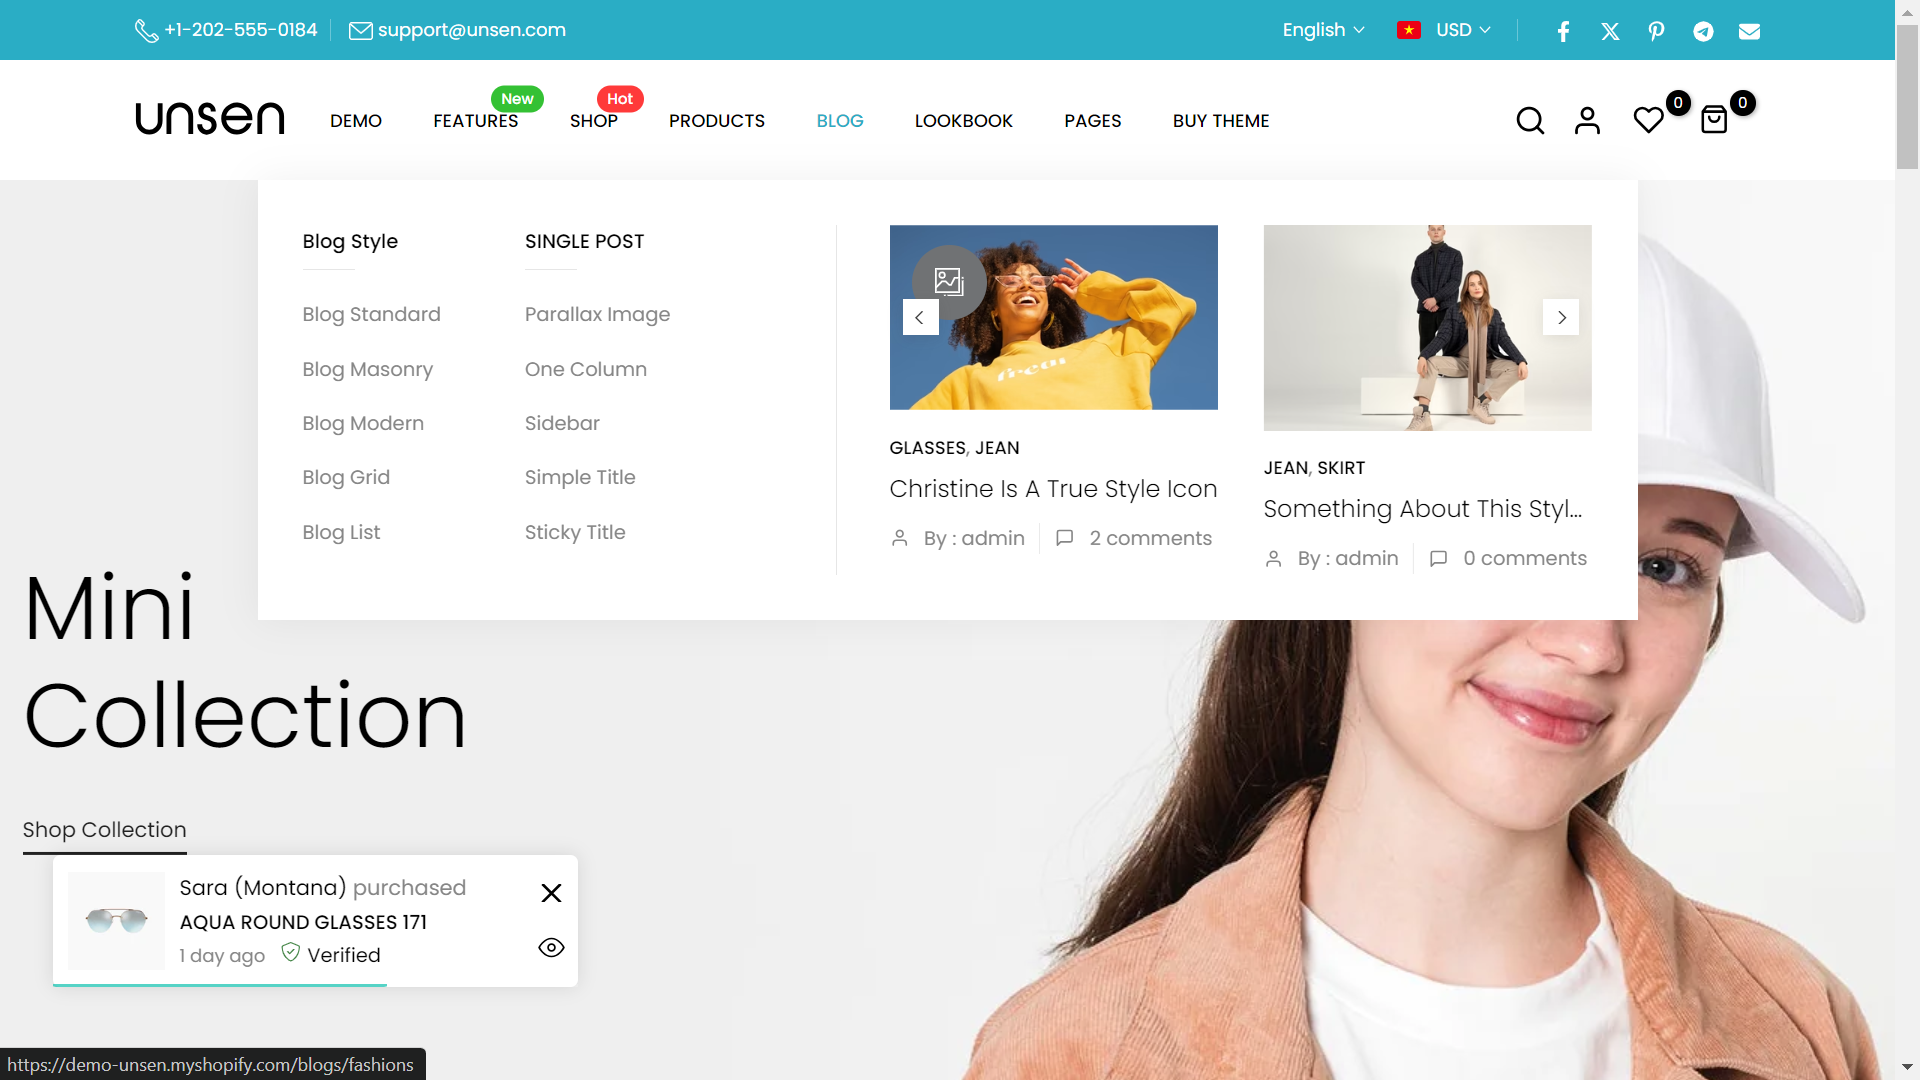
2. Unsen - Multipurpose Shopify Theme OS2.0

Unsen emerges as the latest high-caliber Shopify theme crafted by our exceptional team at The4. Following in the footsteps of our renowned Kalles and Gecko themes, Unsen underwent meticulous development, prioritizing user experience to ensure that stores adopting our new theme offer a seamless and enjoyable journey for their customers.
With an investment of over a year in design and development, Unsen was conceived to introduce fresh designs and vibrant colors to users aiming to establish a contemporary store. Moreover, Unsen has been engineered to seamlessly integrate with EComposer – one of the premier page builder apps available on the Shopify app store. This unparalleled fusion of Unsen and EComposer empowers you to fashion a store that not only captivates with its menu but also excels in user-friendliness.
Why Choosing Unsen?
- Sections in Product Pages
- Compatible with RYVIU
- Multi-Purpose Design
- 20+ available homepage layouts
- Multiple Page Styles
- Social Sharing Features
- Mega Menu
- Sticky Menu
Refer these examples:
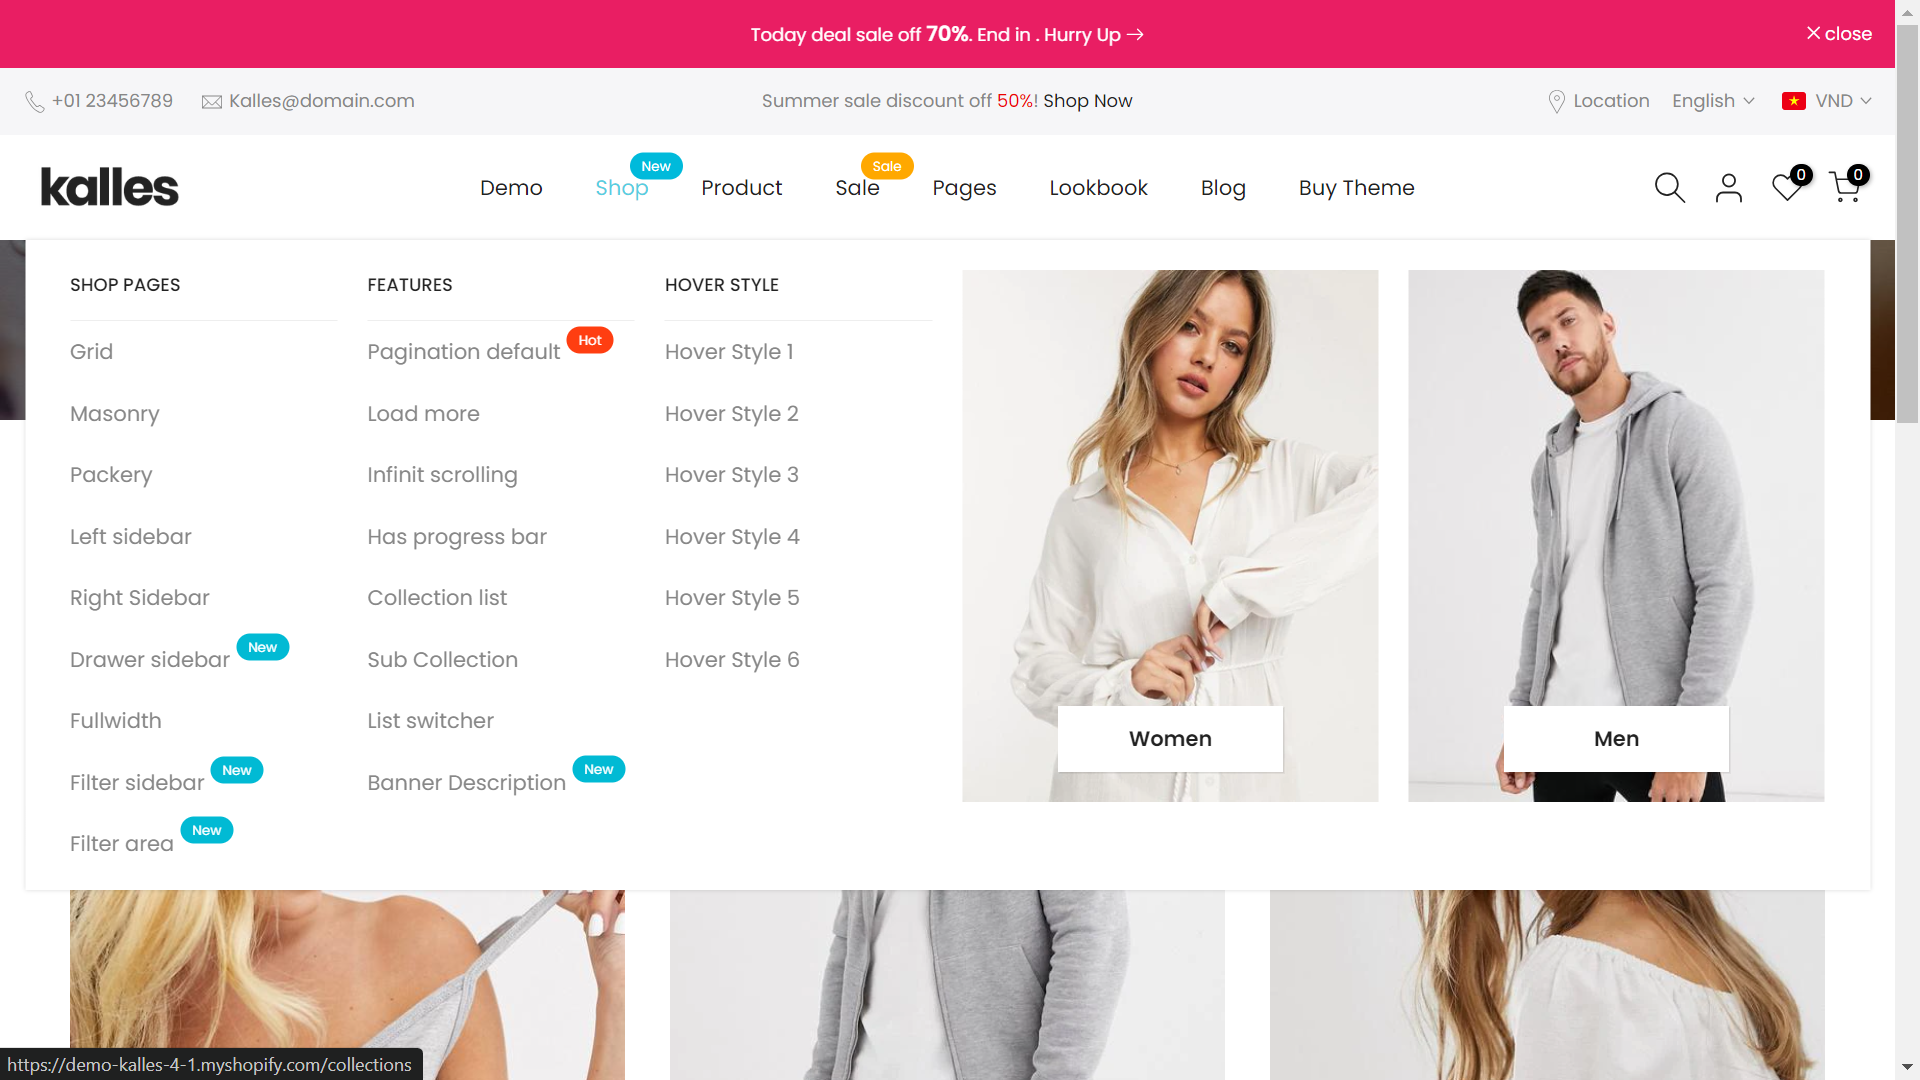
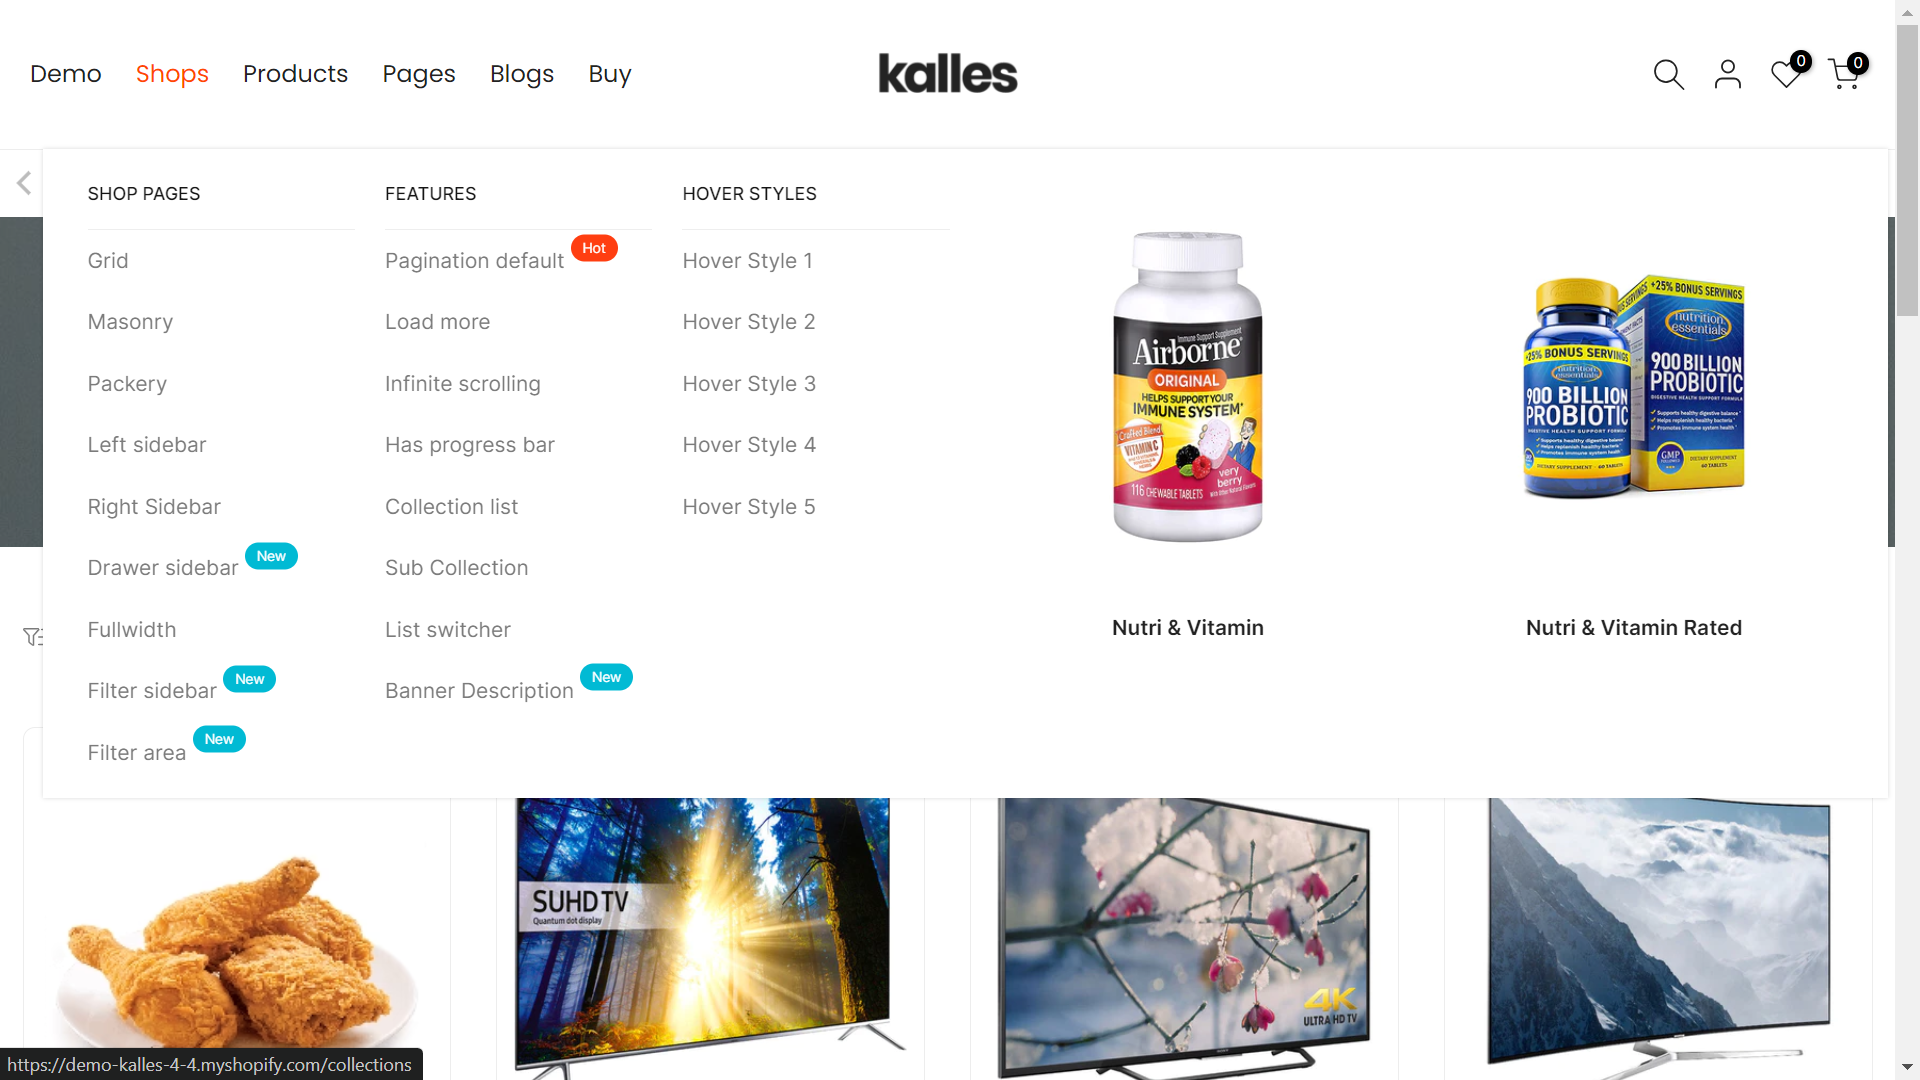
3. Kalles - Clean, Versatile, Responsive Shopify Theme
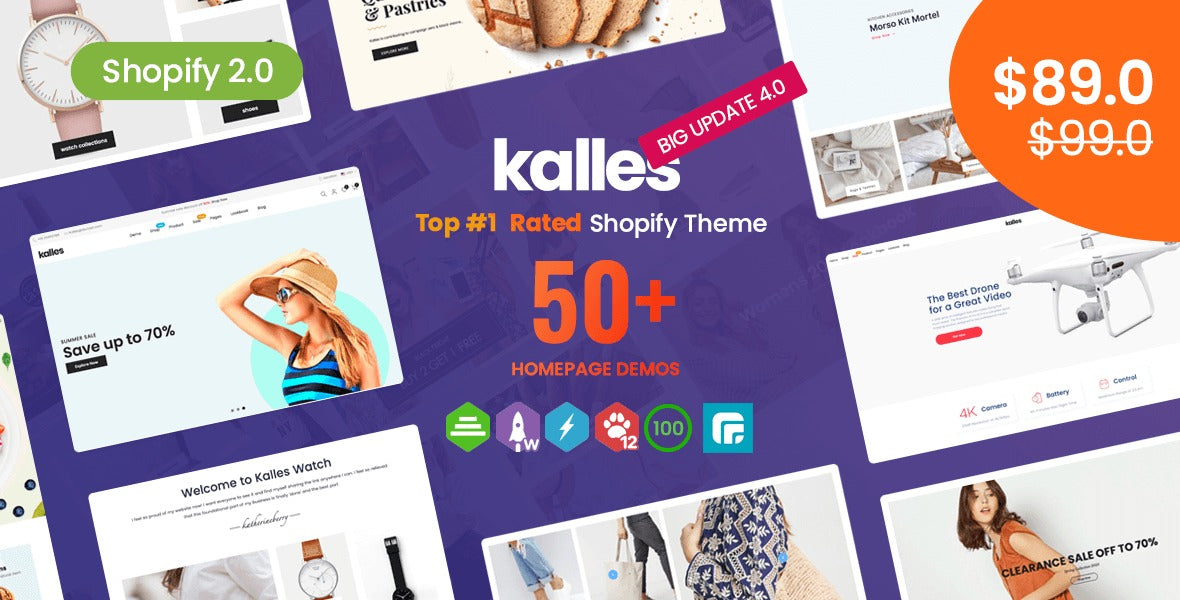
With a rich background spanning 9 years in e-commerce, our extensive expertise has been infused into this product. Tailored for entrepreneurs committed to scaling their ventures without breaking the bank, Kalles presents exceptional value for those in pursuit of premium products and services. Unlike budget-friendly alternatives, our focus lies in delivering superior offerings and services to clientele.
Kalles stands as the ultimate Shopify theme for crafting a robust online store including a drop-down menu that delivers a seamless shopping journey for your clients. Built to support a wide range of online enterprises, Kalles has a modern aesthetic, a simple appeal, and demos tailored to specific uses. Effortlessly showcase your products in a chic manner, simplifying the browsing, selection, and purchasing process for your customers.
Refer these examples:

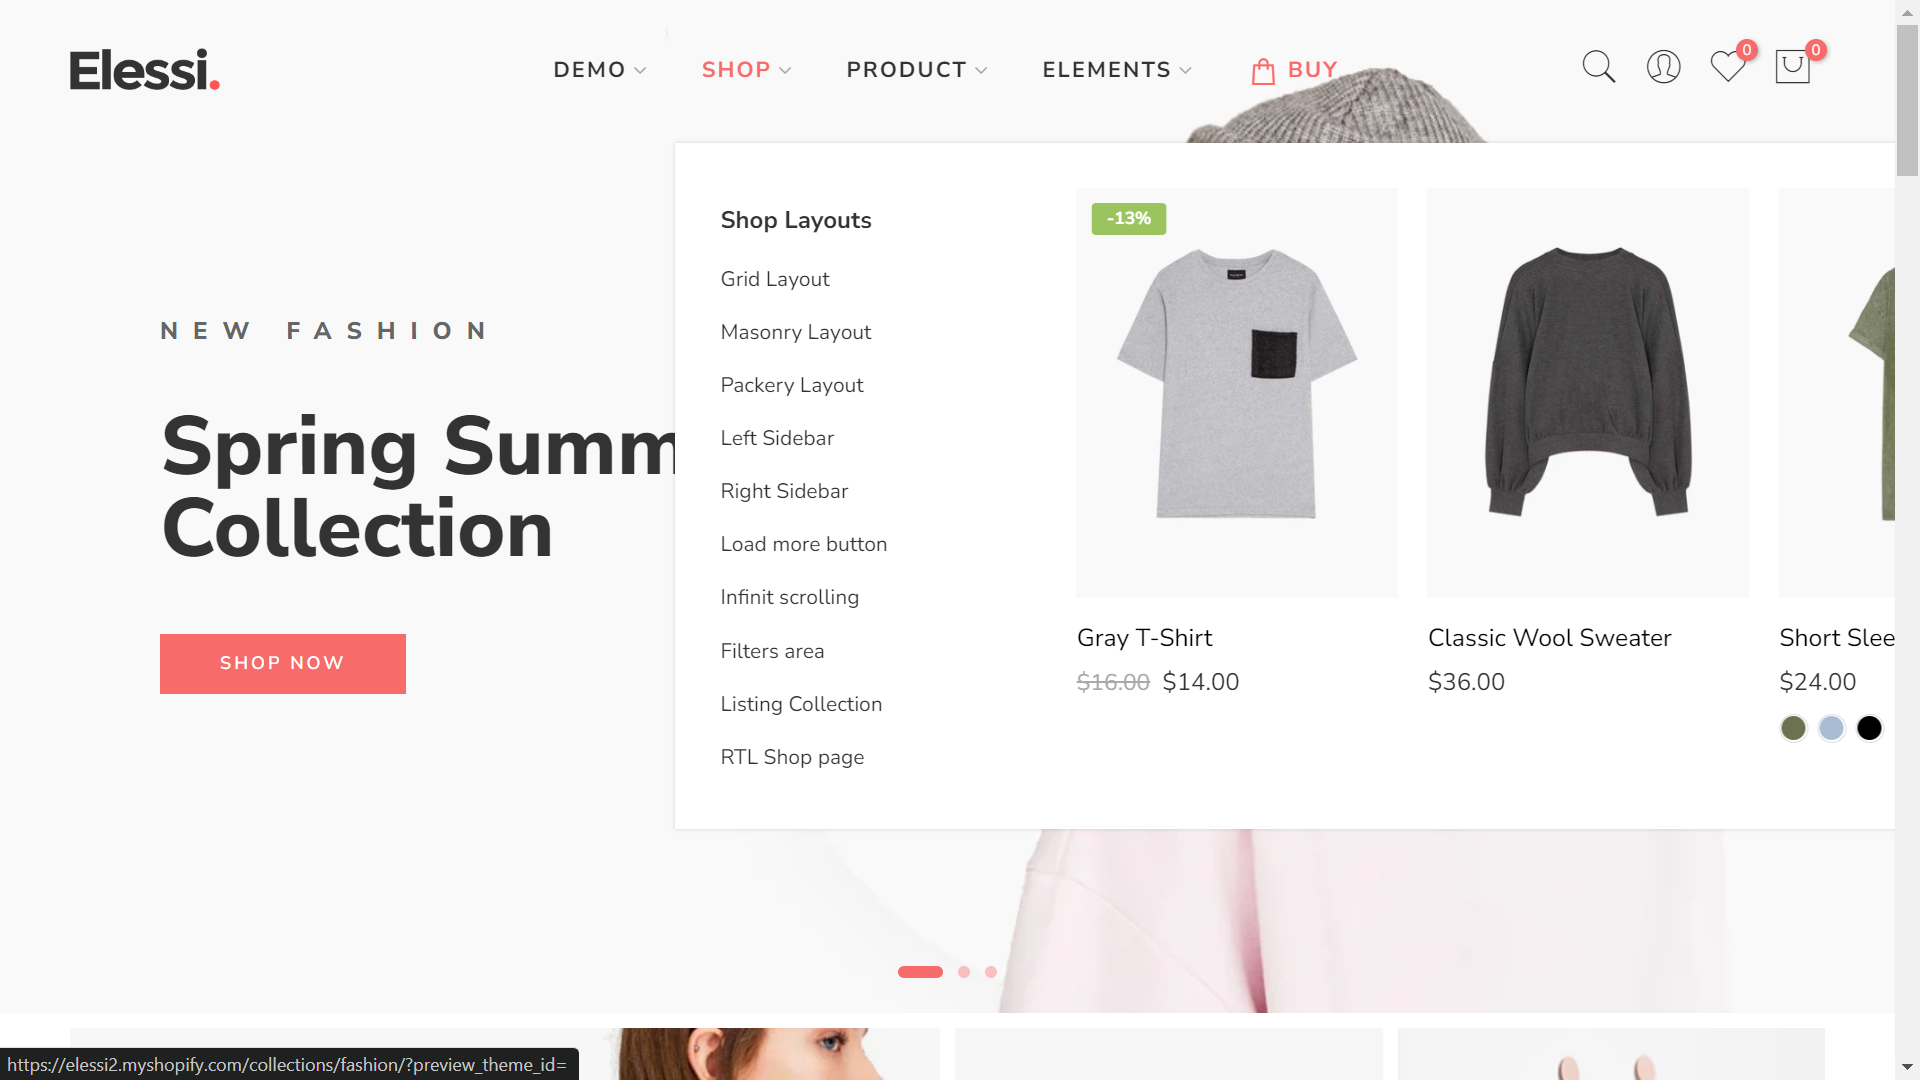
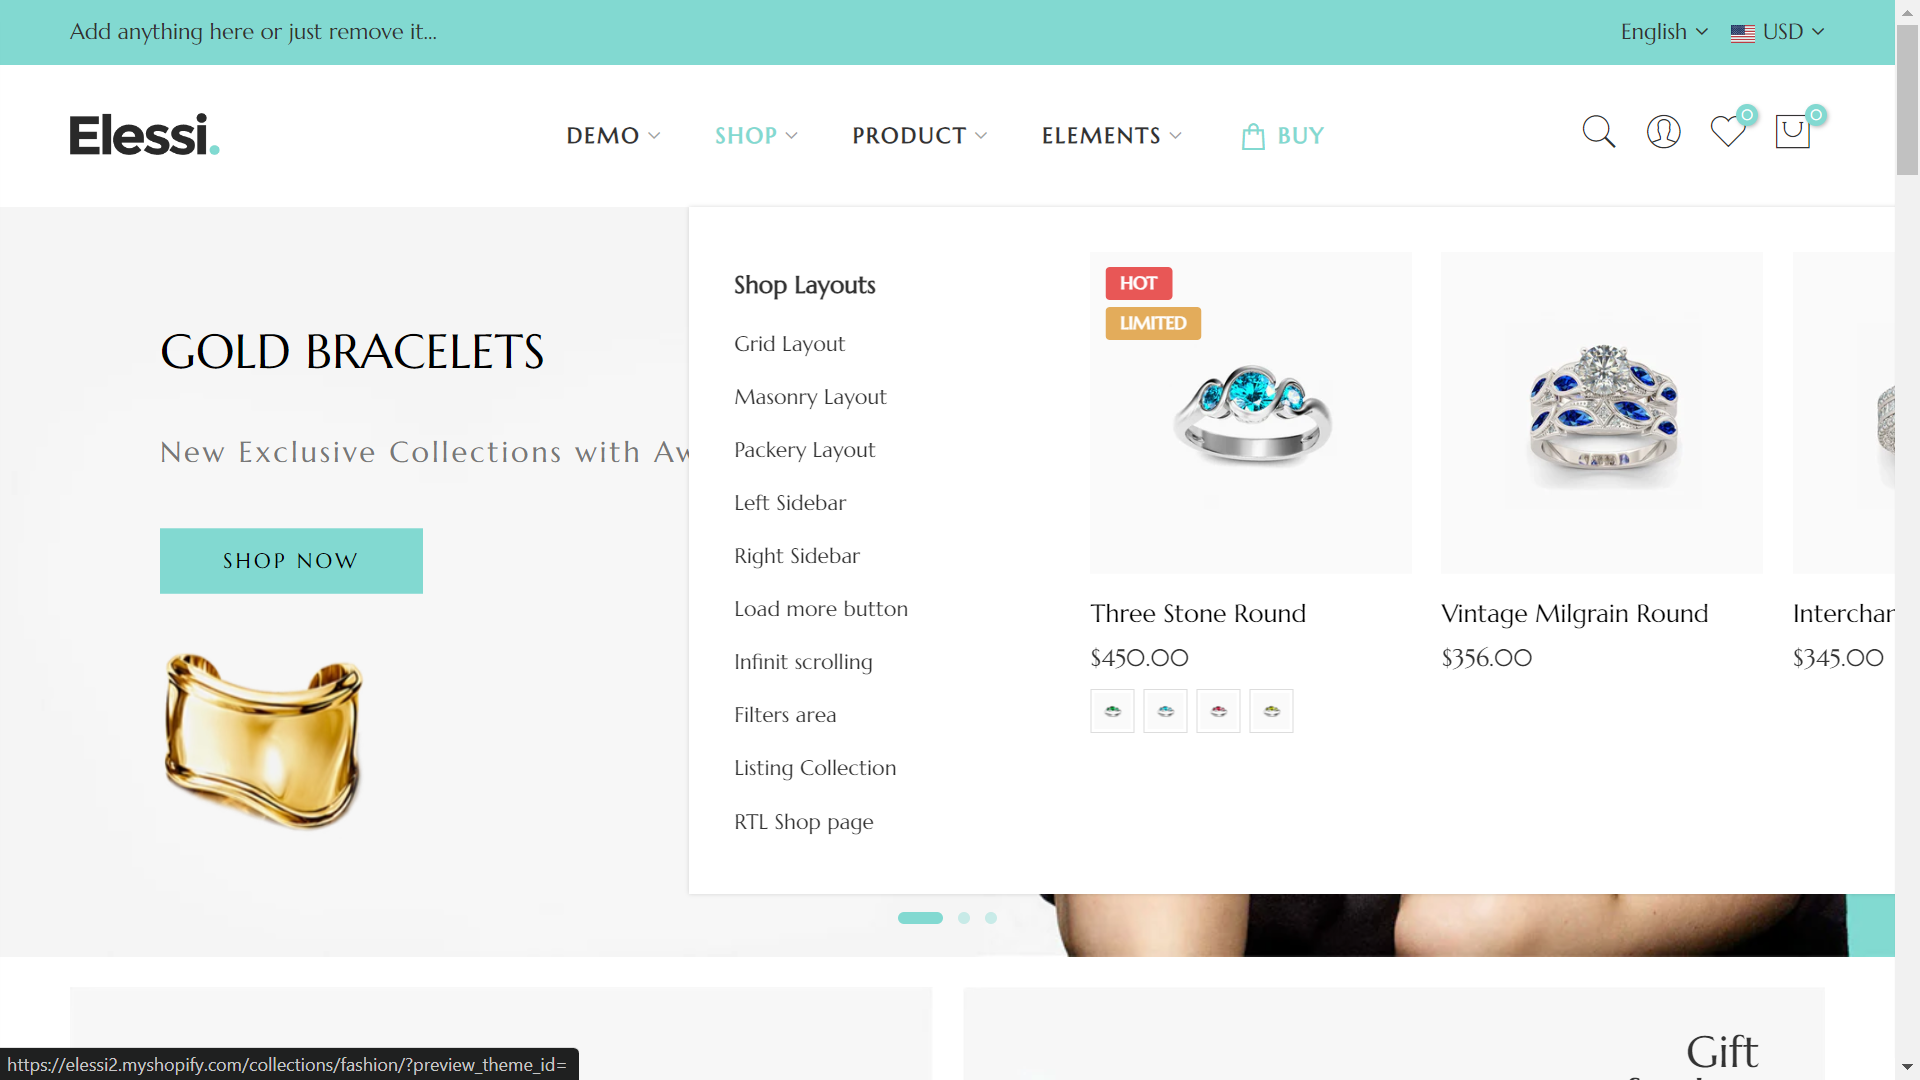
4. Elessi 3 - Responsive Shopify Theme
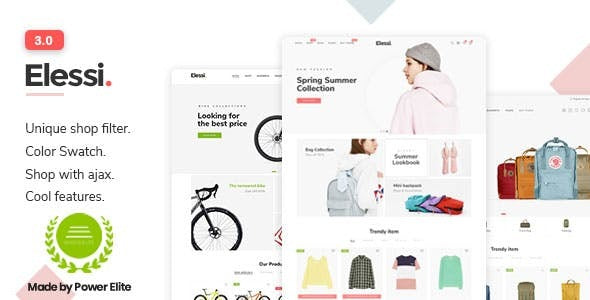
Unveil the full potential of your Shopify store with Elessi – a comprehensive theme boasting a plethora of invaluable inner pages, meticulously designed to facilitate the seamless creation of your website. Encompassing an extensive range of essential niches spanning startups, agencies, and related businesses, Elessi ensures you have all the tools at your disposal to establish a compelling online presence.
Dive deeper into its offerings and discover the versatility of its drop-down menu templates, designed to elevate navigation and enhance user experience, propelling your store to the forefront of the eCommerce landscape.
- 20+ Home Demos
- 30+ UI Elements
- 9+ Shop Layouts
- 12+ Product Layouts
- 5+ Header Styles
Refer these examples:
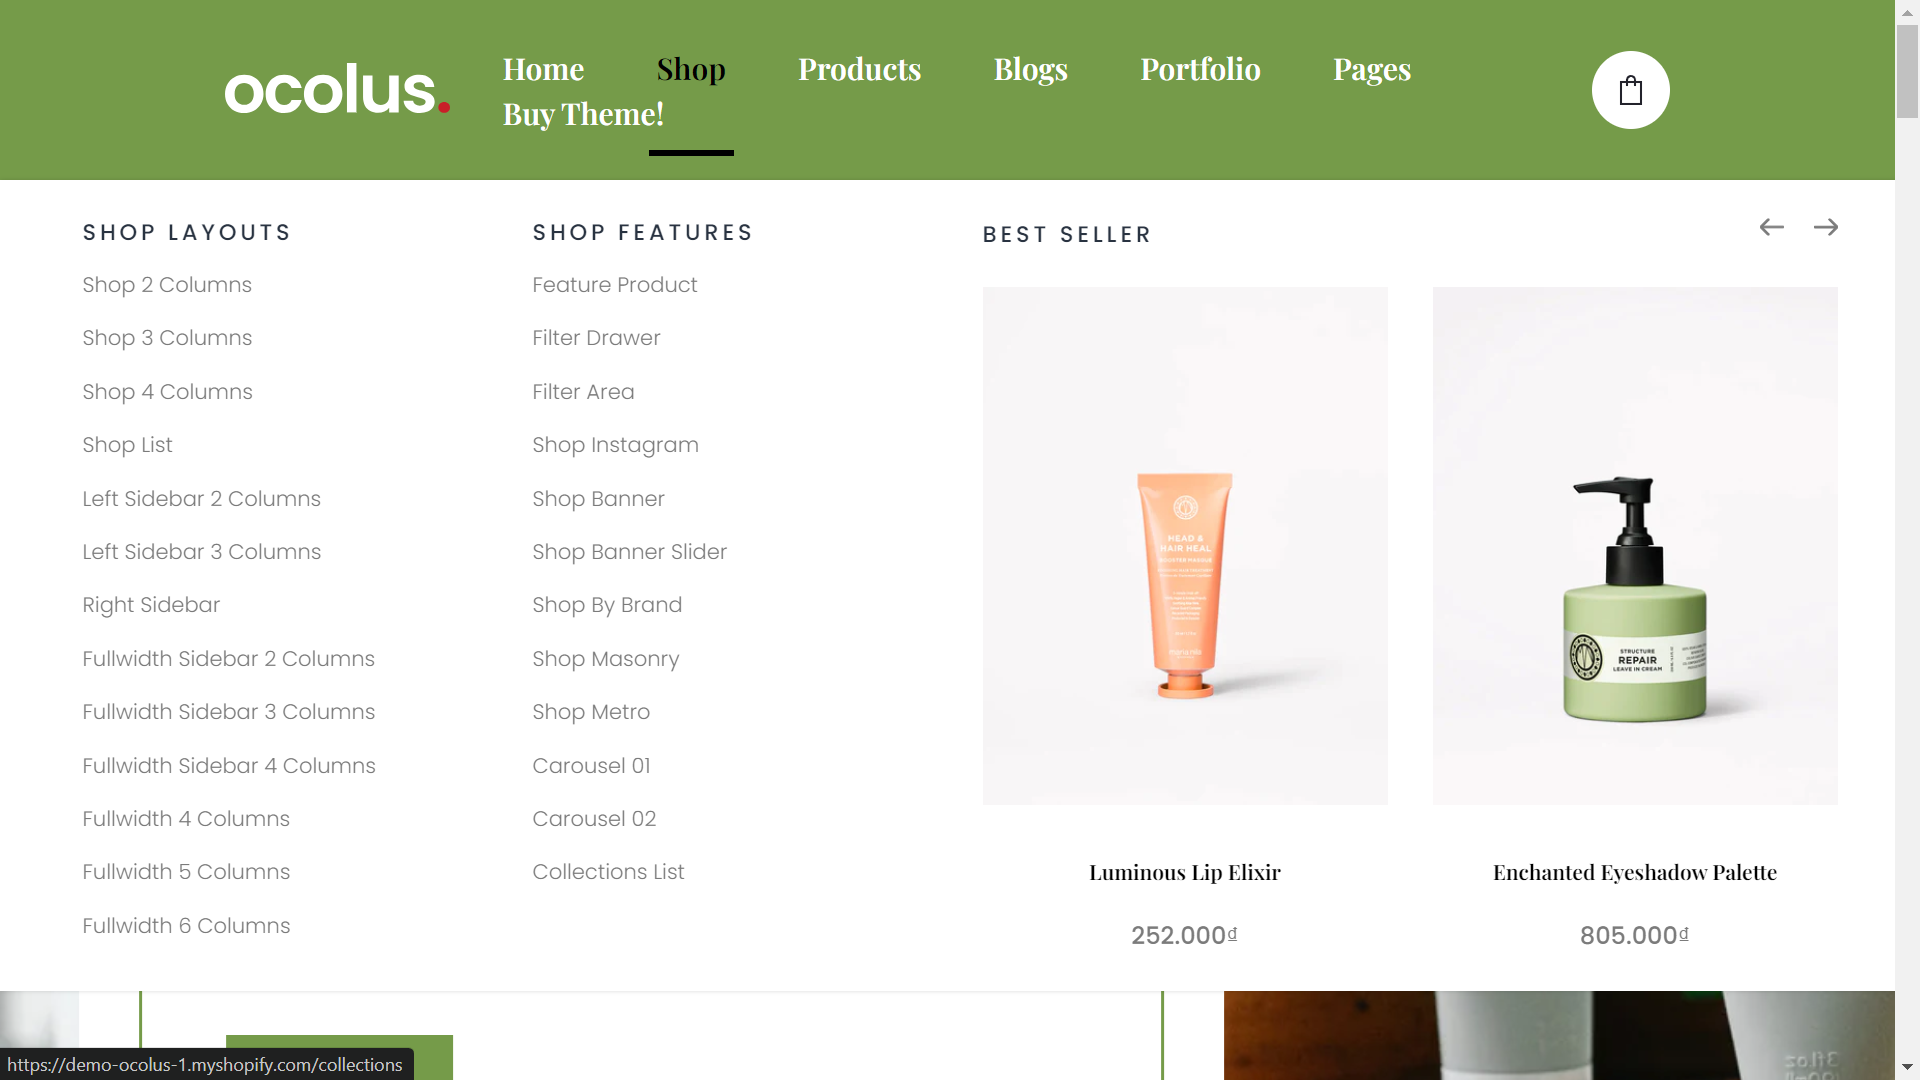
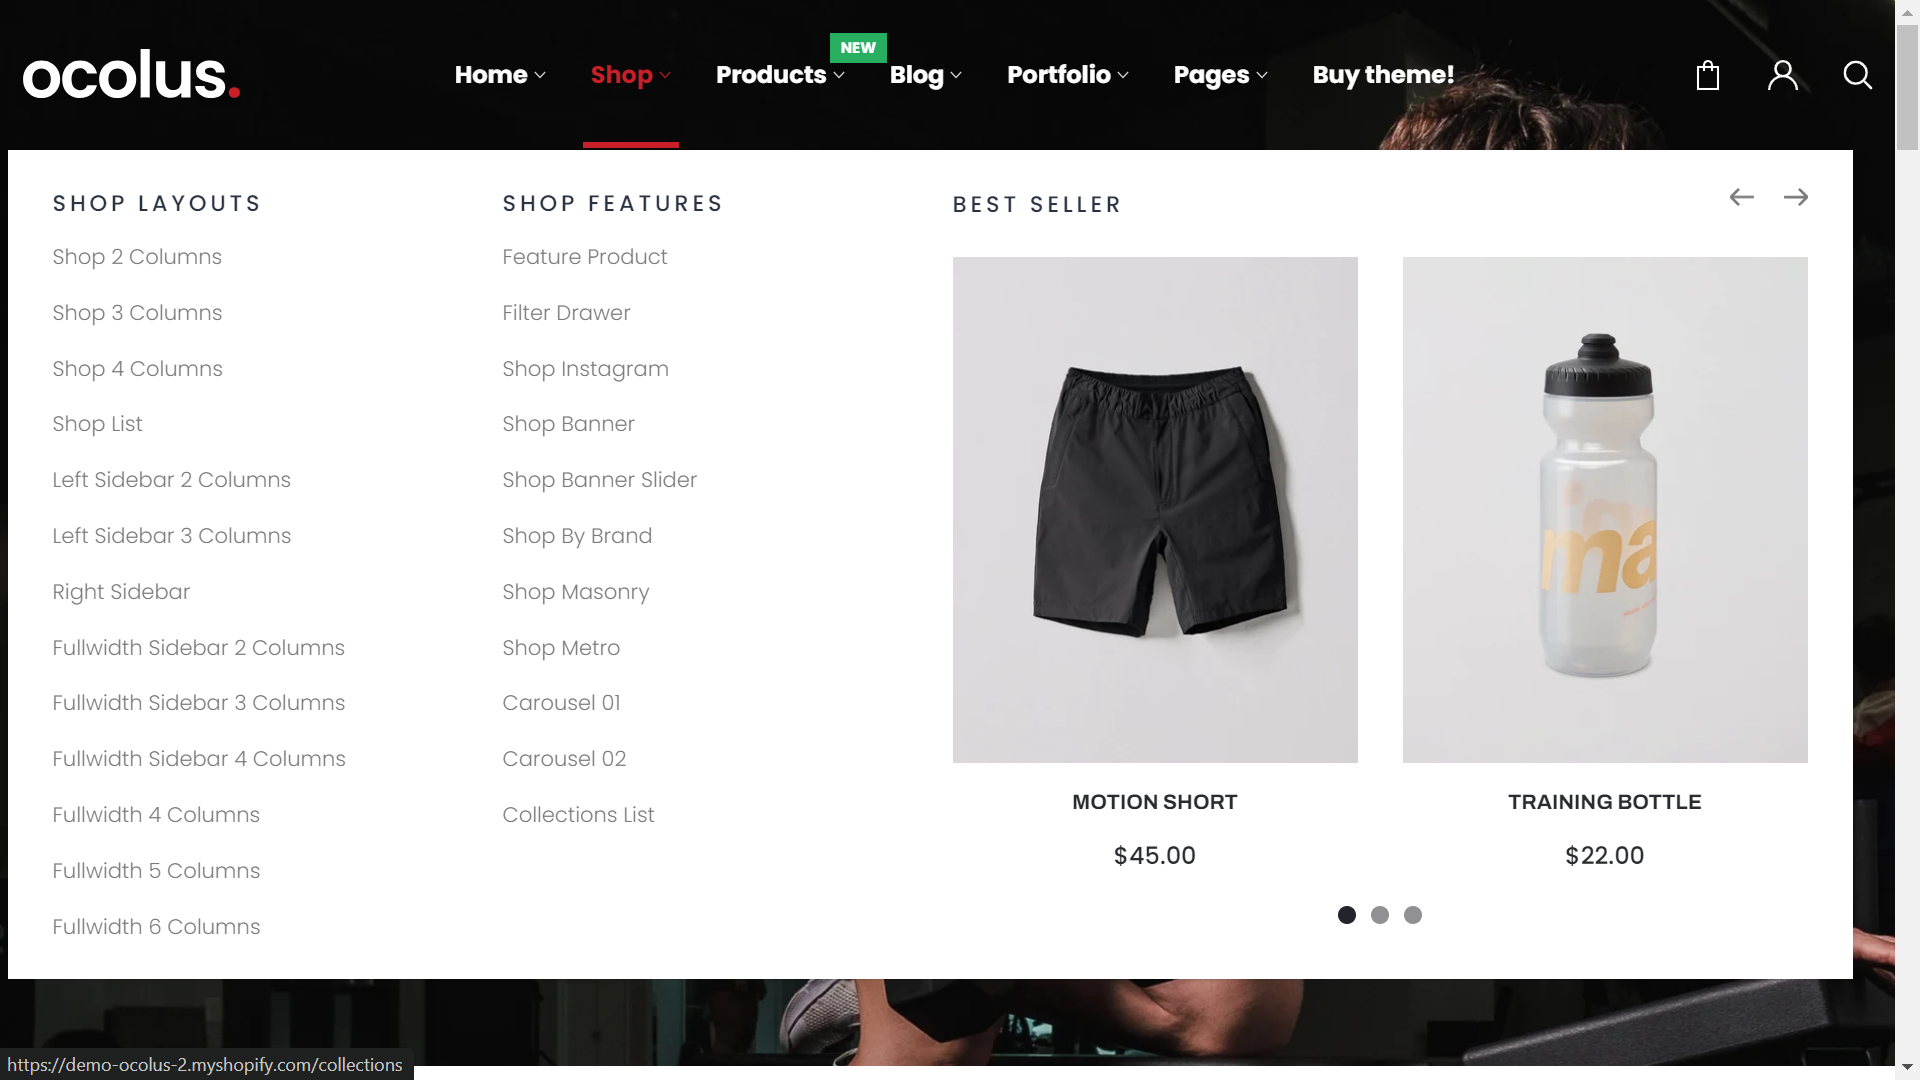
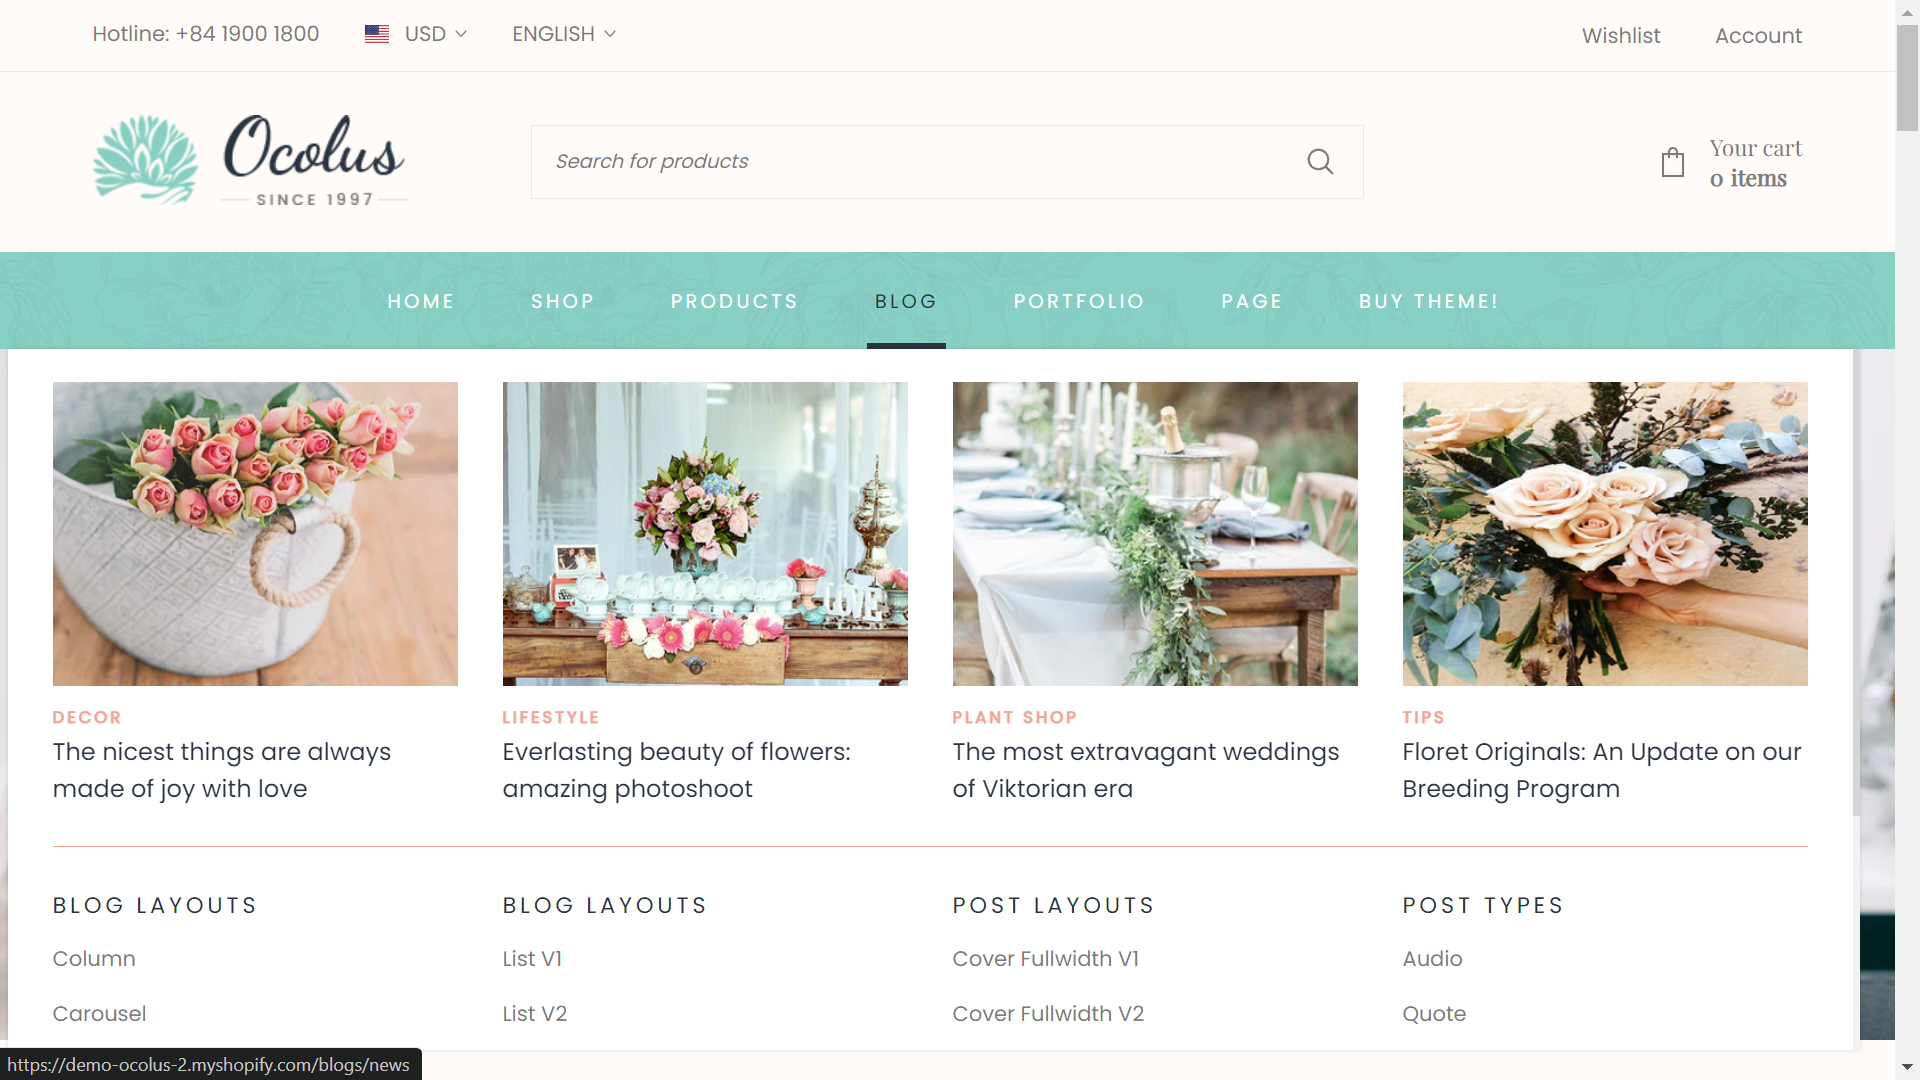
5. Oculus - Classic & Creative Shopify Theme

Ocolus, the latest premium Shopify theme from The4, renowned for bestsellers like Kalles and Unsen, presents exceptional value with a one-time payment model, diverging from subscription-based alternatives. Crafted to harmonize with Shopify 2.0 updates, it integrates built-in features to reduce reliance on third-party apps, ensuring optimal performance. Its streamlined codebase facilitates seamless customization and maintenance, catering to developers' needs.
Boasting over 25 distinct demo layouts including drop-down menu templates, Ocolus adopts a contemporary design ethos, particularly suitable for fashion or furniture e-commerce stores. Soft color palettes and unique typography lend an air of sophistication, enhancing the browsing experience for users. Ocolus emerges as the premier choice for businesses aspiring to elevate their online presence with style and functionality.
Refer these examples:
With these customizable drop-down menu templates, you can effortlessly optimize your Shopify store's menu layout, offering a seamless browsing experience tailored to your brand's unique needs.
Others also read
How to create an impressive Shopify header section
7 Must-have Website Design Elements for a Successful Shopify Store
Create Code-Free Custom Shopify Themes for Beginners
Customizing the Drop-down Menu by Using EComposer
The Menu element within EComposer pertains to the navigation menu visible on your online store, facilitating the organization and structuring of website pages and sections for enhanced visitor navigation. Typically presented as a horizontal or vertical list of clickable links on every store page, common menu items include Home, Shop, and Collections.

Configuring the Menu Element:
Begin by configuring Shopify’s Menu in the Navigation section. Then, select the desired menu and adjust the Content settings:
- Choose a menu: Select the menu previously added in Shopify.
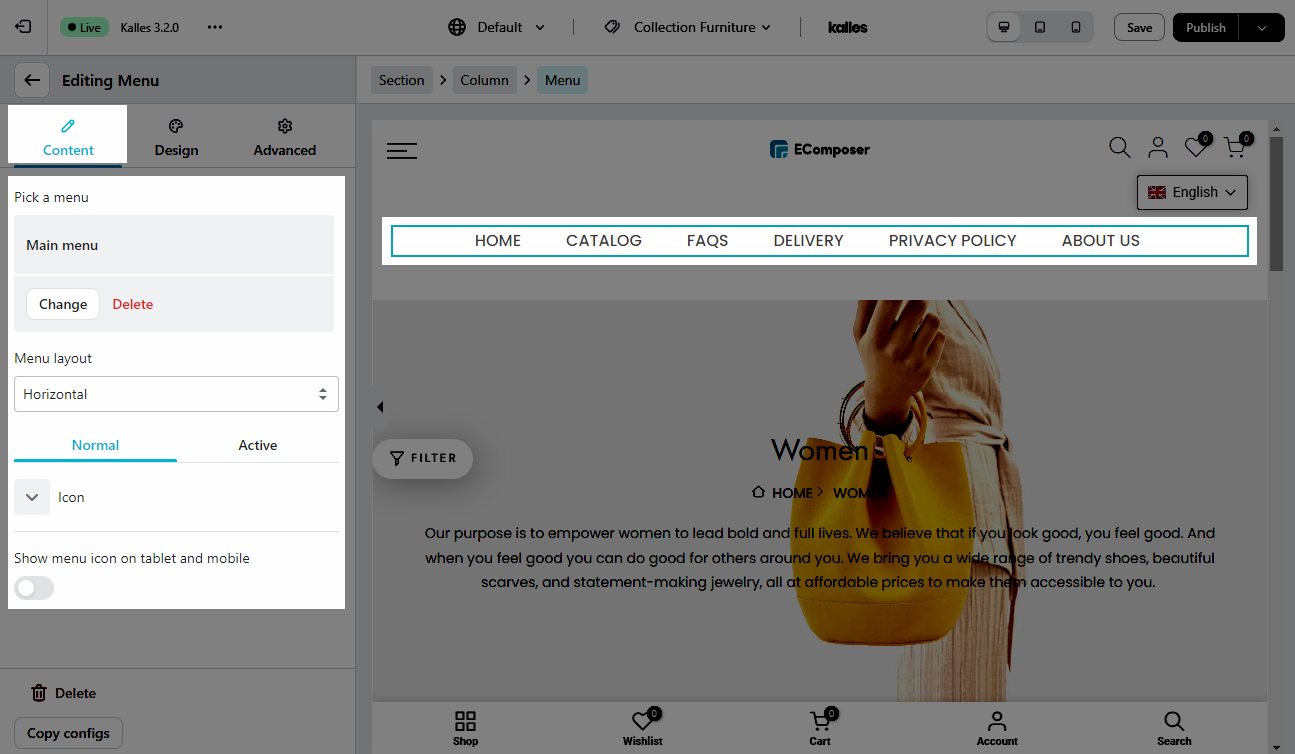
- Menu layout: Switch between Horizontal and Vertical layouts.
- Icon: Customize icons, especially for submenus.
- Display menu icon on Tablet and Mobile: Enhance readability on smaller devices.
Design Settings:
- General: Adjust Background, Box-shadow, Alignment, Border, and Border Radius.
- Link: Modify Typography, Text Color, Text Shadow, and Spacing for normal, hover, and active states.
- Icon: Customize Color, Size, Rotation, and Spacing.
- Submenu: Tailor Background, Box-shadow, Border, Border Radius, and Spacing for submenus.
Click Here to watch more details in the instruction video.
Conclusion
Finally, by learning how to create and modify Shopify drop-down menus, retailers may improve the navigation of their online stores, which will boost customer satisfaction and boost conversion rates. You may enhance the menu layout of your shop to better meet the demands of your consumers by following these steps and looking into modification possibilities.
Prioritizing easy-to-access products and satisfied customers is essential for your Shopify store to succeed, so make sure your website is complete. Effectively designed Shopify pages with vibrant images, fast loading speeds, and extensive information are essential to the success of your shop as a whole.
EComposer offers the versatility to create captivating pages, providing a variety of options from standard layouts to fully personalized designs. Dive into EComposer's outstanding templates with a free trial and start your journey today!
=================
Add EComposer Next generation page builder Here
Follow Us on Facebook
Join Official Community
Build your highest-converting page in 15 minutes


Blog Categories


0 comments