


5 Steps to Quickly Edit Tags in Shopify
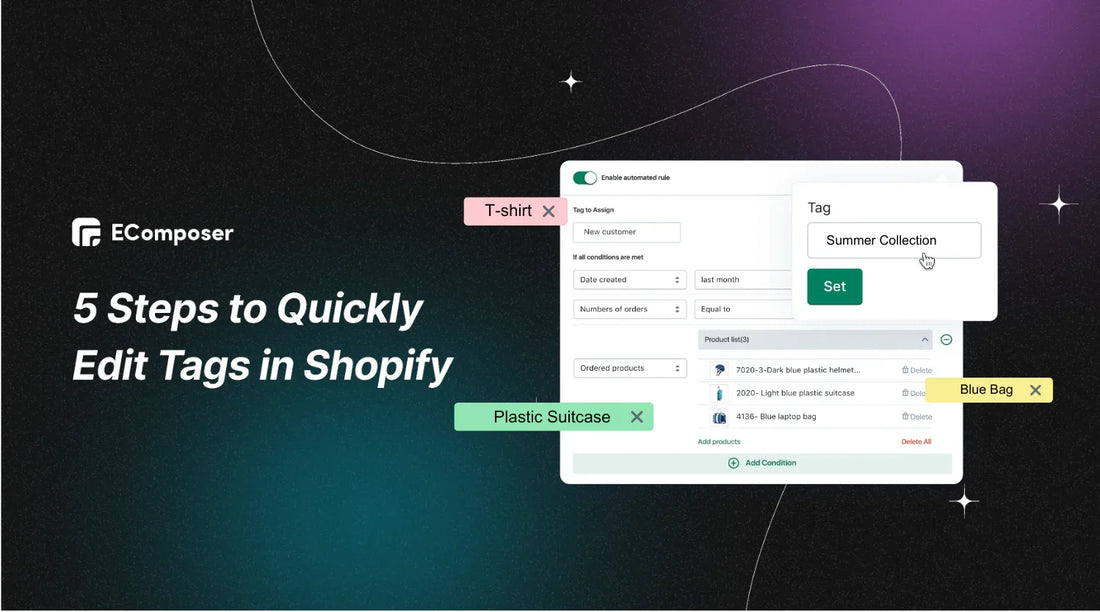
Table Of Contents
In the bustling realm of e-commerce, efficient tag management is key to staying ahead. Ever wondered how to quickly fine-tune your Shopify store's tags? Look no further!
This article unveils five lightning-fast steps to edit tags in Shopify. From organizing products to optimizing searchability, we've got you covered. Say goodbye to tag-related headaches and hello to a smoother, more successful Shopify journey! Let's dive in and transform your online store today.
What are Tags on Shopify?
Imagine walking into a vast library with endless shelves of books. Now, picture each book neatly labeled with descriptive tags like "romance," "mystery," or "bestseller." In the digital world of Shopify, tags serve a similar purpose.
They're like virtual labels you attach to your products, helping you organize and categorize them effectively. These tags can represent anything from product types and collections to unique attributes or promotions. With tags, you can easily navigate through your Shopify store, guiding both you and your customers to the right products with just a click.
Things about Tags you Should Know
Tips for Managing Shopify Tags
Consider the following when using tags:
- Order and draft orders can have tags of up to 40 characters, while those for products, transfers, customers, and blog posts are limited to 255 characters.
- The case of tags is insignificant; for instance, "Packed" and "packed" are treated the same.
- Tags can only include letters, numbers, and hyphens; symbols like accented letters may affect search results.
- A maximum of 250 tags can be associated with each blog post, order, draft order, product, customer, and transfer.
Note: Shopify Plus plan allows unlimited tags on products.
Creative Utilization of Shopify Tags
Explore alternative ways to utilize tags:
- Group-related items are for simultaneous viewing, like orders from a specific shipping service or a particular manufacturer.
- Quickly locate items by tagging them with relevant identifiers, such as seasonal products or orders from social channels or phones.
- Filter customers based on tags to create segments of customers with similar attributes.
- Automate Shopify collections by utilizing tags effectively.
6 Common Types of Shopify Tags for Using
Discover how using these six crucial tag types can improve sales and management and make your Shopify business more productive.
By harnessing the power of these common Shopify tag types, you can elevate your store's efficiency and enhance your customers' shopping experience.
How to Manually Add & Edit Shopify Tags
By learning how to add and modify Shopify tags manually, you can drastically improve the efficiency and organization of your company in a matter of short steps.
1. Create a Tag Manually
1.1. Using Desktops
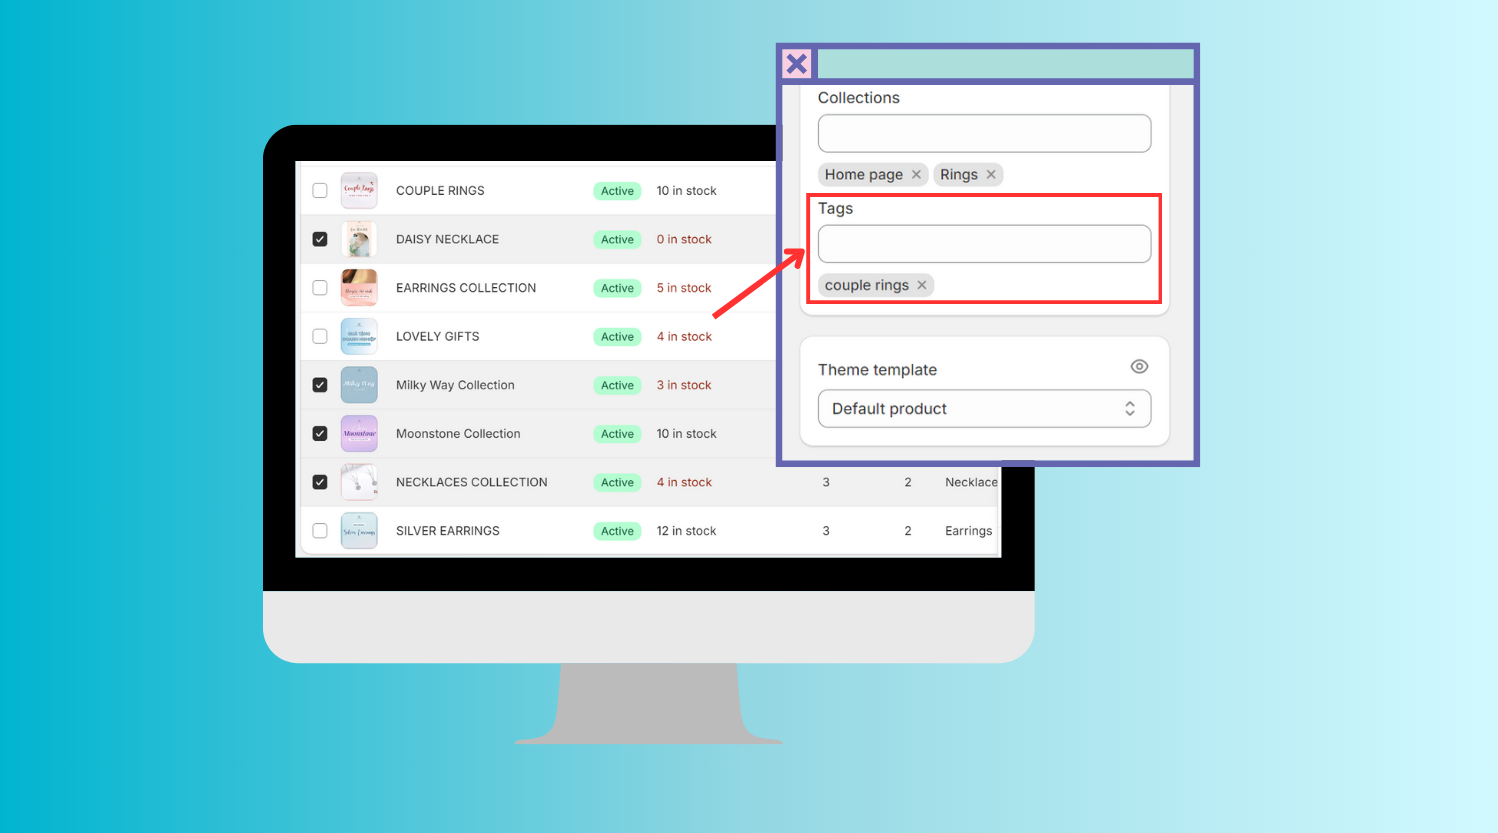
Step 1: Choose the appropriate details page.
You can access the individual customer, blog post, product, transfer, draft order, or order details page within your Shopify dashboard.
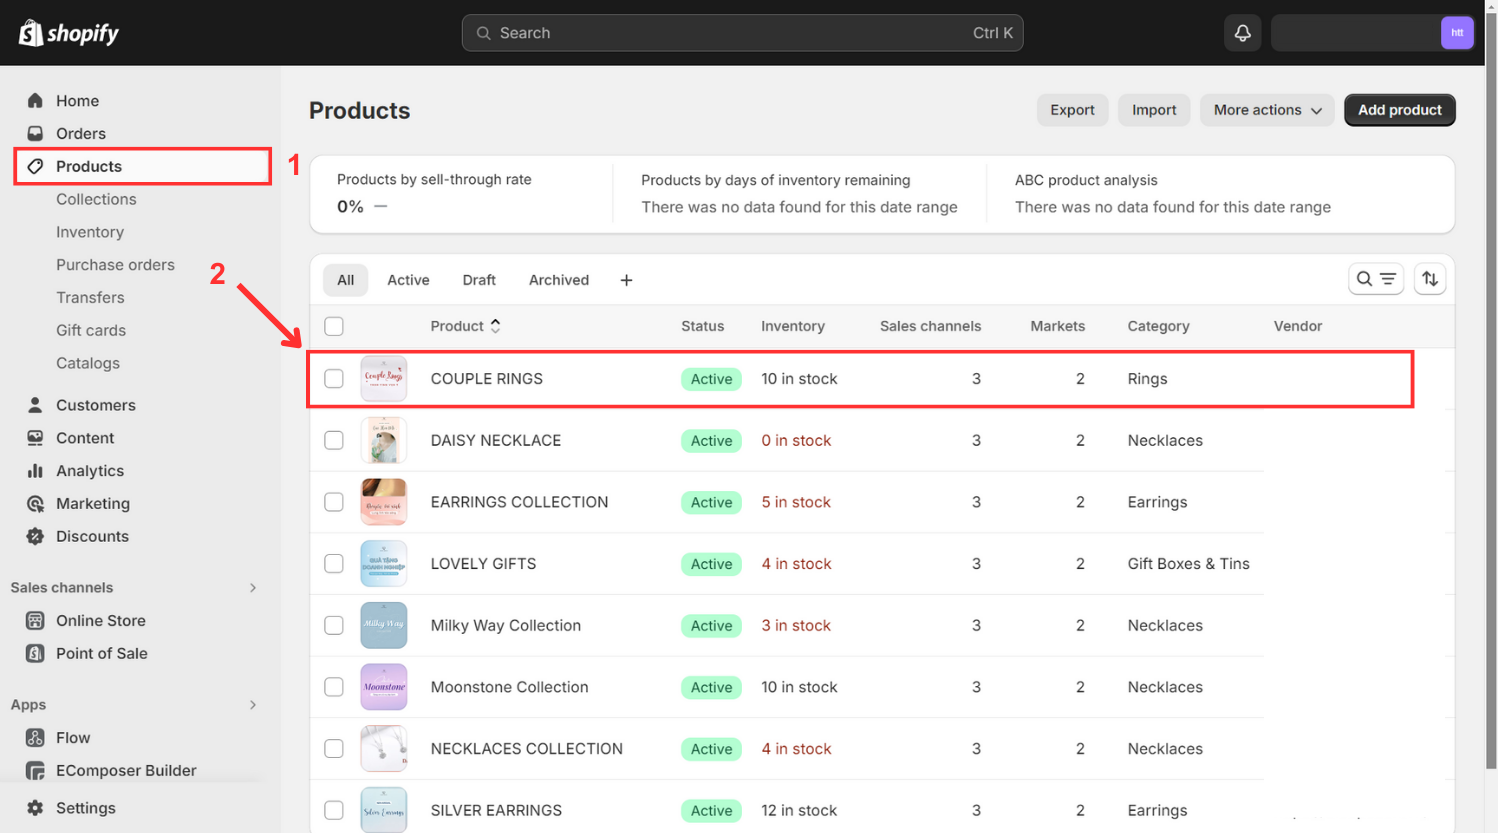
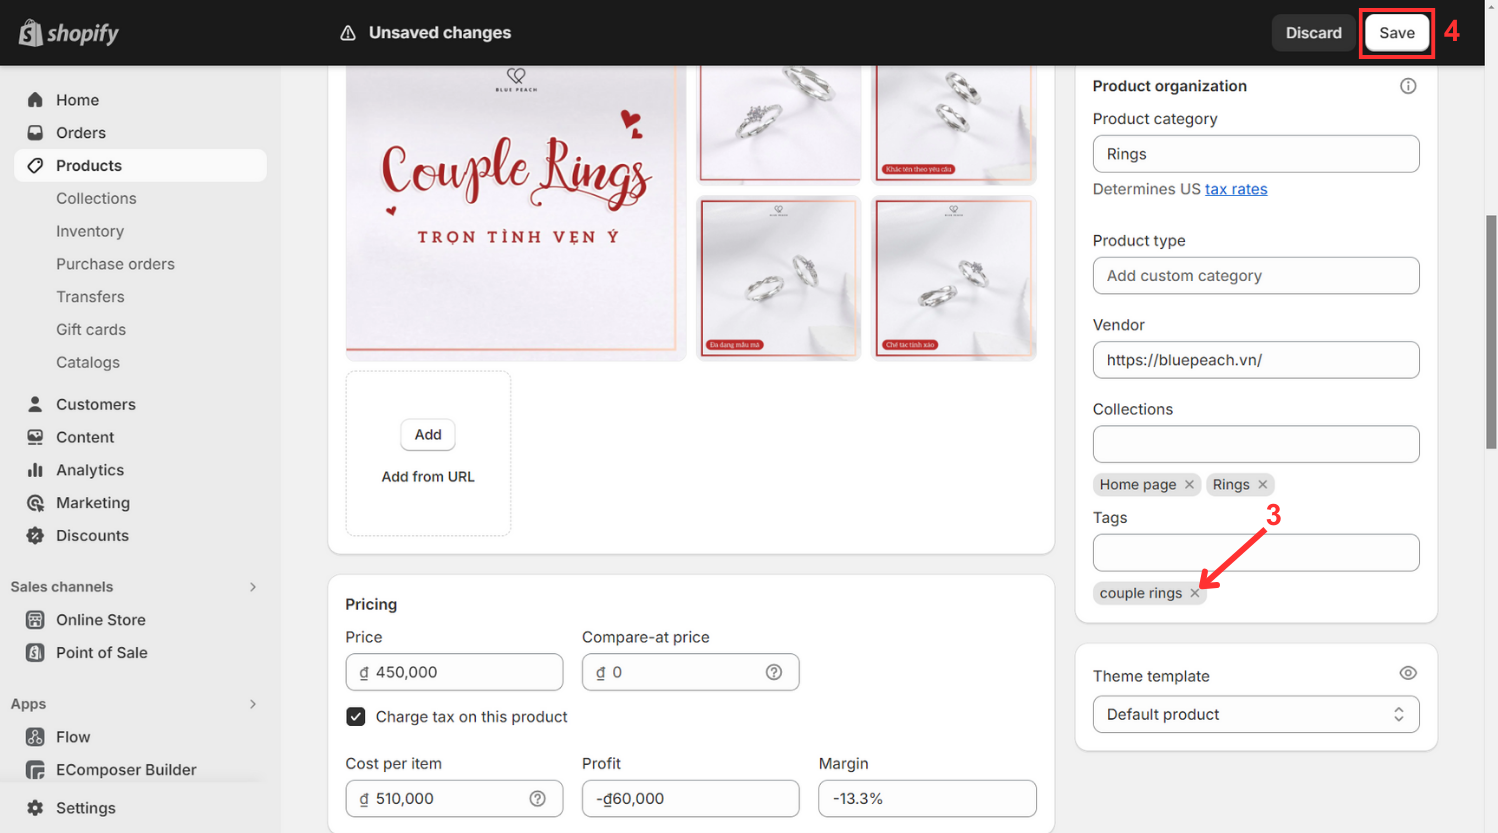
Step 2: Input tags.
- Navigate to the Shopify Tags section and input the desired tag name, or choose from existing tags listed.
- If you input a new tag name, it will be automatically generated for future use within the section.
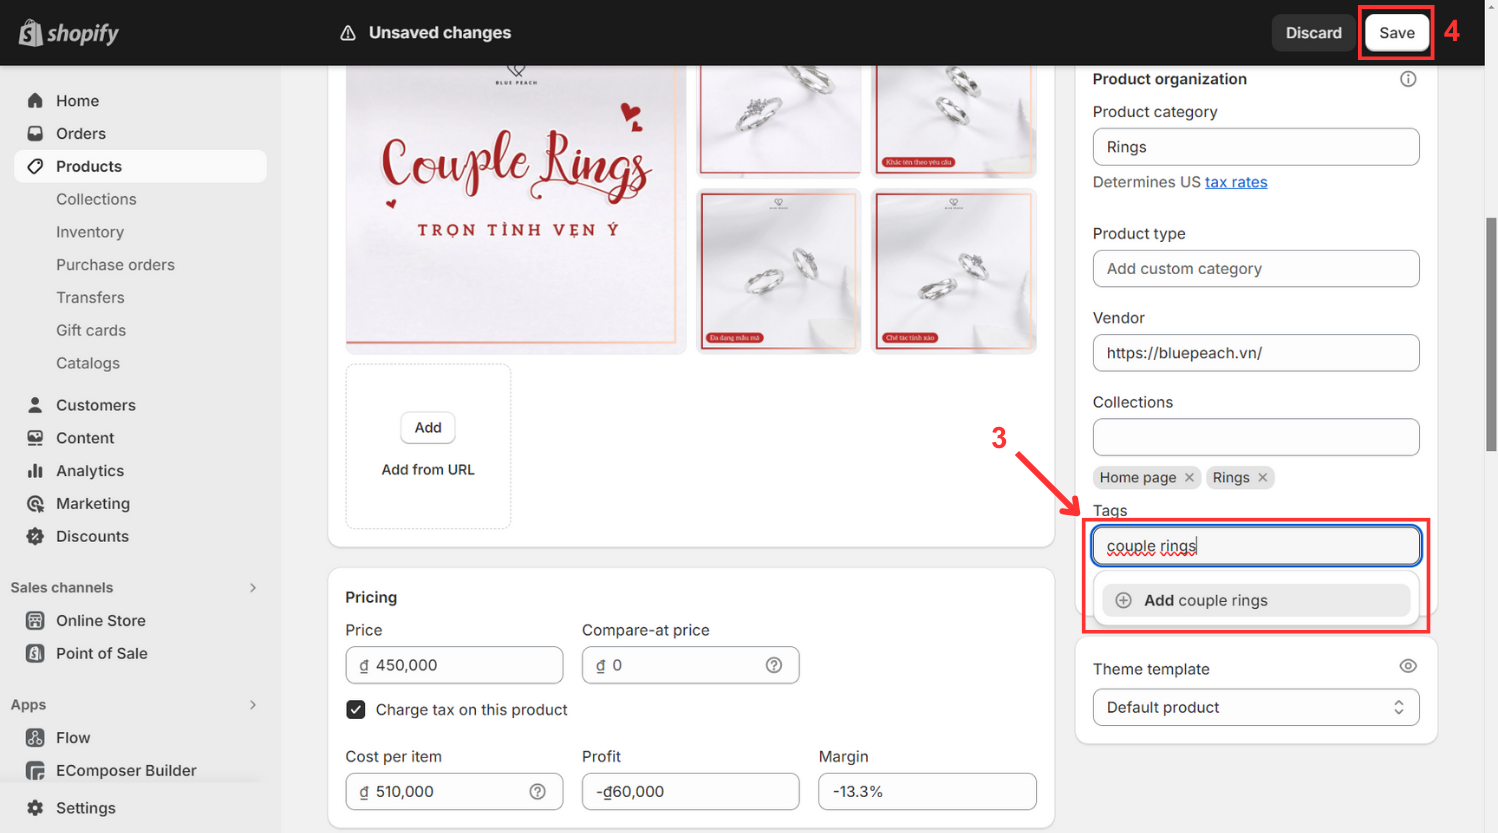
Step 3: Save.
- Save the applied changes.
1.2. Using iPhone/Android
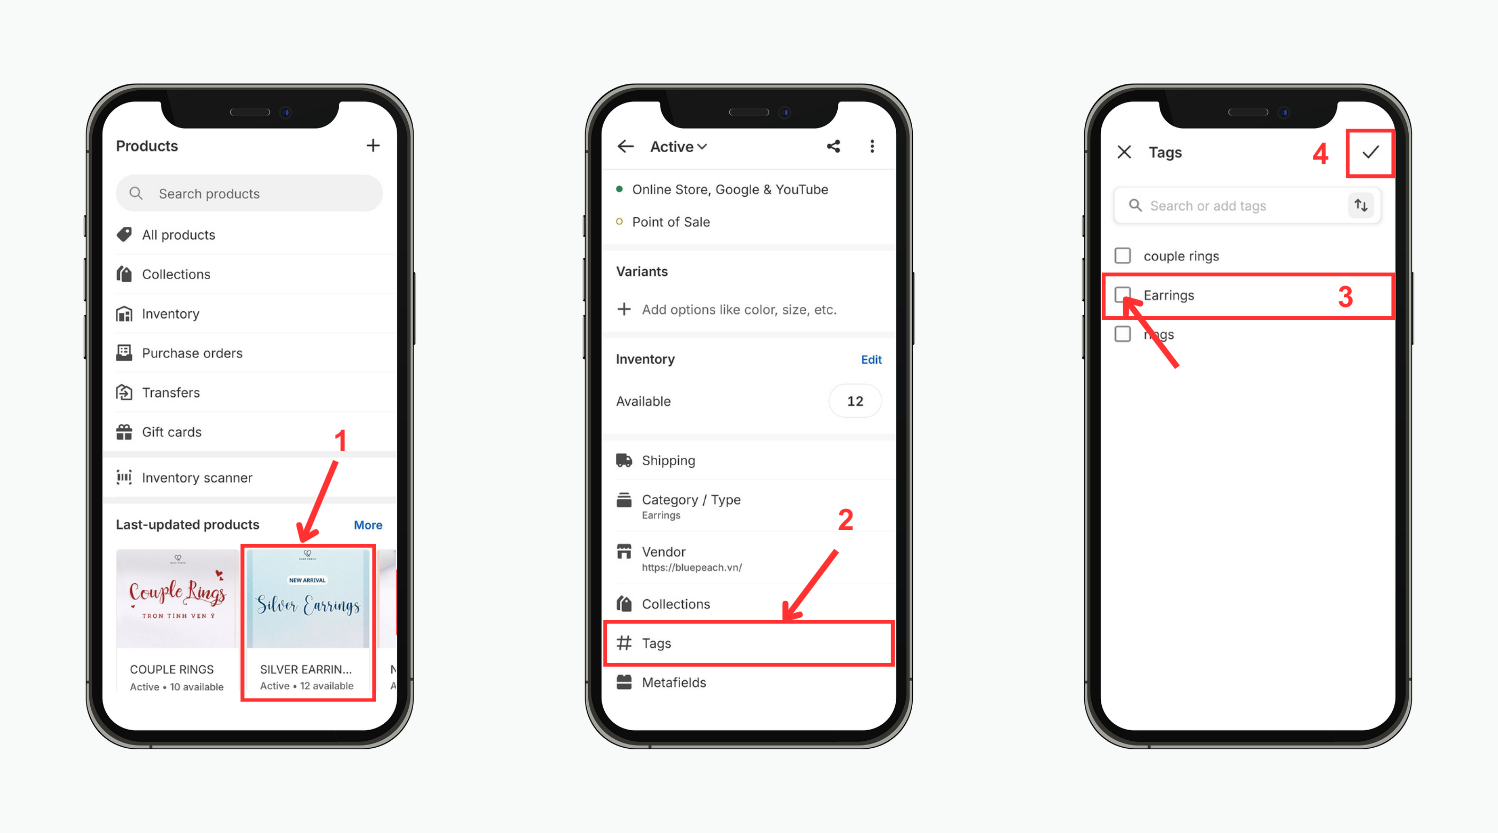
Step 1: Navigate to the detailed page that you want
Step 2: Scroll down to Tags > Click
Step 3: Type Tags name > Tick Check Box > Save
Incorporating tags in your Shopify store is just the beginning; ensuring customer satisfaction and easy product access are equally essential for a well-rounded website. EComposer presents an ideal solution, offering a cost-effective and efficient approach to crafting an attractive online platform.
Recognized as a leading Shopify Page Builder, EComposer streamlines the design process with its intuitive drag-and-drop editor and impressive templates, enabling the creation of captivating landing pages, engaging homepages, and informative blogs.

Optimizing pages is now more streamlined with a range of components and add-ons available. Enhanced features like an AJAX cart, AI content generator, and image compressor in the Landing Page Builder elevate store efficiency, providing a comprehensive solution that saves time, resources, and expenses, while enabling the rapid development of sophisticated Shopify stores.
Enhance your ecommerce endeavors with EComposer—try it for free! For those without a Shopify account, take advantage of a special offer: just $1 per month for the first three months.
2. Delete a Tag
2.1. Using Desktops
Step 1: Access the relevant pages.
- Navigate to the specific blog post, order, draft order details, product, transfer, or customer page in your Shopify dashboard.
Step 2: Eliminate tags.
- Click on the "x" icon next to the tag you wish to remove.
- This action will solely remove the tag from the selected blog post, order, draft order details, product, transfer, or customer.
Step 3: Confirm.
- Click Save to apply the changes.
2.2. Using iPhone/Android
Step 1: Navigate to the detailed page that you want
Step 2: Scroll down to Tags > Click
Step 3: Untick the Checkbox of the tag > Save

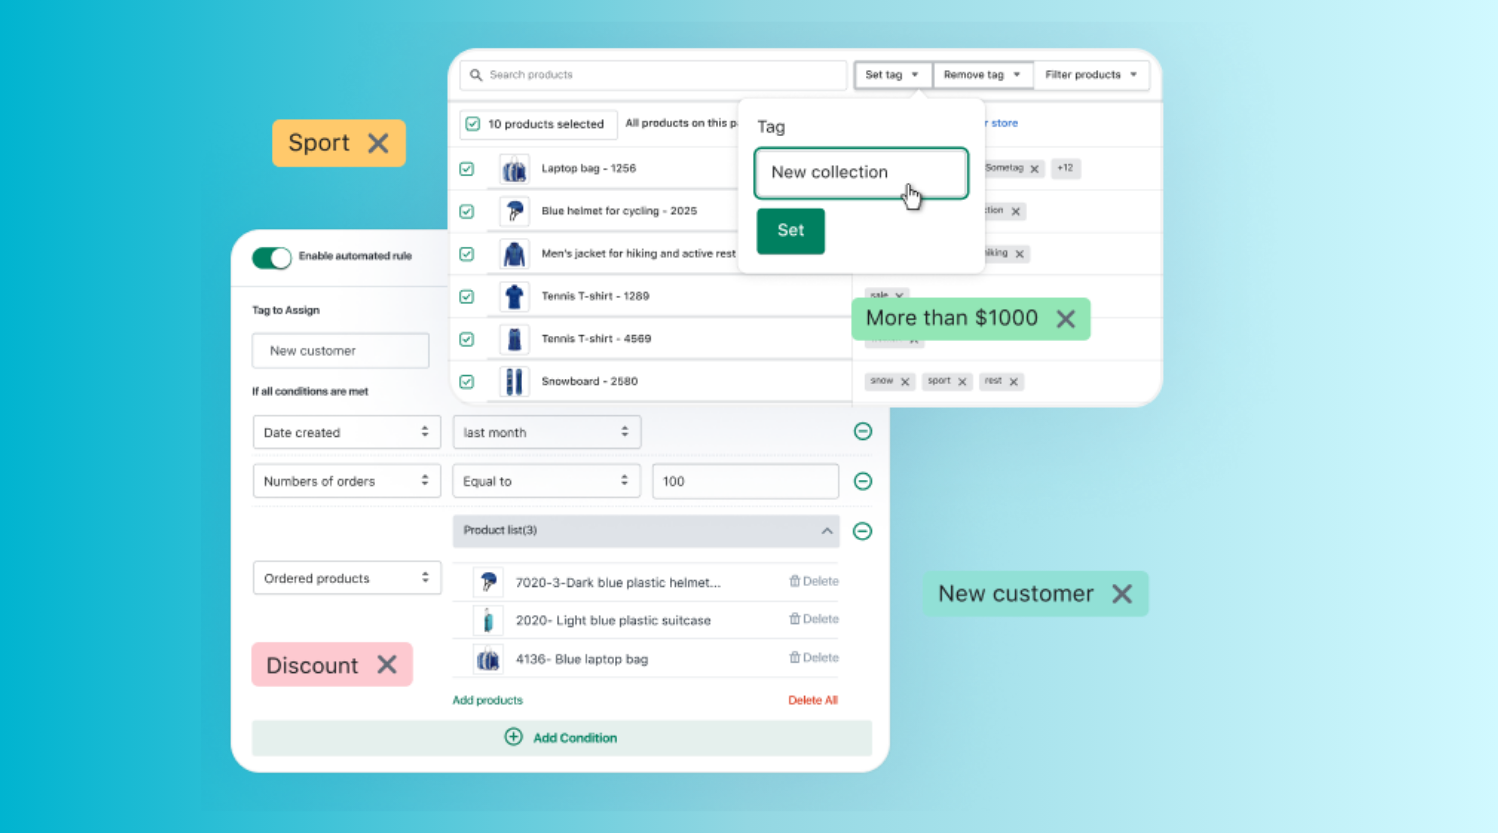
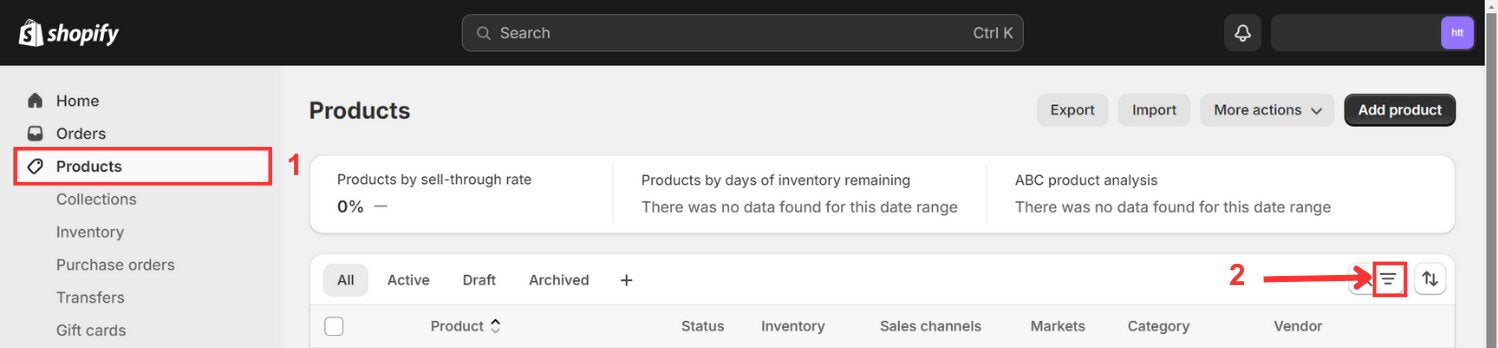
3. Tag Filtering
Utilize Shopify's tag filtering feature on Blog Posts, Orders, Draft Orders, Products, and Transfers pages, along with Inventory variants on the Inventory page. Here's how:
3.1. Using Desktops
Step 1: Navigate to a specific tab.
- Select Orders, Draft Orders, Inventory, Products, Transfers, or Blog Posts within your Shopify admin panel.
- Choose the highlighted button
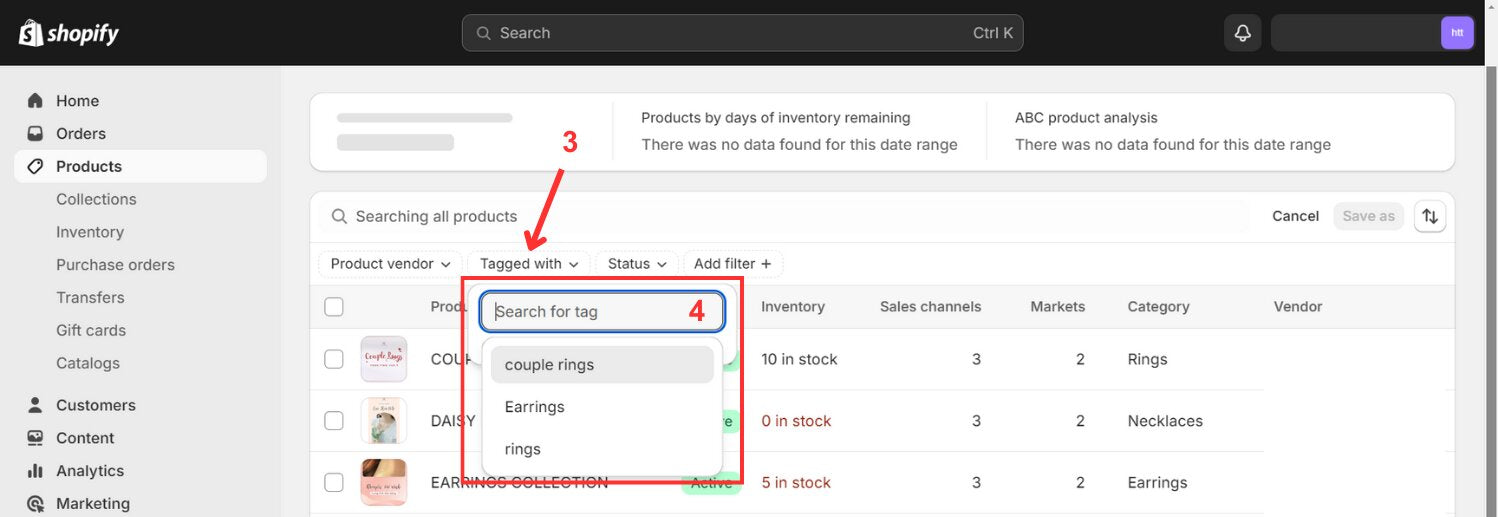
Step 2: Apply Shopify tag filtering.
- Click on Tagged with or More Filters.
Step 3: Specify tag name.
- Enter the desired tag name to use as a filter, and view the filtered results.
3.2. Using iPhone/Android
Step 1: Navigate to a tab
Step 2: Click the highlighted box > Choose Tags
Step 3: Tick the Tag’s name > Turn back twice, you will see the result

By implementing these straightforward techniques for manual tag management in Shopify, you can enhance your store's efficiency and provide customers with a more seamless browsing experience.
Others also read
How to Add Products to Collections on Shopify
Exploring 15 Best Shopify Fonts for Successful Stores
Guide to Shopify "Add to Cart" Links (With & Without Variants)
How to Bulk Add and Edit Tags in Shopify
Streamline your Shopify tag management process with bulk editing capabilities, empowering you to efficiently organize and categorize your products, orders, and more.
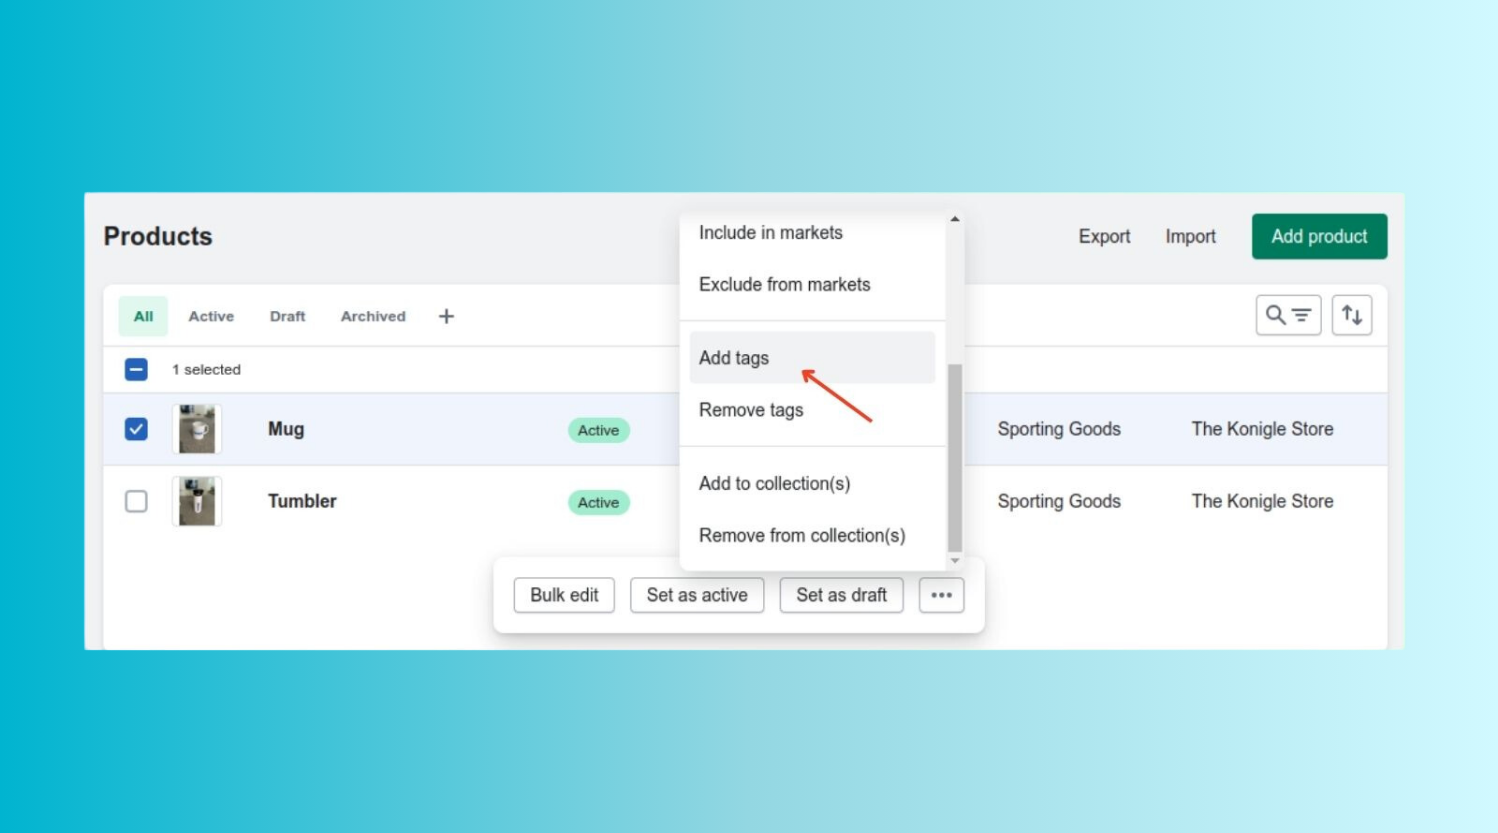
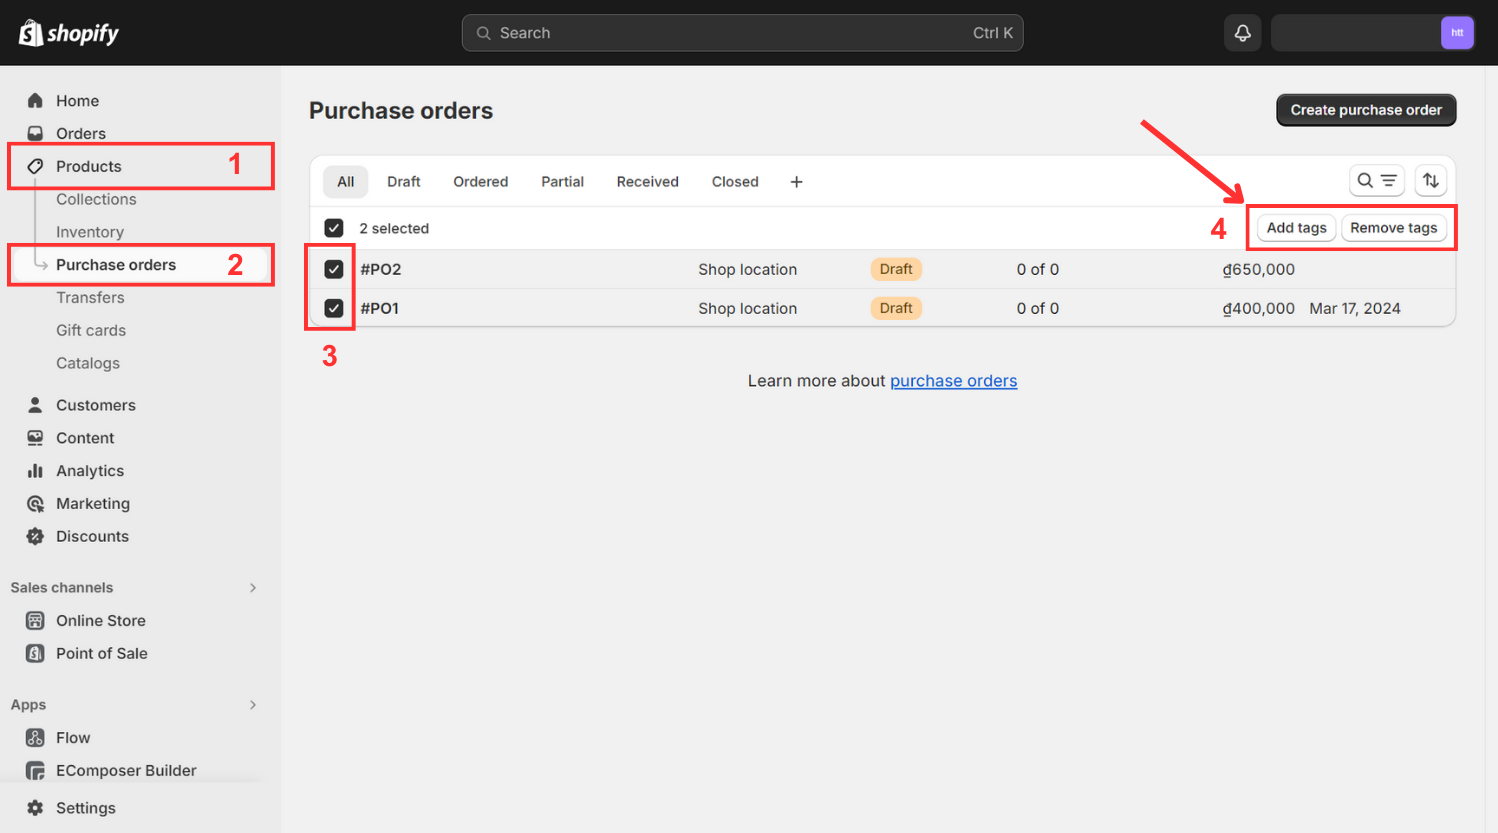
1. Bulk Editing of Product, Transfer, Customer, Blog Post, and Draft Order Tags
Step 1: Choose a tab.
- Navigate to Blog Posts, Draft Orders, Products, Transfers, or Customers within your Shopify admin dashboard.
Step 2: Access detailed pages.
- Select the blog post, draft order, product, transfer, or customer pages you wish to tag.
Step 3: Modify tags.
- Click on Add tags or Remove tags, and choose the tags you wish to add or remove.

Step 4: Confirm changes.
- Click Save to apply the modifications.
2. Bulk Editing of Shopify Order Tags
Step 1: Navigate to the Orders tab.
- Access the Orders section within your Shopify admin panel.
Step 2: Choose specific orders.
- Select the orders for which you wish to add or remove tags.
Step 3: Modify tags.
- To add or delete tags, click Add Tags or delete Tags, then choose the desired tags.
Step 4: Confirm adjustments.
- Save any applied changes.
Mastering bulk tag editing in Shopify revolutionizes your store management, providing a seamless experience for adding, removing, and updating tags across various elements, enhancing organization and productivity. Now, let's delve into how EComposer can elevate your tags to new heights.
Customize your Tags with EComposer
Transform the look and feel of your Shopify tags effortlessly with EComposer, the ultimate page builder app designed to elevate your store's customization capabilities.
Note: In the EComposer App, direct content editing is unavailable; it relies on the content added to Shopify. You can edit your blog articles within the Shopify admin.
1. Adding the Tags Element
- Navigate to Elements → Blog Page → Tags.
- Drag the Tags element from the sidebar and drop it where you want it.
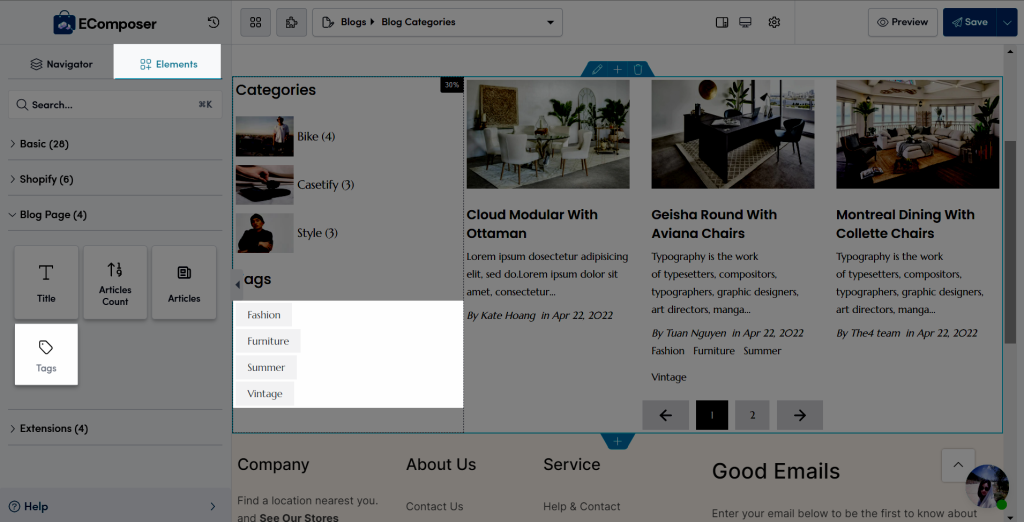
2. Configuring the Tags Element
2.1. Content
- Preview: Allows viewing selected blogs.
- Layout: Change direction (Column or Row) and orientation (Vertical or Horizontal).
- Maximum tags to show: Choose the maximum number of tags to display.
- Column gap: Adjust vertical spacing between tags.
- Row gap: Adjust horizontal spacing between tags.
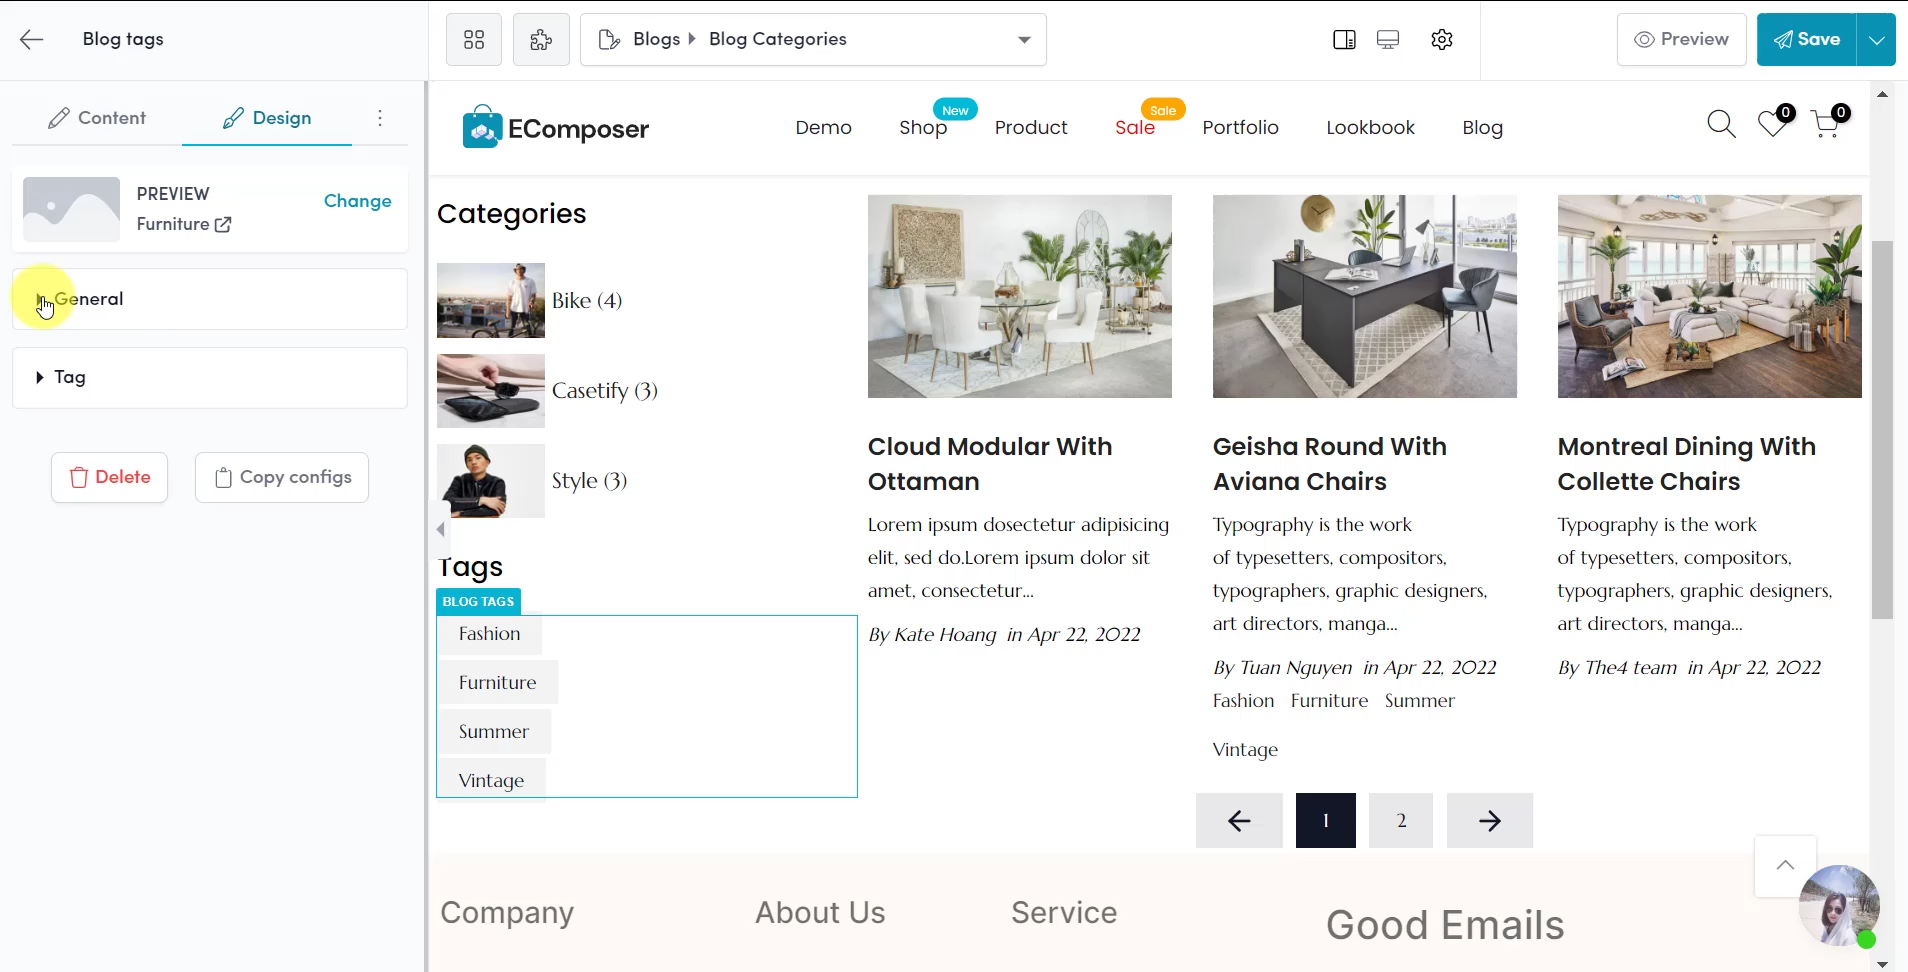
Note: Column gap option appears only when the layout is Row.
2.2. Design
- General: Adjust Alignment, Background, Box Shadow Border, Border Radius, and Spacing.
- Tag: Adjust Typography, Text Shadow, and Box Shadow (Width, Height, Text Color, Background, Border, Border Radius, Spacing, etc.) in both Normal and Hover modes.
Click Here to Explore more
Unleash your creativity and enhance your Shopify store's aesthetic appeal by customizing tags with ease using EComposer, your go-to solution for seamless and stunning design modifications. Moving on to the next section, let's discover how these five apps can assist with bulk tag management in Shopify.
Best Bulk Tag Editor Apps in Shopify
Enhance your Shopify tag management efficiency with top-rated bulk tag editor apps, offering powerful tools to streamline the process of organizing and updating tags across your store.
1. Leap Auto Tags – All-in-1 Tags
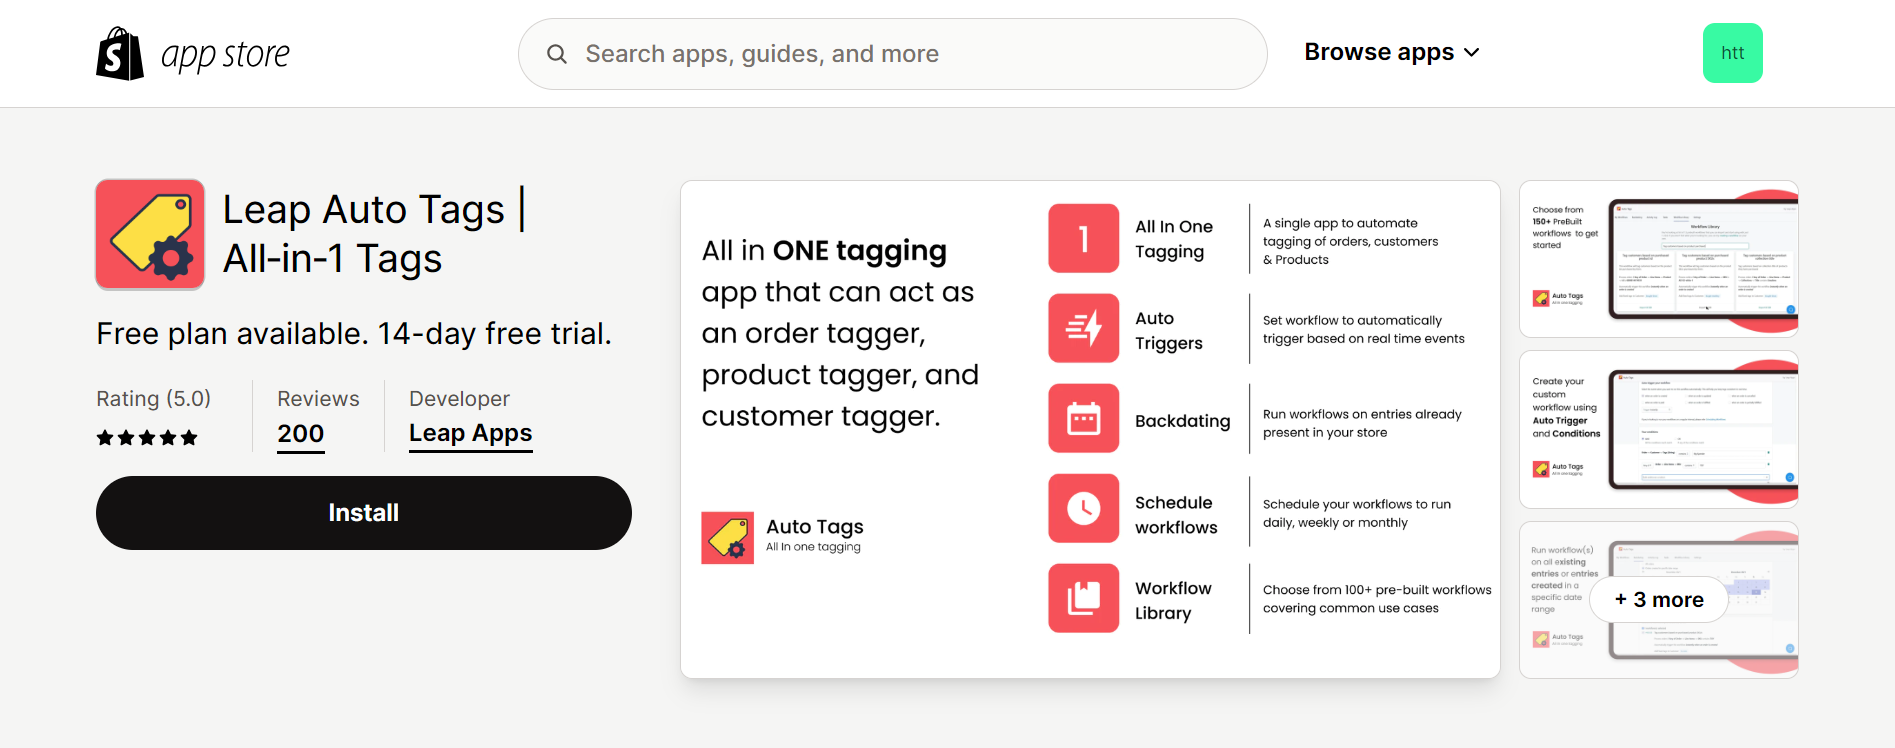
The app Leap Auto Tags facilitates automatic tagging of products, customers, and orders based on customized rules, providing a streamlined approach to order management. It enables the creation of customer segments for targeted marketing campaigns and enhances product categorization for improved discoverability. Users can establish workflows with specific filtering conditions, allowing the app to tag entries that meet these criteria in real-time. Additionally, workflows can be executed to tag existing entries within the store.
Feature Highlights
- Generate limitless, tailored workflows to accommodate individual business requirements.
- Employ custom matching criteria, combinable through operators such as AND and OR.
- Effortlessly tag products, orders, and customers all within a single application.
- Execute workflows to tag pre-existing orders, customers, or products.
- Access over 100 pre-established workflows for immediate implementation and ease of use.
Pricing & Plans
Rating & Review
- Rating: 5 ⭐
- Review: Store owners value this application for its dependable and effective automation of tagging orders, customers, and products. Its extensive array of customizable tagging choices and capacity to minimize manual labor receive acclaim. The customer support team is recognized for their prompt responses and personalized resolutions. The app's pricing is regarded as reasonable given its features, making it a recommended tool for customer segmentation and order analysis. Unique functionalities like retroactive tag application are also highly regarded.
2. Power Tools Bulk Edit Tags
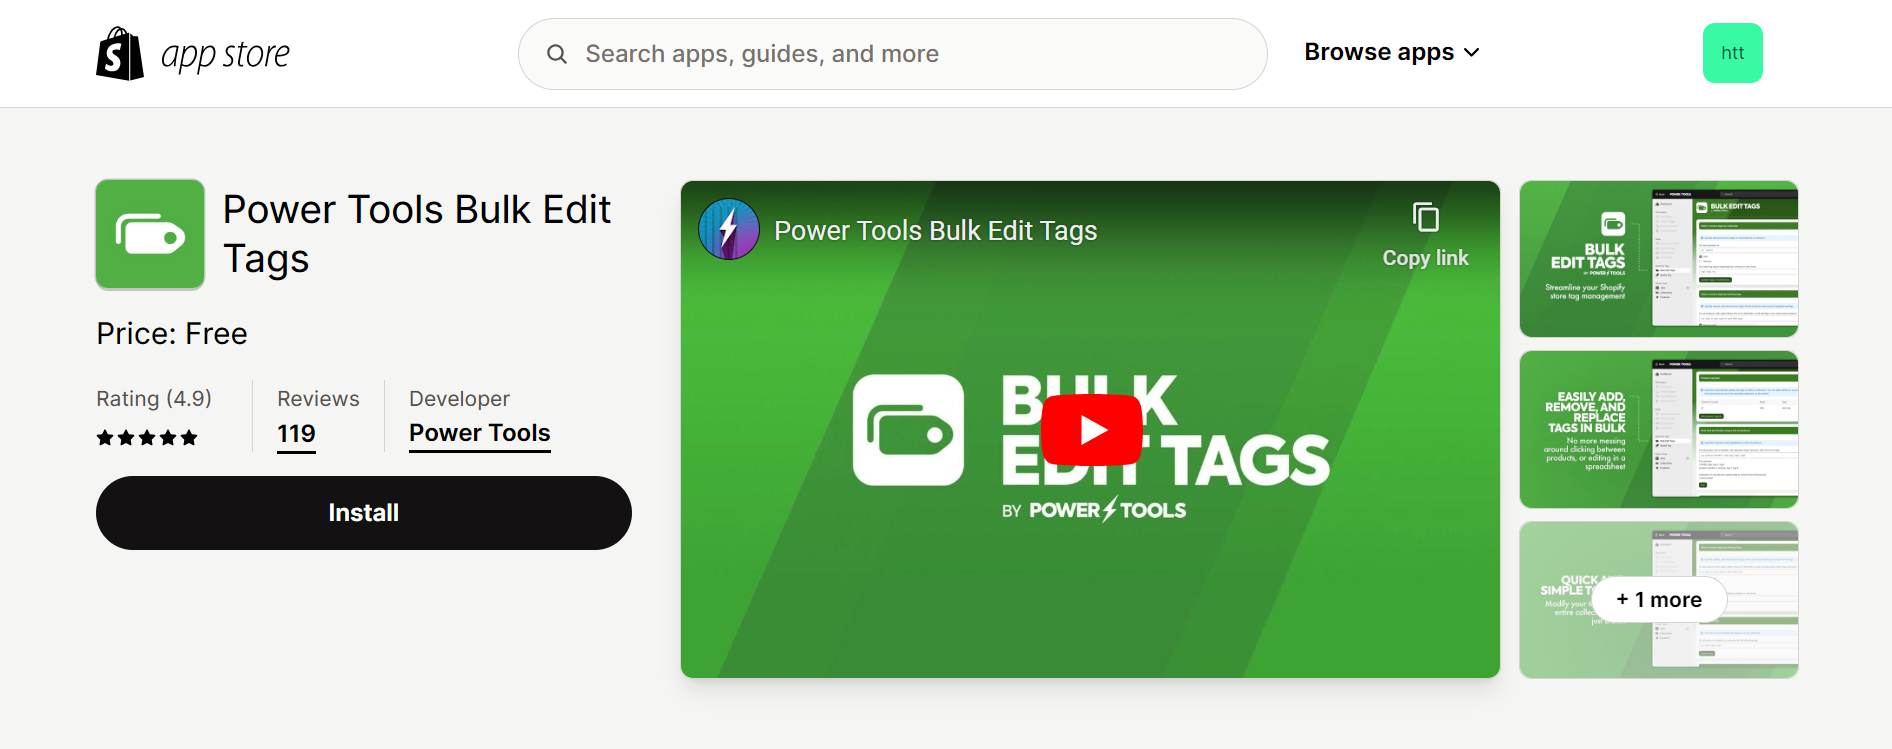
Power Tools Bulk Edit Tags offers a time-saving solution for Shopify store owners. Whether you need to add, remove, or sync your product tags, this software makes it easy to manage them. The app provides flexibility, allowing you to add tags based on collections, existing tags, or product descriptions. Bulk deleting tags across multiple products is simplified, eliminating the need for manual intervention or spreadsheet work. Additionally, the Speed Tag feature enables quick tag addition by selecting from a list of products.
Feature Highlights
- Cut down on office hours by making bulk edits to your tags.
- Easily adjust tags across entire collections with a single click.
- Delete tags in bulk or update tags using combinations of other tags.
Pricing & Plans
Rating & Review
- Rating: 4.9 ⭐
- Review: Shop owners value this application for its capacity to effectively add, remove, and substitute tags in large quantities, particularly beneficial for stores with extensive product catalogs or complex tagging structures. It's lauded for its contribution to store organization and administration, with users noting its usefulness in quickly concealing or unveiling collections. The app, known for its reliability and instantaneous implementation of changes, comes at no cost. Its support team is commended for their prompt and helpful assistance.
3. Omega ‑ Auto Tag & Flow
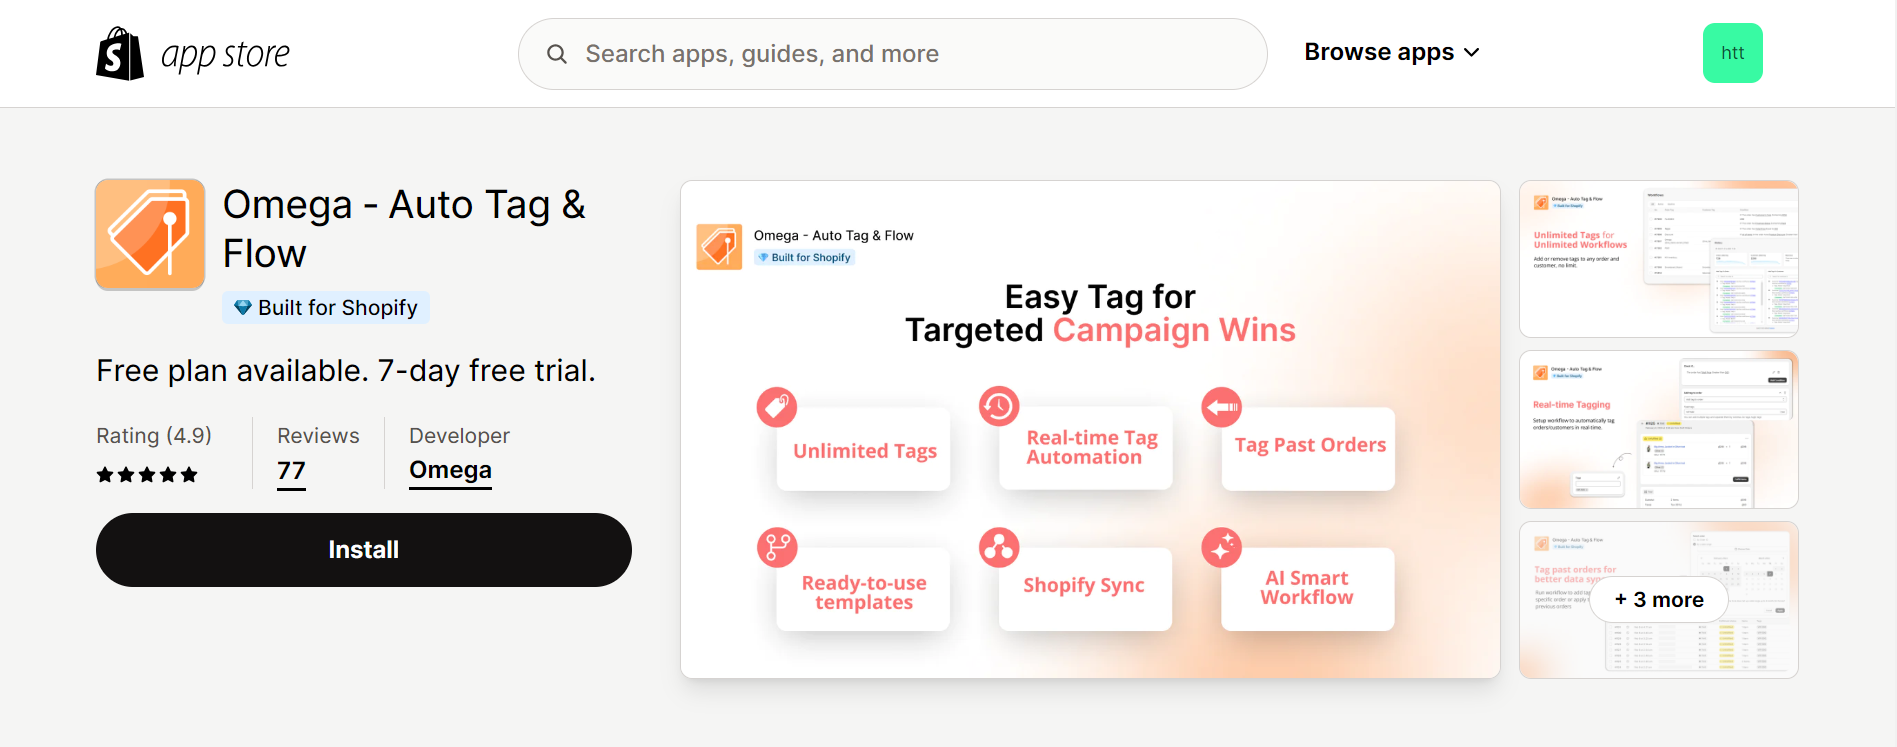
Omega - Auto Tag is a robust order tagging tool that automates the process of adding tags to customers and orders. With unlimited workflow setup based on custom triggers and conditions, it simplifies order management, enhances marketing campaigns, and boosts conversion rates. Users can conveniently create workflows to tag both existing and new orders in real-time, optimizing efficiency and organization.
Feature Highlights
- Unrestricted tagging: Automate the addition, removal, or postponement of tags without limitations.
- Flow templates: Expedite tasks with ready-to-use templates essential for any ecommerce operation.
- Intelligent Tagging: Automatically applies tags to orders based on dynamic criteria such as date, fees, and discounts for enhanced efficiency.
- Seamless Shopify Flow integration: Consolidate workflow automation within a single platform.
- AI-driven automation: Simplify the setup of store workflows using advanced artificial intelligence technology.
Pricing & Plans
Rating & Review
- Rating: 4.9 ⭐
- Review: Omega - Auto Tag & Flow emerges as a must-have app, especially for tracking conversions from Facebook and TikTok ads. Users appreciate its ability to accurately tag orders by sales channel, streamlining campaign performance tracking. The app's standout feature is its retroactive tagging capability, simplifying workflows and enhancing efficiency. The team's exceptional customer service further adds to its appeal, making it a clear winner among competing apps for efficient order management and seamless integration.
4. Tagit: Auto Tags
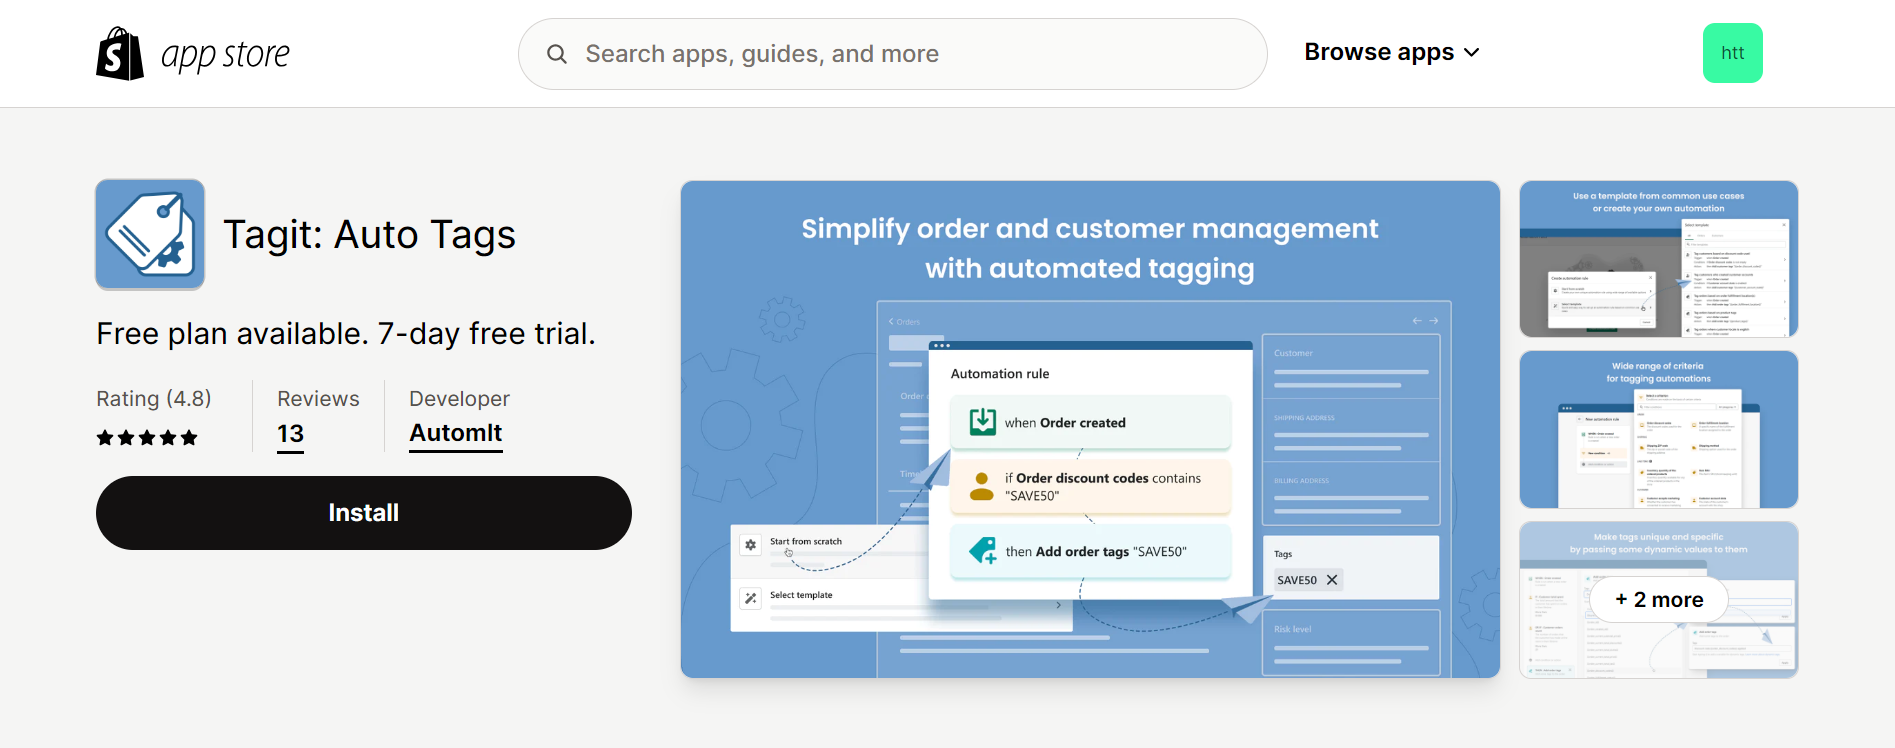
Tagit: Auto Tags offers robust functionality to streamline order and customer management processes. This tool allows you to tag orders and customers according to your specific criteria, facilitating segmentation and simplifying search and filtering tasks. Additionally, you can establish automation rules to automatically apply tags based on predefined conditions in real time. By eliminating repetitive tasks, Tagit helps you save time, enabling you to concentrate on expanding your business.
Feature Highlights
- Effortlessly tag orders and customers in real-time according to your preferences.
- Customize your tagging criteria with a diverse array of available options.
- Personalize tags by incorporating dynamic values for uniqueness and specificity.
- Efficiently filter orders and customers based on auto tags directly within the application.
- Monitor the performance of your automations and manage outcomes through an activity log.
Pricing & Plans
Rating & Review
- Rating: 4.8 ⭐
- Review: Tagit: Auto Tags receives glowing reviews from users who appreciate its seamless functionality and time-saving capabilities. Clients highlight its ability to tag orders with product tags, particularly useful for organizing new release comics by date. This feature streamlines their process, allowing for easy association of orders with products received each week. Merchants also appraised Tagit as a standout among automation apps, praising its user-friendly interface and hassle-free setup.
5. SupaTag Bulk Tag Editor
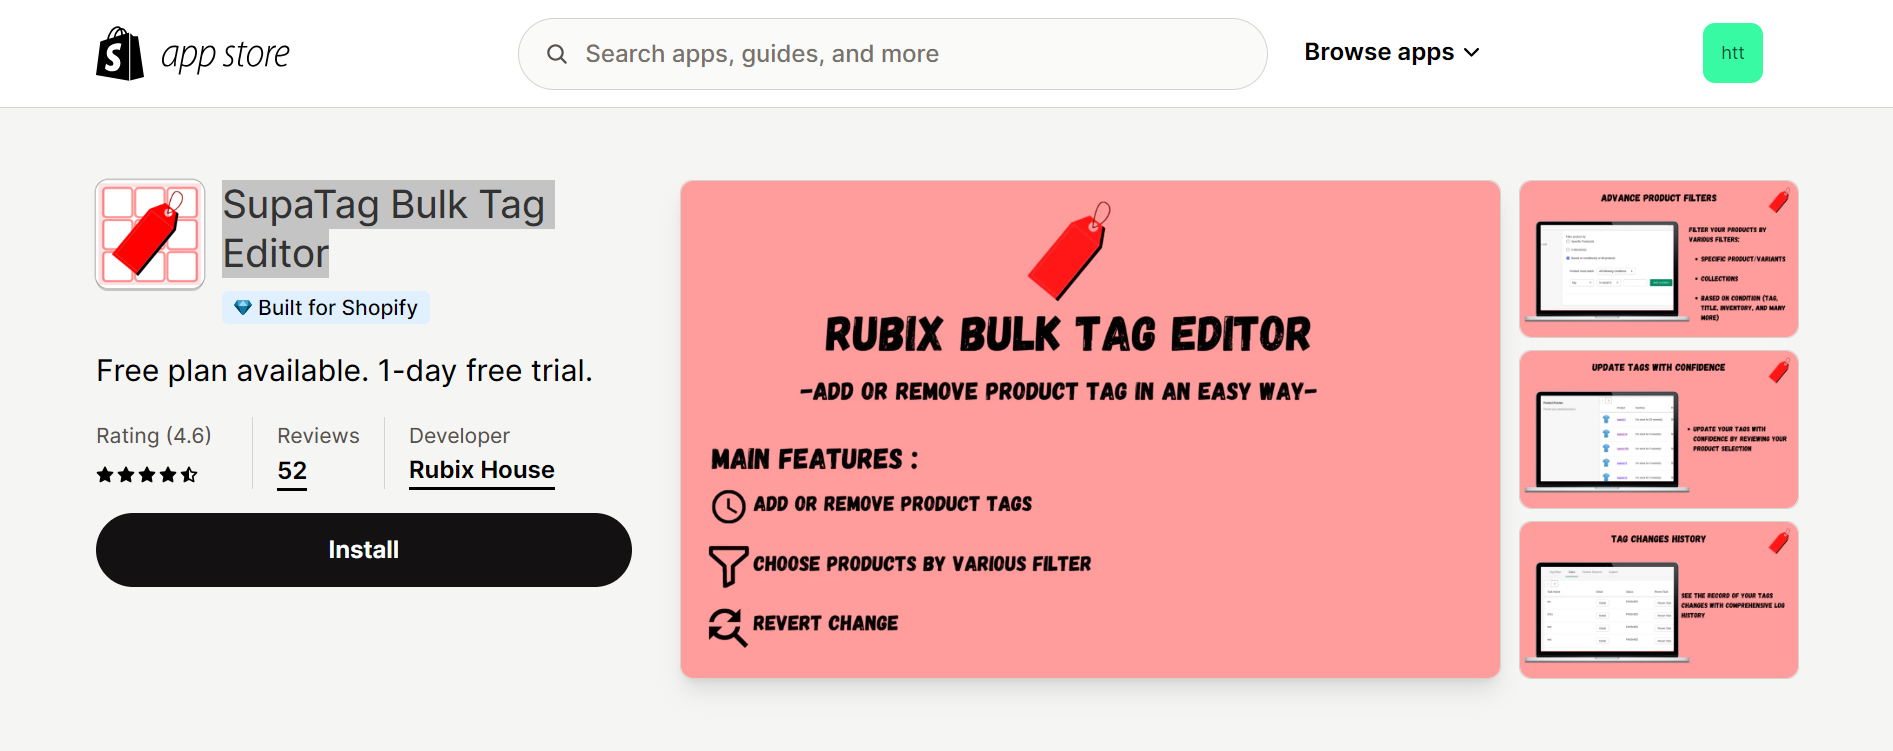
SupaTag Bulk Tag Editor is designed to enhance productivity by simplifying bulk tag management for your store. It makes it simple to easily add, delete, and update product tags. The app offers powerful and flexible filtering options, enabling you to select specific products based on various criteria such as collections, tags, vendors, titles, product types, SKUs, creation dates, or update dates. Additionally, you can easily revert any changes if needed, providing flexibility and peace of mind.
Feature Highlights
- Choose products using diverse filters like collections, vendors, titles, and beyond.
- This application utilizes cutting-edge technology to swiftly update tags.
- User-friendly interface with intuitive navigation.
Pricing & Plans
Rating & Review
- Rating: 4.6 ⭐
- Review: Users acclaim the SupaTag Bulk Tag Editor app for its efficiency during sales, user-friendly trial, and responsive customer service. It's hailed for handling complex tagging tasks and praised for its straightforward design. Considered a must-have tool, it earns high praise as a hidden gem in its category. Users express gratitude to developers and vow to support future iterations, underscoring its value in their operations.
Discovering the best bulk tag editor apps for Shopify empowers you to take control of your store's organization, saving time and effort while optimizing your workflow for maximum productivity and effectiveness.
Wrap up
In conclusion, mastering the art of quickly editing tags in Shopify empowers users to efficiently organize and manage their products. By following the five simple steps outlined in this guide, users can streamline their workflow, enhance product discoverability, and optimize their overall Shopify experience.
Ensuring convenient product access and customer satisfaction is paramount for the success of your Shopify store, thus it's crucial to ensure your website is comprehensive. Well-designed Shopify pages featuring vibrant images, quick loading times, and thorough information are integral to your shop's overall success.
EComposer provides the flexibility to design engaging pages, offering a range of choices from standard layouts to fully customized designs. Explore EComposer's exceptional templates with a complimentary trial and embark on your journey today!
=================
Add EComposer Next generation page builder Here
Follow Us on Facebook
Join Official Community
Build your highest-converting page in 15 minutes


Blog Categories


0 comments