


How to Create a Pricing Table in Shopify

Table Of Contents
A Shopify pricing table helps you clearly display and compare different pricing tiers or packages, making it easier for customers to understand what each option includes and make confident purchase decisions. You can create an effective pricing table without coding or extra cost using a page builder like EComposer, which lets you visually add and customize pricing tables on your store. An optimized pricing table not only improves clarity and trust but can also help increase conversions and average order value.
In the highly competitive landscape of online retail, particularly for stores offering subscription-based products, an effective Pricing Table is not just an add-on but a crucial necessity. It serves as a compass for your potential customers, guiding them through their buying decisions by displaying clear, comparative information about different subscription options.
Despite its importance, constructing an efficient Pricing Table for your Shopify subscription store does not necessitate an enormous budget or intricate technical skills. It's completely achievable, even for free, with the right approach and guidance.
In this guide, we will embark on a step-by-step journey to create an Effective Shopify Pricing Table for FREE. Before going into the details, make sure you have built an eCommerce store on Shopify!
What is a Shopify Pricing Table?

A Pricing Table is a graphical representation, typically in the form of a chart, that presents various pricing options or packages for a product or service. This table becomes especially important in cases where businesses offer a product or service in multiple tiers or packages - think of services such as software subscriptions, membership plans, or product bundles. Each tier in the Pricing Table includes a different set of features or benefits, each available at a distinct price point.
The pricing Table is different from the single-price listing. The typical single-price listing, as seen on most retail or eCommerce sites, offers a product at one fixed price with a defined set of features. Think of it as a one-size-fits-all approach, where a customer pays a single price to receive a specific product with a fixed set of characteristics.
So, in a nutshell, a Pricing Table takes the concept of pricing and packages it in a way that customers can easily compare options and make informed purchasing decisions.
Why You Need an Effective Shopify Pricing Table
1. Clear communication of pricing to customers
When it comes to online shopping, clarity is not just a virtue, it's a necessity. Customers want to know precisely what they're signing up for. An effective Pricing Table aids in this by presenting pricing information in a clear, concise manner. By categorizing your products or services into different packages or tiers, and listing what each package includes, customers gain a more explicit understanding of what they're purchasing. This breaks down ambiguity and encourages confident purchase decisions.
Moreover, a comprehensive Pricing Table also reduces the time customers spend pondering over their purchase. This can be particularly advantageous in today's fast-paced world, where every second counts. By simplifying their decision-making process, you're providing a smoother, more satisfying shopping experience that can lead to increased customer loyalty.
2. Enhances trust and transparency
ECommerce operates largely on trust. An effective Pricing Table is not just a tool to communicate prices, but also an opportunity to build and strengthen this trust. By detailing what each of your pricing tiers include and exclude, you set clear expectations for your customers. There's no room for misunderstandings or misconceptions that could potentially harm your customer relationships.
Further, transparency in pricing underlines the honesty and integrity of your business. When customers see that you have nothing to hide, they feel more secure in making a purchase. This trust can subsequently translate into long-term customer relationships, repeat purchases, and valuable word-of-mouth recommendations.
3. Up-sell with higher price plans/products
While Pricing Tables serve as informational tools, they're also strategic sales instruments. They allow you to showcase the added value that higher-tiered packages or premium products offer, in comparison to basic ones. By visually contrasting different pricing tiers, you subtly encourage customers to consider the potential benefits of upgrading their choice.
Additionally, a Pricing Table creates a value perception. By listing the added benefits of higher-priced plans alongside basic ones, customers can visualize the value they stand to gain from spending a bit more. This, in turn, can boost your average transaction value and overall revenue.
How to Create a Pricing Table for your Shopify store?
Are you ready to take your Shopify store to the next level? If so, creating a clear, persuasive, and visually appealing Pricing Table is one of the most impactful steps you can take. The good news is, you don't need to be a coding genius or a design wizard to pull this off. Currently, on Shopify, there are many applications that support you to create a Pricing Table, but not all of them are really good. In this section, we will introduce you to EComposer Shopify Page Builder.
EComposer is known as a next-generation Shopify application that allows users to build professional online stores without coding knowledge. It provides a lot of templates and elements to help you build all kinds of pages, including pages not available in Shopify.
Thanks to EComposer, a user-friendly tool designed to make your eCommerce life easier, you can create a powerful Pricing Table for your Shopify store without breaking a sweat.
Follow the steps below:
Step 1: Sign up for your Shopify account
- If you don't already own a Shopify store, you need to sign up for Shopify trial
- Log in to your online store using your registered email and password.

Step 2: Install and open EComposer
- Open Landing Page Builder on Shopify App Store then click Add App
- To activate the use of the app, Install the app to your Shopify store.

- In the Dashboard menu, go to Apps, click EComposer Landing Page Builder.

Step 3: Start creating your Pricing Table
- Click Start Building in the right corner of the dashboard and select a page where you want to set your Pricing Table.

- Choose any EComposer template you want or click Blank Template. Then, go to Set up page info and select Start Building.

- In EComposer's editor, go to Elements, select Advance, and look for Pricing.

Step 4: Customize your Pricing Table
Now use EComposer's live drag and drop to drag the Pricing Table anywhere you want. Then start customizing Shopify Pricing Table to your liking.
* Edit row:
- Layout:
In this section, you can edit the entire layout, structure and video background to your liking. In particular, you have a variety of options for the source of the video, including youtube videos, and you can customize the url of that video.

* Design:
This section allows you to change the Background Color and CSS Filters, set the Border for it, and you can edit the Typeface. Furthermore, you are free to color style each column it belongs to.
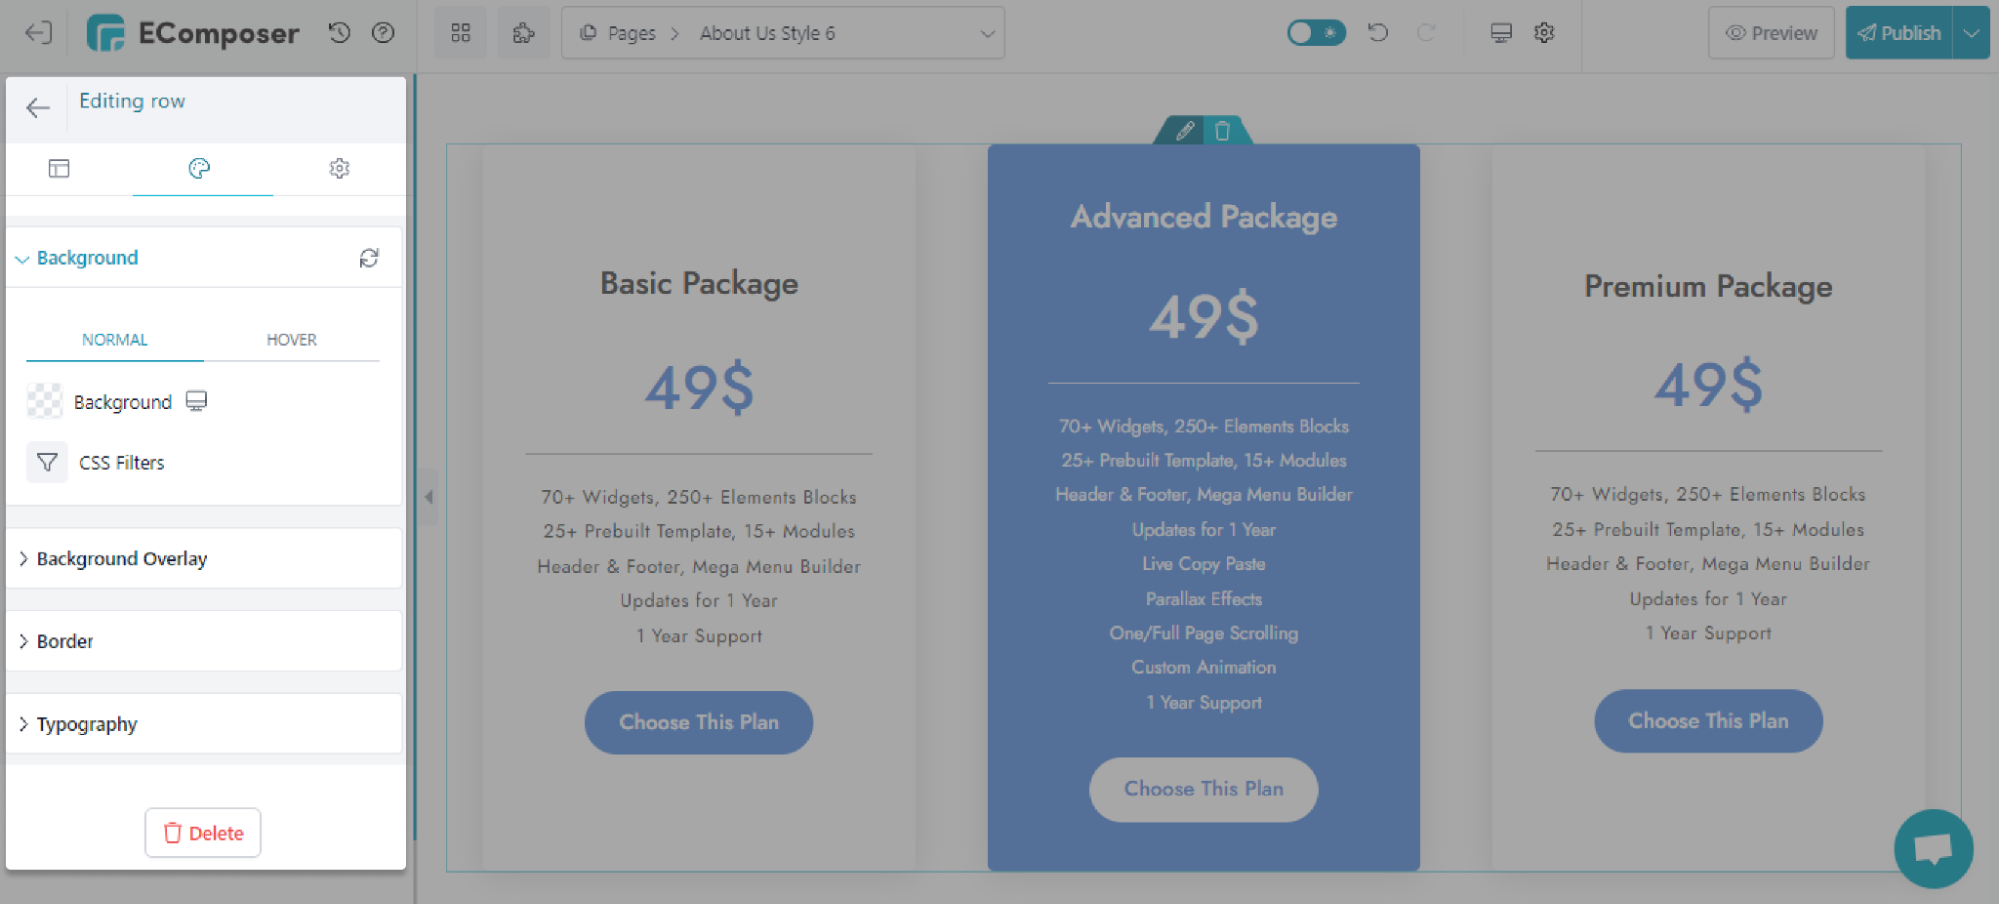
* Advanced:
You can customize everything related to visible settings like code, background, animation, and so on.

Step 5: Save and publish
Once you are satisfied with your customization, in the right corner of the edit page you have options to save and publish.

Common Mistakes to Avoid when Creating Shopify Pricing Table
Creating an effective Pricing Table is crucial, but it's also important to be aware of potential pitfalls that could harm its effectiveness. Let's go over some common mistakes you'll want to steer clear of:
1. Making the difference between each tier complicated
One of the key benefits of a Pricing Table is the ability for customers to easily compare different packages or tiers. If the distinctions between these tiers are complex or unclear, it undermines this advantage. Customers should be able to glance at your Pricing Table and quickly grasp the differences between each tier in terms of price, features, and value.
Further, avoid overwhelming your customers with too much information or too many tiers. A cluttered Pricing Table can be just as confusing as a poorly differentiated one. Strive for simplicity and clarity. Remember, the goal is to make the purchasing decision easier for the customer, not harder.
2. Not Highlighting the Packages You Want Users to Focus On
As a seller, you likely have a package or tier that you would like to sell more of, perhaps due to higher profit margins or popularity among customers. Not highlighting this package in your Pricing Table is a missed opportunity. By visually emphasizing a particular package, you subtly draw the customer's attention to it and increase its chances of being chosen.
This doesn't mean you have to resort to flashy or distracting design tactics. Subtle enhancements, such as a contrasting color, a different font, or a label like "Most Popular" or "Best Value," can be enough to make a package stand out. Remember, your Pricing Table isn't just a static display of information; it's also a strategic tool for influencing customer behavior.
3. Lacking Hover Details for Key Features
In the quest for simplicity and clarity, it's easy to fall into the trap of providing too little information. Customers often need additional details about specific features to make an informed purchase decision. While it's important to keep your Pricing Table uncluttered, it's equally important to offer these details when needed.
Incorporating interactive elements, like hover details, can strike a balance between maintaining a clean look and offering in-depth information. These elements can reveal more about a feature or package when a customer hovers their cursor over it, ensuring they have access to all the necessary information without overwhelming them right away.
4. Not highlighting the call to action
The call to action (CTA) is arguably one of the most critical components of your Pricing Table. It's the bridge between a customer considering a purchase and actually making one. If your CTA doesn't stand out or isn't compelling enough, it may fail to motivate customers to take that crucial next step.
Your CTA should be visually distinctive and easy to locate on your Pricing Table. Use contrasting colors, compelling language, and strategic placement to make your CTA stand out. A good CTA doesn't just draw attention; it encourages action, serving as the final nudge a customer needs to make a purchase.
5 Examples for Shopify Pricing Table
1. Spotify

Spotify's Pricing Table does an excellent job of illustrating the benefits of upgrading to a premium plan. They offer four different premium packages, each with its own unique value proposition. The differences between these tiers are clearly delineated, ensuring customers can easily compare and contrast their options.
CTAs của Spotify stands out against the black background. This encourages users to move forward with their purchase decision. However, while Spotify does a good job highlighting their recommended package ("Family"), they could potentially make it more visually distinct to draw users' attention to it more effectively.
2. BeanBox

Bean Box's Pricing Table is straightforward and easy to understand, with three different subscription options available. The Pricing Table makes it clear what the customer will receive in each package, from the type of coffee to the frequency of delivery. This transparency helps to build trust and set customer expectations.
The CTAs are eye-catching, making it clear what the next step is for the customer. Furthermore, the Pricing Table uses an interactive design, allowing customers to customize their subscription based on their preferences, which can enhance the user experience and create a more personal connection with the product.
One area for improvement could be the addition of hover details for more depth of information. While the Pricing Table is simple and clear, some customers might appreciate having access to more detailed information about each package's features.
3. Candy Club

The price list of Candy Club's Pricing Table is very intuitive and attractive. The two plans are presented with a white-pink delimited image, which gives a tangible sense of the value each level brings.
The pricing table also highlights the benefits of the subscription, such as plus shipping and premium candy, creating a compelling incentive for users to purchase the subscription. The CTA is distinct and recognizable, effectively guiding the user through the buying process.
4. Book of the Month

Book of the Month's Pricing Table is straightforward and simple. It clearly outlines the three available gift plans, making it easy for customers to compare their options. Each plan includes the total price, and the length of the subscription, which provides transparent and detailed information to customers.
The Pricing Table also emphasizes the benefits of choosing a longer subscription plan by displaying the savings customers can make, encouraging customers to opt for higher-priced plans.
5. SurveyMonkey

SurveyMonkey's Pricing Table is a great example of how to display a lot of information in a clean, organized manner. The different plans are clearly delineated, and a detailed list of features allows customers to compare the options easily.
The Pricing Table also uses hover details effectively, providing additional information about certain features when users hover over them. This balance of providing detailed information without cluttering the initial view is a strong point.
Read more:
- how to edit footer in shopify
- How to Change Text Colors on Shopify
- How to create Shopify Members-Only Area
In a nutshell
Navigating the process of creating a free, effective Pricing Table for your Shopify subscription store should now feel like a more approachable task. This guide has shown that such a crucial component of your business need not be complex or costly. Remember, an effective Pricing Table can significantly enhance your customer's shopping experience, driving more conversions and overall success for your store.
As you move forward, remember these principles and steps, applying them to see your customer engagement and satisfaction increase. If you want more information or want to learn more about EComposer, follow us at ecomposer.io or click on the message icon located in the right corner of the screen.
Build your highest-converting page in 15 minutes


Blog Categories


0 comments